Hey all, I've been enjoying my RPi 4 router and it seems to be a popular topic so I thought I'd write up a quick article to help people get started with their own setup. If you have any feedback or would like to propose an edit please feel free to open an issue or PR on GitHub.
So You Want To Build a Raspberry Pi Router
With the increasing prevalence of gigabit-speed home internet connections in the US and elsewhere comes the need for routing hardware with greater performance than many "all-in-one" devices can offer. This is especially true for users who wish to take advantage of advanced traffic shaping technologies like SQM which is notoriously CPU-intensive. The Raspberry Pi 4 single-board computer is affordable, ubiquitous, and runs circles around any consumer device near its price point. All of these qualities make it an ideal candidate to become the next foundation of your home network.
What It's Good For
- Full gigabit routing performance with SQM disabled. The CPU is certainly capable of much more, limited only by the speed of the network interfaces.
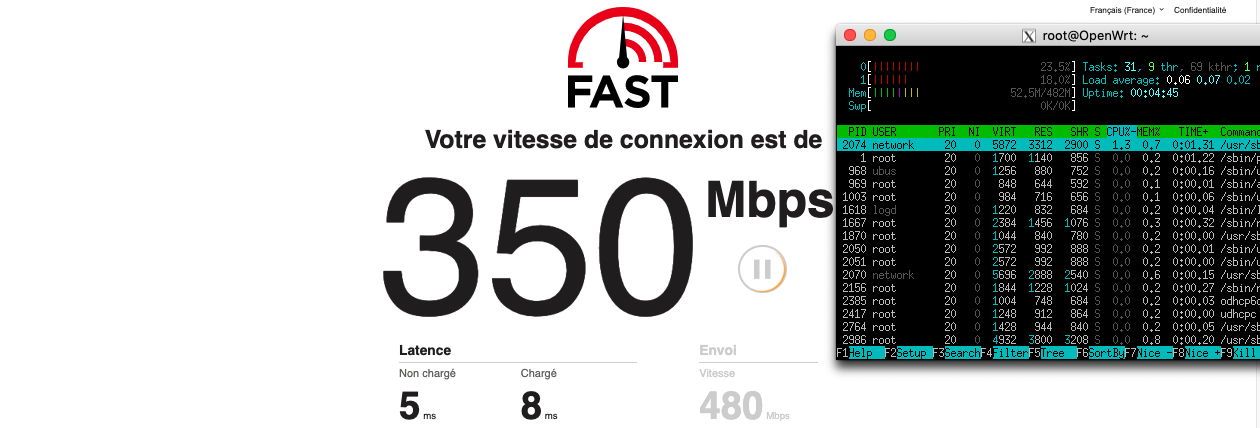
- ~800 Mbps up/down with SQM enabled.
- Oodles of extra RAM and processing power for running additional services if you're so inclined.
- Doing all of the above with no moving parts, low power consumption and in a very compact footprint, at a very competitive price.
What It's Not So Good For
- Servicing your wireless devices. The Pi's onboard WiFi implementation is truly pitiful compared to a decent all-in-one consumer router. Instead, plan on supplementing the Pi with another device to serve as a wireless access point.
What You'll Need
- A Raspberry Pi 4 board. 1GB of RAM will be plenty for this application but more won't hurt.
- Power supply or PoE hat.
- A quality microSD card of any commonly available size; even 8GB is an enormous amount of space compared to your average plastic consumer network router.
- A case designed for passive cooling. Here are a few options you might consider:
- A USB-to-Ethernet interface. Any dongle based on the
RTL8153chipset will do. The TP-Link UE300 is a popular choice and works very well.
It's possible to use the Pi in a so-called "router-on-a-stick" configuration using only the single onboard Ethernet port in conjunction with VLANs. This configuration requires the use of a managed switch and is beyond the scope of this guide.
Example Build and Total Cost
- Raspberry Pi 4 2GB: $35
- Inland USB-C power supply: $6
- Micro Center 64GB microSD card: $7
- Argon Neo case: $15
- TP-Link UE300: $14
Total: $77
Note that due to the ongoing global unpleasantness the 2GB Pi 4 recently suffered a price bump to $45. This is said to be a temporary measure but for the time being I feel the 4GB version is a better value at $55. Opting for the 4GB board will bring the total build cost to $97.
Getting Started
With your Pi assembled it's time to write an OpenWrt image to your microSD card. One option is to use wulfy23's excellent build which should get you up and running with minimum fuss. Another is to use the stock image OpenWrt provides; however the stock image lacks a driver for the USB dongle. The last, and the one we'll explore here, is to build a customized image with the needed packages. Luckily for us the OpenWrt firmware selector website makes it easy to request such an image.
To get started, navigate to the firmware selector server at https://firmware-selector.openwrt.org/. Start typing Raspberry Pi 4 into the search field and select Raspberry Pi 4B/400/4CM (64bit). Now expand the Customize accordion.
We are now free to add additional packages to our firmware image. Nice! Go ahead and add these three packages to the end of the list: kmod-usb-net-rtl8152 luci luci-ssl. This will ensure that both the USB Ethernet driver and the LuCI web interface are baked into our custom image.
Click Request Build and go top up your coffee while you wait for your image to be built. Once it's ready, download the FACTORY (EXT4) image. Decompress the gzipped image and finally flash it to your microSD card using the tool of your choice.
Getting Online
Connect your Pi's onboard Ethernet port to your LAN. Connect your WAN connection to the USB dongle, but DO NOT connect it to the Pi just yet. Navigate to http://192.168.1.1 in your browser and log in without a password. Immediately do the following:
- Navigate to
System -> Administration -> Router Passwordand configure a strong password. - Navigate to
System -> Administration -> SSH Accessand configure the SSH server to listen only on theLANinterface. - If desired, provide a public key for SSH login in
System -> Administration -> SSH-Keys
Now that LuCI (OpenWrt's web-based configuration interface) and SSH have both been locked down you may connect the USB Ethernet dongle. Navigate to Network -> Interfaces -> Devices and confirm that you see a new eth1 device. If you don't, restart your router from System -> Reboot.
Click back to the Interfaces tab. Add a new interface called WAN using the correct protocol for your internet service and attach it to the new eth1 interface. Complete any additional configuration steps based on your chosen protocol, then save and apply your changes.
If your ISP requires your WAN device to communicate over a specific VLAN, use the "custom" device field to provide the VLAN ID in the form
DEVICE.VLANID, e.g.eth1.10.
Navigate to Firewall Settings and confirm that the new WAN interface is set as the firewall zone.
During this step, you also need to navigate to the "Firewall Settings" tab, and assign "WAN" as the firewall zone.
You should now be connected to the Internet!
Maximizing Performance
In its current configuration your router will effortlessly route a symmetric gigabit connection. However, there are a handful of things we can do to wring even more performance out of the Pi.
Configuration Tweaks
-
Navigate to
Network -> Interfaces -> Global network optionsand enablePacket Steering. This feature helps ensure that all packets belonging to a particular flow are handled by the same processing core, enhancing performance. See here for a helpful introduction to the concept. -
Navigate to
Network -> Firewalland verify theSoftware flow offloadingsetting. If you intend to use SQM you will want to leave this feature disabled. If you will not be using SQM go ahead and enable it now.
Enabling irqbalance
IRQs are the mechanism by which your network interfaces inform the operating system that there is work to be done. By default these requests will be handled by a single CPU core which can result in a bottleneck in situations where the lone core can't keep up.
This is where the irqbalance package comes in. This daemon monitors processor load and IRQ volume and distributes the IRQs across different CPU cores, easing the bottleneck.
Using irqbalance is as straightforward as it gets: just install it from System -> Software and either reboot the router or manually start the service from System -> Startup to ensure that the daemon is running. You should now see an irqbalance process in Status -> Processes.
Overclocking the CPU
Your new router's CPU can be overclocked to 2 GHz with a simple configuration change. Do the math - that's a 33% performance bump across all cores for free! While the higher frequency will necessarily translate to more heat, a quality case designed for passive cooling or any active cooling solution should have no trouble keeping your Pi at a comfortable temperature.
While even higher overclocks are possible (and despite conventional wisdom will no longer void your warranty as of the Pi 4) I think the extra juice is unlikely to be worth the squeeze for most.
To enable the overclock simply add the following lines to the bottom of /boot/config.txt, then reboot:
over_voltage=6
arm_freq=2000
Putting it all together
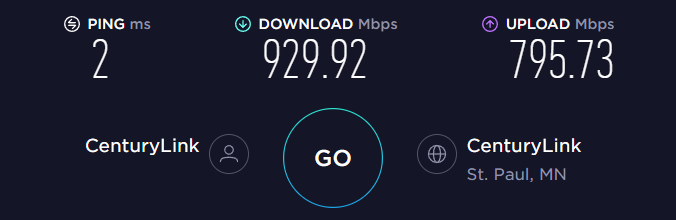
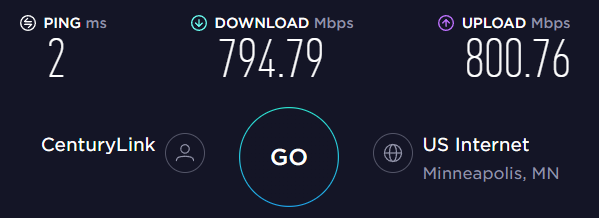
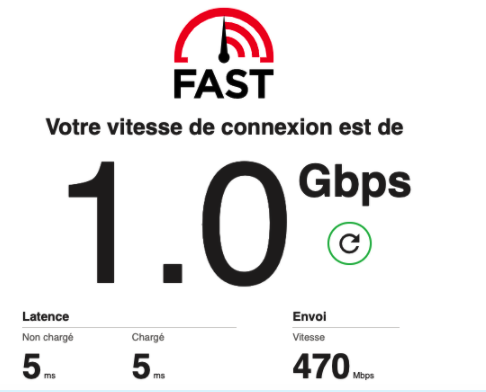
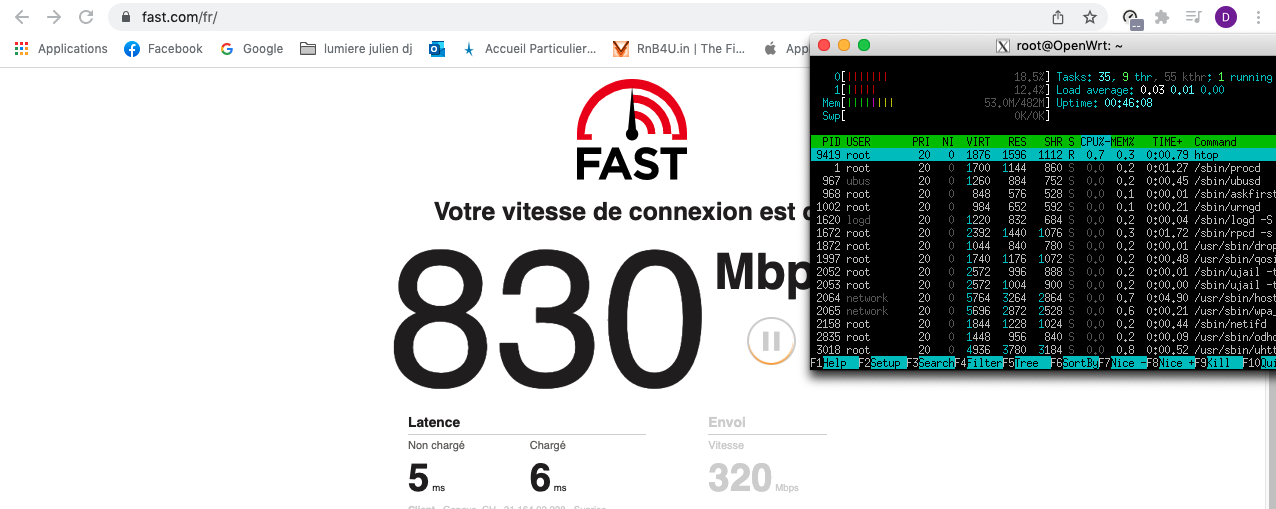
Here are a handful of Ookla speedtests and Waveform bufferbloat tests to give you an idea of what you can expect both with and without SQM enabled.
Without SQM
With SQM
Settings:
sqm.eth1=queue
sqm.eth1.qdisc='cake'
sqm.eth1.debug_logging='0'
sqm.eth1.verbosity='5'
sqm.eth1.linklayer='ethernet'
sqm.eth1.overhead='44'
sqm.eth1.script='piece_of_cake.qos'
sqm.eth1.interface='pppoe-WAN'
sqm.eth1.download='850000'
sqm.eth1.upload='850000'
sqm.eth1.enabled='1


 i'm on vdsl2 for the moment but if i remember max sqm is about 500 500