This completely bricked the router, leaving me with only TFTP Recovery working as Failsafe Mode won't work. I've watched and read countless tutorials but I couldn't get anything to work until I stumbled upon these threads:
I think this is where my problem is, I'm failing the hwid and hwver verification with every image that I try to flash. I tried all images linked in those threads and even some I compiled myself but to no avail so my question is, is there anything else I can try to flash? Sadly soldering a serial port isn't an option as I am useless with a soldering iron.
I suggest (sorry, more reading) that you read this thread, it might help. Sometimes it appears that using a stripped UBoot factory image helps:
When you go back to the original firmware, you must use the TPLink's image, or the FriedZombie images that are UBoot stripped.
Edit: I've noticed that FriedZombie seems to be down. You can make your own stripped version using the dd linux command (or dd for Windows) by following the ToH Doc:
Then, make sure when you offer your file via TFTP that it is correctly spelled (it's also case sensitive). Disable any firewall on your station offering the file via TPTF.
Maybe you can manage to use the serial port without soldering. If your serial port holes are empy, try to coin the wires using toothpicks (slice the toothpick in half using a knife if too big).
If the holes are empty, get some jumpers for them, you can get ribbon jumpers from amazon for around $5. You can torque them sideways just a bit to keep them connected, or wrap them with a bit of aluminium foil if needed. Works great for prototyping. If the holes aren't empty, you might be able to use alligator clips to jumper cables, also on amazon.
I was not sure what image I was supposed to flash so I tried the "factory.bin" from both firmwares linked above and also the "standard" openwrt one and none of them worked.
Again, was not sure what original firmware to download so I tried both the US and EU version. As your link suggests images with boot on the name don't need to be stripped, but either way, I tried stripped and non-stripped ones and still nothing.
My serial ports are indeed empty but I am failing to understand what do with the toothpicks.
The idea is to hold the receiver wires (from your PL2303TA that you already have?), which are smaller, inside the port holes. That is if you don't want to wait for these ribbon jumper wires to arrive. They will be smaller than the port holes too anyway.
Or use ticker wire and sand it to shape. Or a pushpin that you removed the head.
That's actually pretty clever! But yeah, I don't have the PL2303TA or any other adapter.
I've also seen people recommend the FT232RL, I fail to see any difference between then so, in your opinion, is one better than the other?
Avoid the Prolific chips if your PC runs Windows. They are fine with Linux.
As for temporary connection, find a strip of square pins with a plastic bar holding them together. Plug your adapter wires into one side in the correct order. Put the other end of the pins into the holes in the router PC board. Then pull the wires to the side so the assembly tilts over and touches the inside of the holes.
Different unit, but you can do this with the pre-made "breadboard" or "Dupont" wires illustrated above instead of the clip leads I'm using. The header is not soldered in. The weight of these leads is enough to make contact. Good enough for reading serial and typing commands, but I wouldn't trust it to send data that you're going to flash.
With most routers today, including the Archer C7 v2, make sure your adapter is set for 3.3 V logic and don't connect V+.
If your Archer C7 seems "deaf" to your typing, you may need a pull-up resistor as described on the wiki.
If it's expecting 0-3.3V for 0 and 1, that matches what the raspberry pi's serial controller uses. If you need to order something, the proper 3.3 to -12V adapter is probably the more reliable choice, but if you have a pi on hand, it might be worth hooking them together and seeing if they'll talk.
That is incorrect, at least for the routers we're talking about here (and most single board computers/ devboards), these expect a 3.3V volt signal at most, attaching -12V will kill them. So you must be careful to only hook up usb2serial adapters operating on a 3.3V level (or a RPi, which has the same expectations). Yes, this isn't in line with RS232C specifications (which allow up to +/- 25 volts), but that isn't the point or purpose here - these SOCs operate on 3.3V and don't intentionally expose the serial console to the user in a RS232C compatible way, it's just an internal debugging port operating at the same voltage levels as the SOC itself and without the additional protection a real RS232C port would require. In most cases the internal serial header is directly connected to the SOC, with no active components inbetween (pull-up/ pull-down resistors at most), without level shifters, opto-copplers, surge protection, etc. - if you connect voltages beyond 3.3V to it (and that already includes 5V), the SOC is likely to be dead within seconds.
I think I was not clear enough in my post. If you want to talk to the router (or raspberry pi) via the 3.3V serial, you either need a 3.3V serial to universal serial adapter, or a voltage level adapter that can handle connecting 3.3V and +/- 12V. Simple way is a couple high speed read relays, and a diode. The tx pin on the 3.3V board needs to trip the rx pin 12V read relay, and the +/- 12V tx pin needs to trip the read relay on the 3.3V rx pin only when it's high, which is where the diode comes in. Or you can just buy one of these.
Note that that particular one is only rated to go between 5V and 3.3V. People in the reviews report it working at 12V, but I'd probably look around for one rated to 12V.
Before you lead someone into causing irreparable harm, you might want to get a current understanding of logic levels and RS232. Reed relays? Are you kidding? At 115200 baud?? +/-12 V on a computer’s serial port? Your information and suggestions are incorrect in this context and inappropriate even in the 1990s.
To be very clear, only use 3.3 V logic levels on a router’s SoC’s serial port. Applying 5 V logic levels may fry the SoC. Applying true RS232 levels or any negative level to the SoC will almost certainly fry it.
I soldered the connections in. It's easy! If you don't want to do it, have someone else do it who is comfortable to do it. My cable (left to right) green, yellow, blue, not connected, (looking at the image "WDR7500 v2 / Archer C7 v2" to connect the UART. Those colors may be different for your UART.
I downloaded from ftp://ftp.dd-wrt.com/betas/2017/02-07-2017-r31277/tplink_archer-c7-v2/
this file: factory-to-ddwrt.bin
I used putty for the serial connection of the UART and typed "tpl" until it interrupted the steady reboot (may not be needed in your case) - see what it the console tells you.
The commands at the serial console that helped me were:
tftp 0x81000000 factory-to-ddwrt.bin
erase 0x9f020000 +fb0000
cp.b 0x81000000 0x9f020000 0xfb0000
reset
To get back to a working stage in case I mess it up again, I noted to reset to defaults on the serial console:
firstboot -y
reboot -f
I am now on the current openwrt image.
I hope this can help you. Good luck!
PS - I can't remember how many and which forums I traveled to get my problem solved - none of this comes from my expertise. I only searched, read, tried and took my notes.
Sorry for the late reply, I was waiting for stuff to arrive.
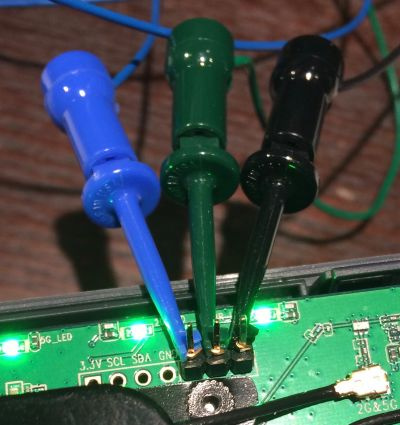
I've managed to get a solderless serial connection working using @jeff's and @mk24's tips!
As I suspected I was falling the product id verification test:
original_product_id = 743d2275
original_product_ver = 74662d38
recovery_product_id = c7000002
recovery_product_ver = 01
auto update firmware: product id verify fail!
While I was waiting for the image with the proper header values to compile, I decided to try @newbee's method and to my disbelief it worked! I was expecting issued with TFTP as before but it all went fine.
After flashing DD-WRT, I just simply rebooted the router into TFTP and flashed the "factory.bin" from here: [GCC 7.2 BUILD] Optimized TP-Link Archer C7 V2 AC1750 LEDE Firmware and my router is now back from the dead!
I wish I could mark all your answers as solution as they all played a crucial part in this adventure!


 I am glad my post could help you!