Both of my devices that came from aliexpress are china devices (RD03). I have no clue where do people actually source their international versions.
1 Like
Same here, works flawesly, very good deal.
The one supplied with the router - 12V 1A. I think I have 2 amps one lying around, I will test it that one as well.
1 Like
Yep, but this connextor is special and not usual 5.5/2.5 or similiar, so happy hunting proper psu.
This works a treat to convert a "normal" plug to the thinner one required
1 Like
Xiaomi AX3000T RD23 (Global version): OpenWrt installation
- guide for installing OpenWrt on the Xiaomi AX3000T RD23 (Global Version).
- installation method: UART flash.
- the following OpenWrt installation method requires opening the device, connecting a UART cable, and following a specific set of steps.
 This process is recommended only for advanced users, and may soft-brick your device. Please do not forget to make a backup of original router partitions before performing any actions with the router.
- the following OpenWrt installation method requires opening the device, connecting a UART cable, and following a specific set of steps.
1. Open the router case and connect a UART adapter to the router.
Opening the router case
Remove the sticker/label on the bottom of the device to reveal two screws (it might be a good idea to use a hot air from a hair dryer to soften the glue under the sticker/label). Unscrew these two screws and use a plastic spudger or pry-tool in order to remove the top cover.
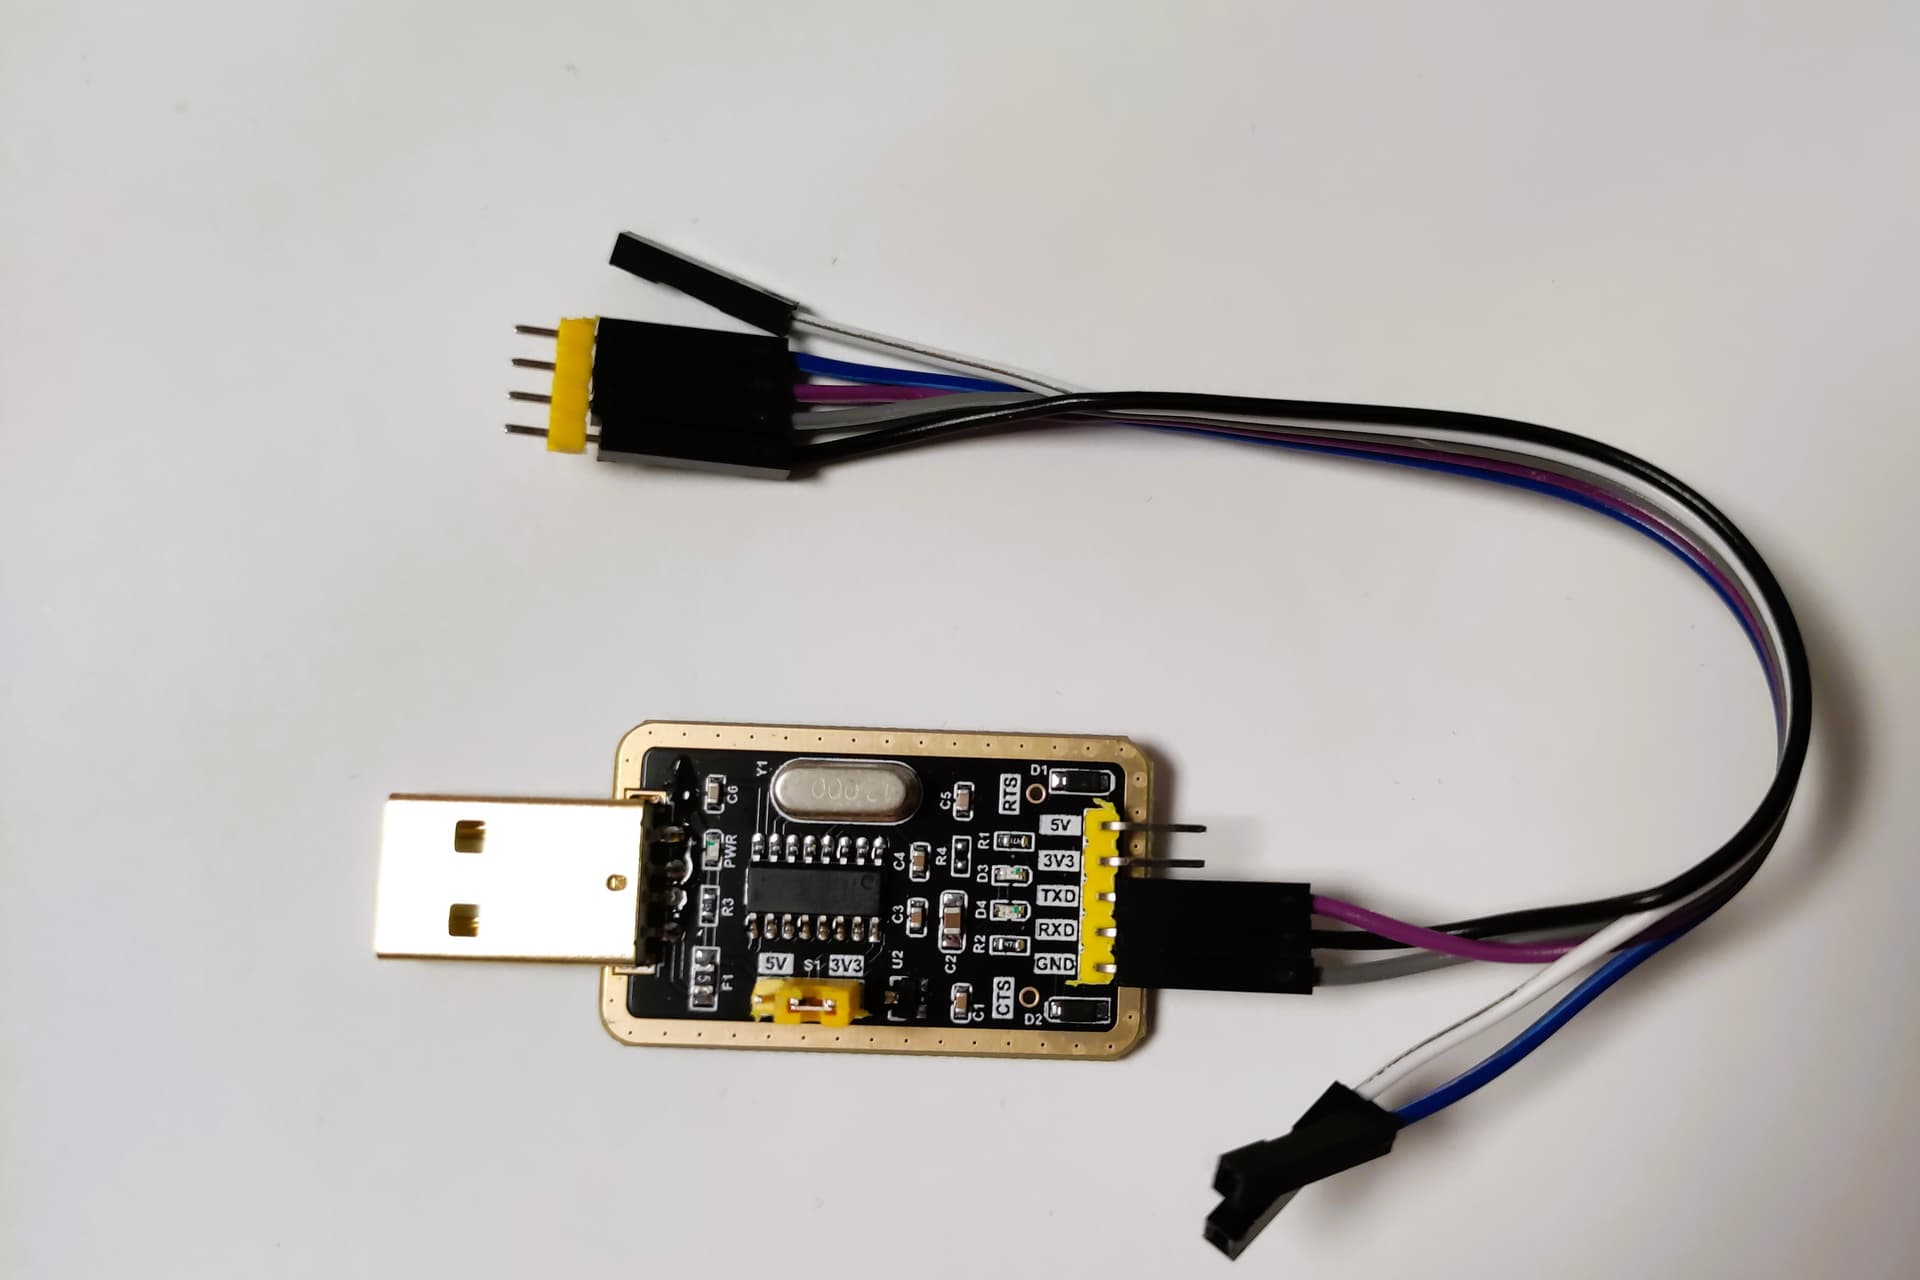
UART adapter: CH340G-2
I used USB – UART RS232 TTL CH340G-2 adapter (this), and UART 4 pin strip (this).
Connection of UART adapter to the router
UART pins: insert the UART 4 pin strip into the router's UART slot (no soldering required):
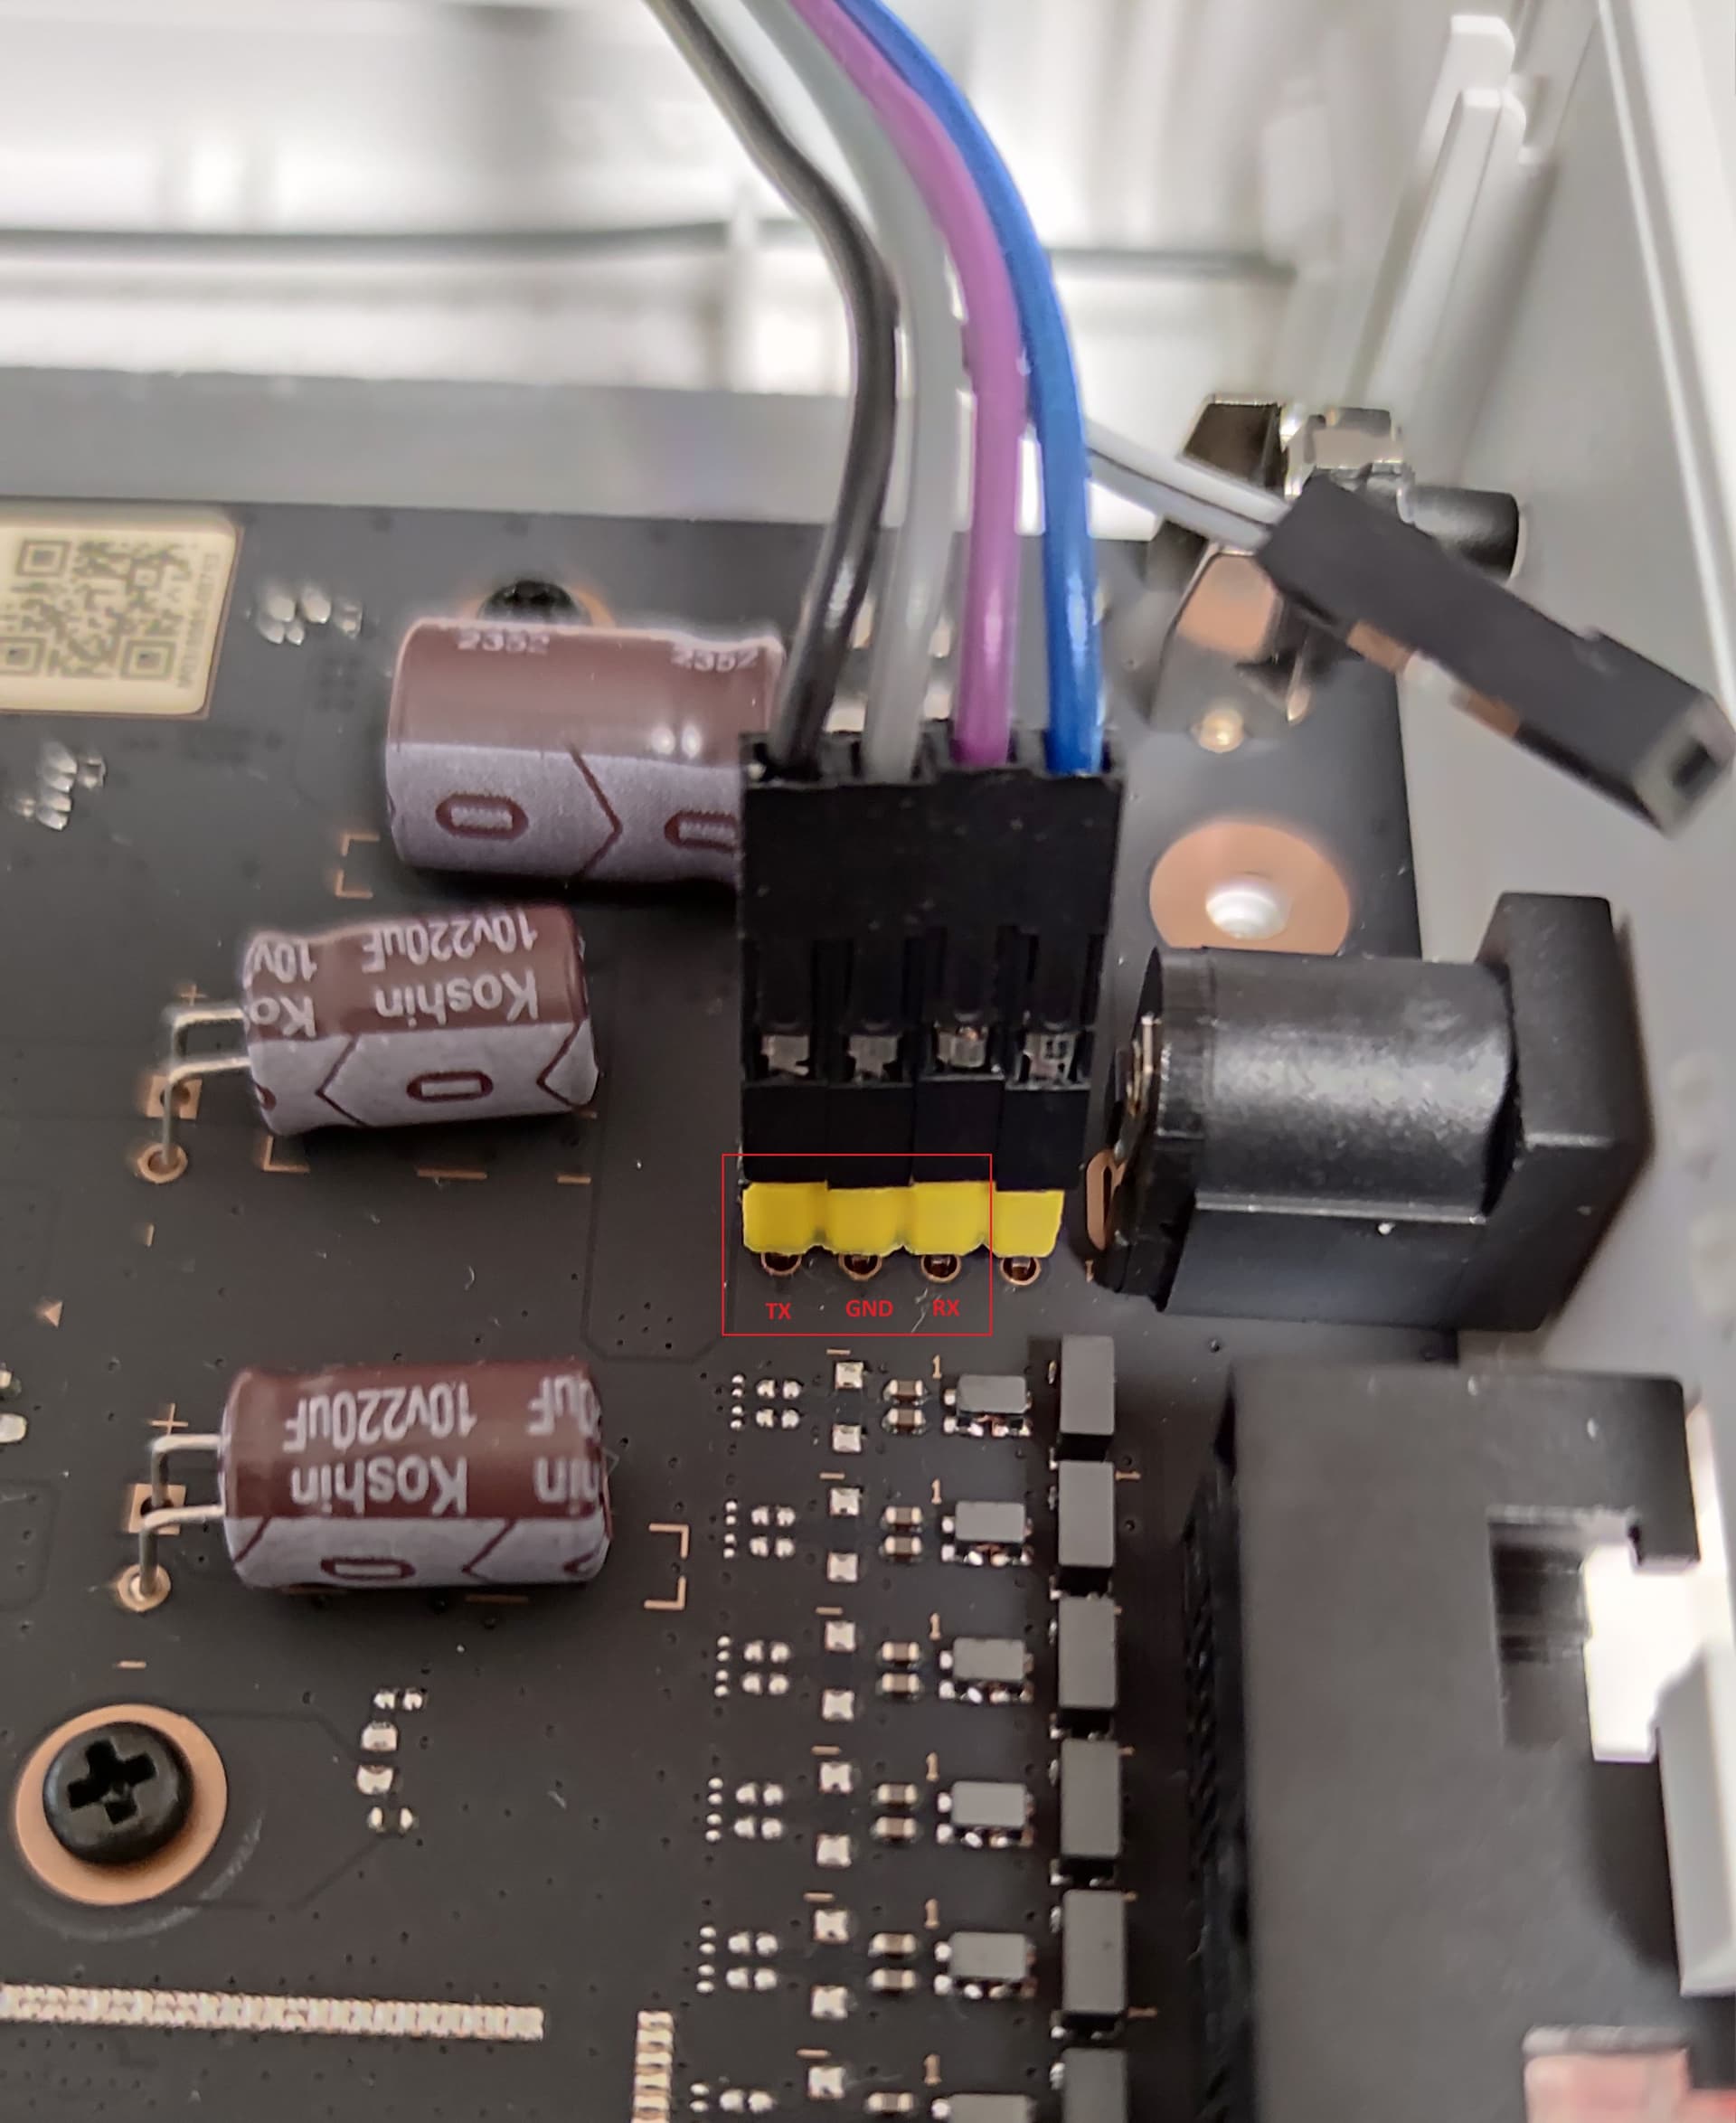
![]() Important:
Important:
- set the jumper on the UART adapter to operate at 3.3V.
- the RX pin on the router shall be connected to the TX pin on the UART adapter.
- the TX pin on the router shall be connected to the RX pin on the UART adapter.
- the GND pin on the router shall be connected to the GND pin on the UART adapter.

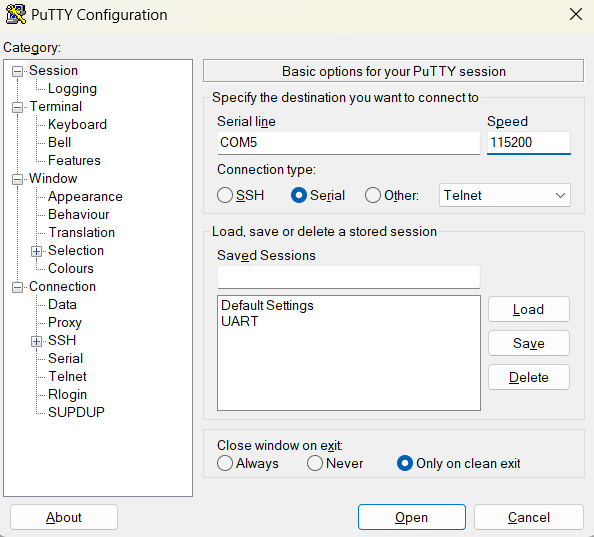
2. Insert UART adapter into the USB port of your PC, open and configure PuTTY, and then plug in the power adapter of the router. You should start receiving uart-log output from the router, which will be displayed in PuTTY.
PuTTY configuration
Check the COM port to which your UART adapter is assigned in the operating system. For example, if it's assigned to COM5 according to Device Manager, then:
Open PuTTY => select "Connection type:" Serial => change Serial Line from COM1 to COM5 => set "Speed" to value 115200 => click "Open" button. PuTTY is now configured and waiting to receive information once the router is turned on.
3. Close PuTTY and power off the router.
4. Download software for router flashing and prepare it. Also, plug an Ethernet cable into one of the middle ports of the router (the 2nd or 3rd port on the router), and then connect the other end of the Ethernet cable to your PC. Disable Windows firewall.
software list
- 4.1: download mtk_uartboot-v0.1.1-x86_64-pc-windows-msvc.zip for windows and unzip it.
- 4.2: download bl2-mt7981-bga-ddr3-ram.bin and place it in the folder with unzipped 'mtk_uartboot.exe'.
- 4.3: download FIP file openwrt-mediatek-filogic-xiaomi_mi-router-ax3000t-ubootmod-bl31-uboot.fip and place it in the folder with unzipped 'mtk_uartboot.exe'.
- 4.4: download tftpd64.464.zip and unzip it.
- 4.5: download ITB file openwrt-mediatek-filogic-xiaomi_mi-router-ax3000t-ubootmod-initramfs-recovery.itb and place it in the folder with unzipped 'tftpd64.exe'.
- 4.6: download UBI file openwrt-mediatek-filogic-xiaomi_mi-router-ax3000t-initramfs-factory.ubi.
- 4.7: download BIN file openwrt-mediatek-filogic-xiaomi_mi-router-ax3000t-squashfs-sysupgrade.bin.
- 4.8: download WinSCP and install it.
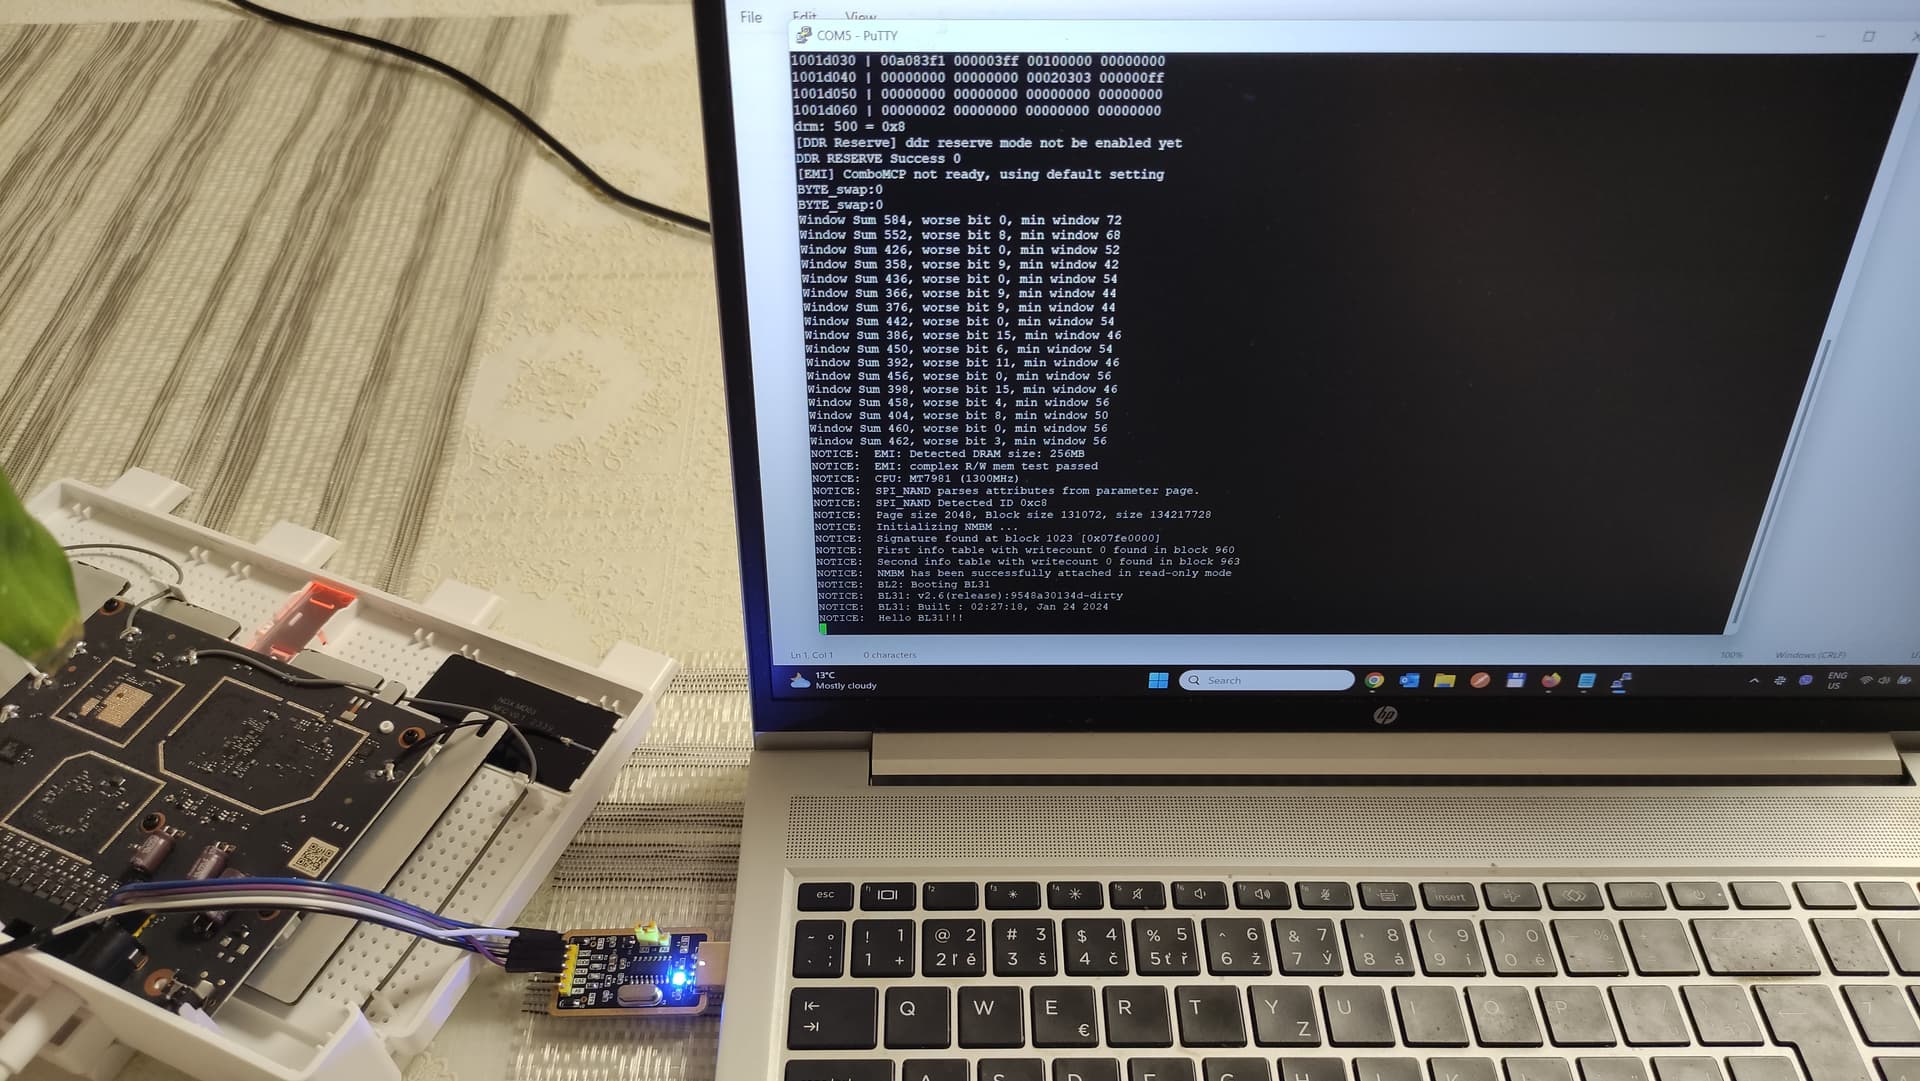
5. Start Windows Command Prompt console. In the console, navigate to the folder containing the unzipped 'mtk_uartboot.exe' file. Then, execute the following command (* before executing the command below, ensure that you replace the COM port number in the command below with the port number assigned by your operating system, which you detected in step 2.):
mtk_uartboot -s COM5 --payload bl2-mt7981-bga-ddr3-ram.bin --aarch64 --fip openwrt-mediatek-filogic-xiaomi_mi-router-ax3000t-ubootmod-bl31-uboot.fip && putty.exe -serial COM5 -sercfg 115200,8,n,1,N
6. As soon as the "Handshake..." text appears in the windows command prompt console, turn on the power adapter on the router. If router successfully processes the 'mtk_uartboot' loading, additional information will appear in the Windows console. Following that, a new window with PuTTY will automatically appear, attempting to retrieve the 'openwrt-mediatek-filogic-xiaomi_mi-router-ax3000t-ubootmod-initramfs-recovery.itb' file.
- note: if an infinite loop ending with the message "NOTICE: Hello BL31!!!" appears in PuTTY, power off the router and start from step 5 again. Sometimes you may need to repeat it 6-10 times before the router attempts to retrieve the 'itb' file, instead of the loop ending with the 'NOTICE: Hello BL31!!!' message).
Windows console output with 'mtk_uartboot' loading, and PuTTY console output with attempts to retrieve the 'itb' file.

7. Double click on "tftpd64.exe" to start TFTP server, and select the Server Interface 192.168.1.254 in tftpd64. It should allow the 'openwrt-mediatek-filogic-xiaomi_mi-router-ax3000t-ubootmod-initramfs-recovery.itb' file to be transferred into the router's RAM, enabling OpenWrt to load from RAM (which will be displayed in PuTTY).
PuTTY output log with initramfs-recovery.itb loading
#################################################################
         #################################################################
         #################################################################
         #################################################################
         #################################################################
         #################################################################
         #################################################################
         #################################################################
         ###
         1.2 MiB/s
done
Bytes transferred = 7667712 (750000 hex)
## Loading kernel from FIT Image at 46000000 ...
   Using 'config-1' configuration
   Trying 'kernel-1' kernel subimage
     Description:  ARM64 OpenWrt Linux-6.6.29
......
......
......
BusyBox v1.36.1 (2024-05-05 09:27:18 UTC) built-in shell (ash)

  _______                     ________        __
 |       |.-----.-----.-----.|  |  |  |.----.|  |_
 |   -   ||  _  |  -__|     ||  |  |  ||   _||   _|
 |_______||   __|_____|__|__||________||__|  |____|
          |__| W I R E L E S S   F R E E D O M
 -----------------------------------------------------
 OpenWrt SNAPSHOT, r26181-d1504a1e76
 -----------------------------------------------------
=== WARNING! =====================================
There is no root password defined on this device!
Use the "passwd" command to set up a new password
in order to prevent unauthorized SSH logins.
--------------------------------------------------
root@OpenWrt:/#
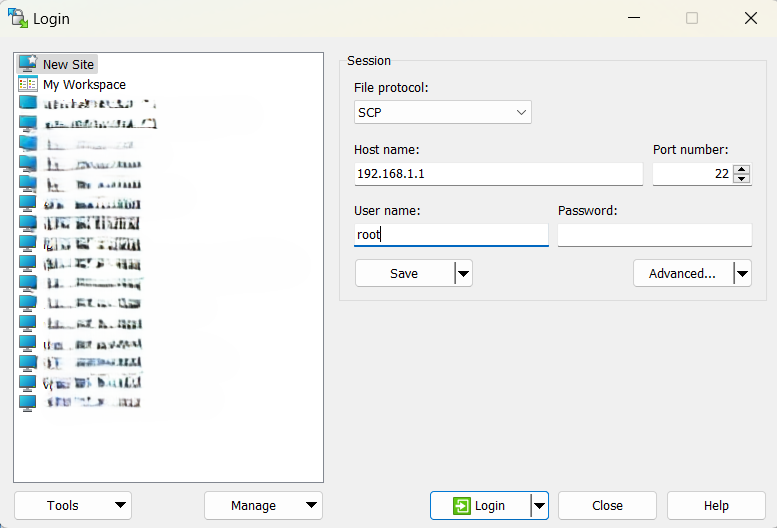
8. Once OpenWrt from 'initramfs-recovery.itb' is loaded, open WinSCP tool, login to 192.168.1.1, and upload the 'openwrt-mediatek-filogic-xiaomi_mi-router-ax3000t-initramfs-factory.ubi' file to the router's /tmp folder.
WinSCP configuration
Open WinSCP => select "Tabs", "New Tab" => "New Site" => select File Protocol: SCP => Host name: 192.168.1.1 => Port number: 22 => User name: root => click "Login" button.
9. In PuTTY, enter the following command:
ubidetach -p /dev/mtd8
After mtd8 is detached, enter the following command:
ubiformat /dev/mtd8 -y -f /tmp/openwrt-mediatek-filogic-xiaomi_mi-router-ax3000t-initramfs-factory.ubi
After successfully completing the ubiformat, reboot the router by entering reboot. It should boot to the OpenWrt initramfs system now.
10. As soon as OpenWrt is reloaded, open WinSCP tool, login to 192.168.1.1, and upload the 'openwrt-mediatek-filogic-xiaomi_mi-router-ax3000t-squashfs-sysupgrade.bin' file to the router's /tmp folder.
11. In PuTTY, enter the following command:
sysupgrade -n /tmp/openwrt-mediatek-filogic-xiaomi_mi-router-ax3000t-squashfs-sysupgrade.bin
After successfully completing the sysupgrade, the router will reboot automatically.
12. As soon as OpenWrt is reloaded, enter the following commands in PuTTY:
fw_setenv boot_wait on
fw_setenv uart_en 1
fw_setenv ssh_en 1
fw_setenv boot_fw1 "run boot_rd_img;bootm"
fw_setenv flag_boot_rootfs 0
fw_setenv flag_last_success 1
fw_setenv flag_boot_success 1
fw_setenv flag_try_sys1_failed 0
13. Check that the flags from step 12 in fw_printenv are set correctly by entering the following command:
fw_printenv
If everything looks fine, reboot the router by entering reboot.
- note: if bootloop occurs with the red message
"*** UBI is read-only mode ***"after router is reloaded, the value offlag_last_successshould be changed. To fix it, go through steps 5 to 13 again, but in step 12 instead offw_setenv flag_last_success 1usefw_setenv flag_last_success 0.
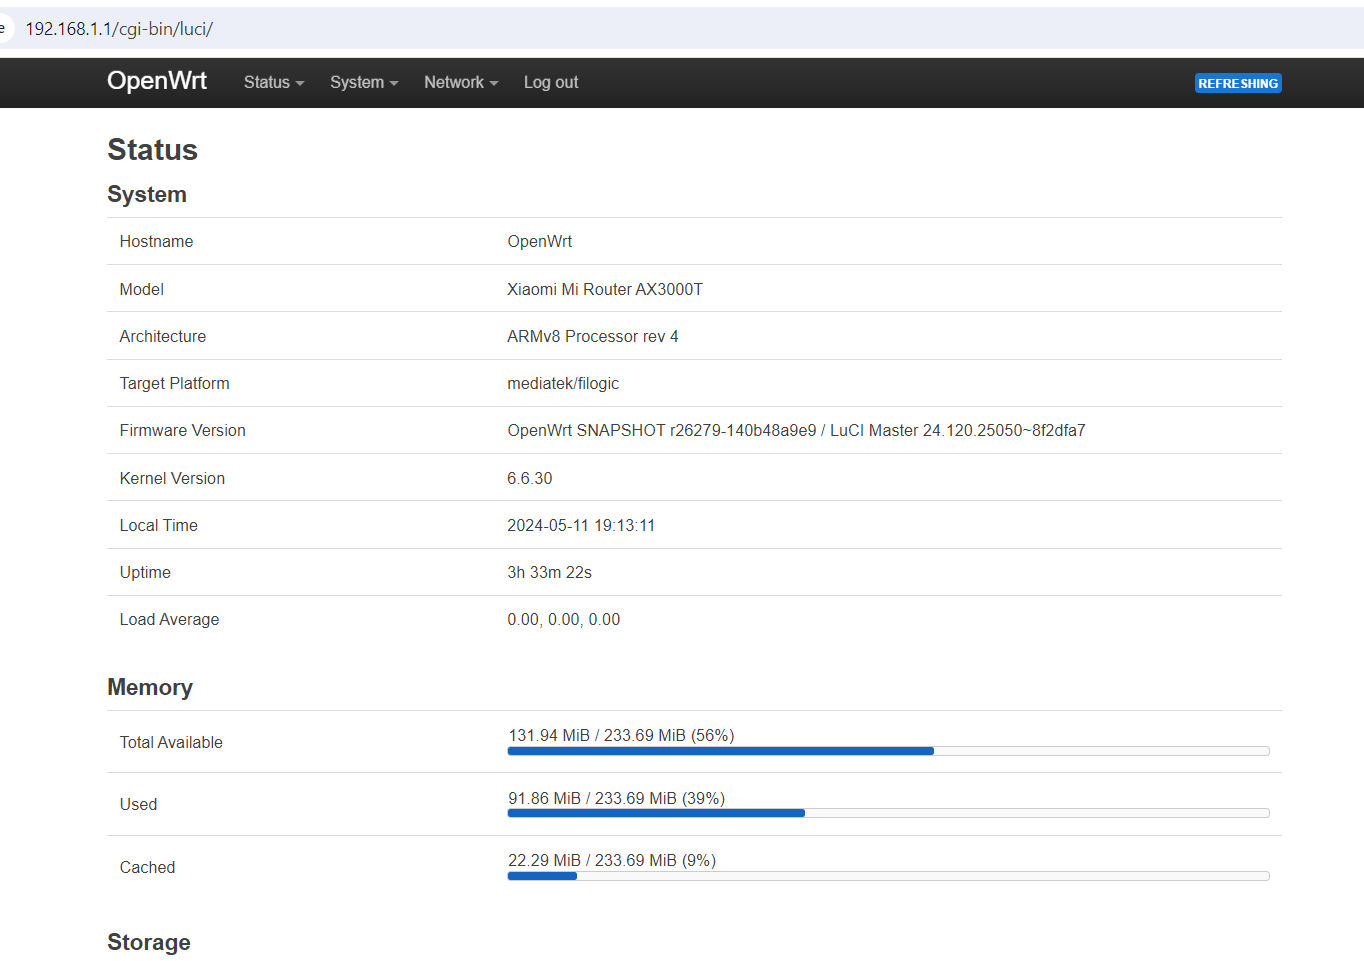
14. Once OpenWrt is reloaded, connect an internet cable to the WAN port of the router.
Congratulations, your router is now running under OpenWrt firmware!
this hidden part is no longer required.
note: configuration reset issue after 6 reboots, caused by the stock Xiaomi bootloader logic, has been addressed since the OpenWrt 24.10.0 release.
So, this hidden part is no longer required:
- Enter one more command in PuTTY that will modify the
/etc/rc.localfile with nvram settings ensuring that theflag_try_sys1_failedis always reset to 0 (without this command, OpenWrt will be restored to default settings after 6 reboots, so it's worth adding it even after future clean OpenWrt sysupgrade installations).
sed -i '/exit 0/i sleep 5\nfw_setenv flag_try_sys1_failed 0' /etc/rc.local
15. Optional step (only if Snapshot of OpenWrt is installed).
enable wi-fi and install Luci
enable wi-fi from console:
uci set wireless.radio1.country='DE'
uci set wireless.radio1.disabled='0'
uci commit wireless
wifi reload
install Luci from console:
apk update && apk add luci
- note: for older OpenWrt versions, use the
opkgcommand instead:opkg update && opkg install luci
Now, you can open the OpenWrt web interface of the router by entering 192.168.1.1 in the browser's address bar.

Additional information:
- Original Xiaomi firmware can be restored on a router with OpenWrt installed. To do this on the international version of the AX3000T RD23 model, use the official stock Xiaomi firmware ver. 1.0.49 (INT) or 1.0.76 (INT) and either the TFTP recovery method or the Xiaomi MiWiFi Repair Tool. Simple instructions with screenshots from another Xiaomi router can be found here.
- It's possible to avoid opening the case to access UART pins, as they are accessible through holes in the router's case. For example, see the following connection option.
- Changing default bootloader to the OpenWrt U-Boot bootloader has not been covered in this guide, but there is a report about a successful OpenWrt U-Boot installation on the RD23. Please understand the benefits and risks involved, especially the fact that the TFTP recovery method or Xiaomi MiWiFi Repair Tool cannot be used when a custom bootloader is installed.
- The
"software list"in the instruction above references Snapshot OpenWrt images. However, the stable24.1025.12 release is already available and can be used instead.  The UART flash method described in this guide is also suitable for the AX3000T RD03 model (Chinese version).
23 Likes
1A is enough with original settings only.
But if you have special settings like wifi Panama and 26/28db (630mW), the router need 2A. It will constently reboot if there is not enough charger capacity with full charge wireless network. (I'm using USB 5V to 12V (only 1A sadly) for the routeur on a nas, and tested fews settings) : https://s.click.aliexpress.com/e/_EjwV0Ib
1 Like
Thanks for your contribution ! ![]()
1 Like
Any ideas on setting the mesh up between 3 of these?
mesh with wired backhaul or wireless backhaul?
wireless mesh:

Do someone know how to add USB-A port with iron solder ?
MT7981B SOC is supposed support : 2p 2.5GbE IF, 2x PCIe 2.0, RGMII/SGMII, Wi-Fi 6E (160MHz), NAPT, HQoS, USB, SDXC/eMMC flash, GPIO, I2C, I2S, PMIC, PWM, SPI, UART.
Should be possible to add it (datasheet ?) and cut the case...
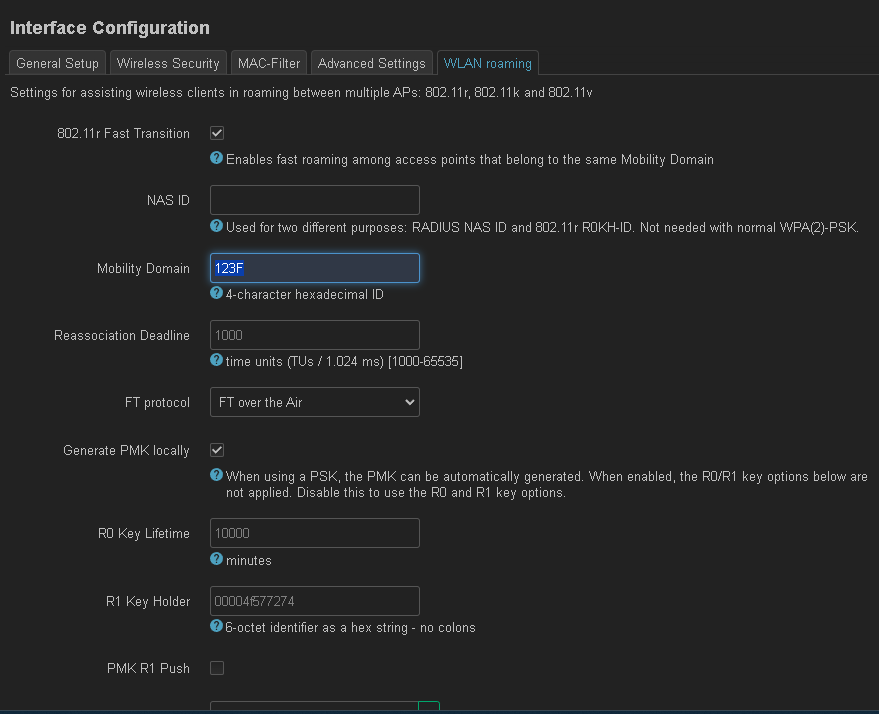
802.11r Fast Transition
Has anyone enabled Fast Transition?
When my devices are connected to the 2.4GHz band, they do not switch to the 5GHz band, even though it is within range.
I have DTIM interval set to 3.
Any ideas?
NAS ID should not be empty , and unique for each radio...
And switching is also depend on client , so also from him it depends if he moves to 5GHz from 2,4Ghz or not...
1 Like
802.11r is used for fast transition between 2 or more APs on the same band and with the same SSID. You are looking for down or usteer package.
2 Likes
Thanks, but I couldn't get it to work. Even the usteer package did not help. My Samsung S10e connects to the 5 Ghz band, but as soon as I move away from the router, it switches to the 2.4 Ghz band and stays there.
I am not using that, as I want to monitor my networks, but you can look at the usteer topic or dawn and ask there.
Kr
Thanks a lot for this detailed guide!
It looks like the platform.sh sets flag_try_sys1_failed and flag_try_sys2_failed to 8 (instead of 0). Is setting it to 0 really needed? If so, the platform.sh should probably be updated, right? Also, would this be something that could be fixed by flashing OpenWrt's U-Boot, like described in the wiki?
Becouse Fast Transition is not to switch between 2,4 and 5Ghz radios in the same router.... It is to switch beetween two and more routers ![]()
1 Like
nasid - no required, by default= BSSID without colon
https://openwrt.org/docs/guide-user/network/wifi/basic#fast_bss_transition_options_80211r
802.11r used for band steering (between 2.4 & 5 wifi on one ap) and between two or more ap.
https://openwrt.org/docs/guide-user/network/wifi/usteer
1 Like
@Ser9ei ,but in this way also option ieee80211r is not required and set to 0 by default ... But in this way Fast transitio will be disabled...
So nasid should not be empty , i havn't lied ![]()
Also Usteer is something above 802.11r ( needs 802.11k and 802.11v additionally).
I'm not sure if enabling only ieee80211r will give result to switch in the same ap...