What about my factory firmware backup i made? Since i cant find any earlier versions besides the newer unsigned version. Can i just use my backup file to flash itself then i can try and flash openwrt to partition 1?
Well the issue is that as you can see, the partitions here are different. I have no idea which one to wipe or modify and/or how. I've tried the "mtd resetbc" on all partitions but it returns as invalid or fails. And I tried unlocking "mtd unlock alt_firmware", but that isn't possible. For now, the router always boots OpenWRT, but we'll see if maybe at some point it doesn't.
You're wasting your time trying to flash it through the Linksys GUI. There is no certain and/or guaranteed way to ever getting OpenWRT to flash successfully without a lot of hassle and/or retries. Some get lucky that it works, but for most of us, we just don't.
[Full Setup Guide below]
However, UART serial is guaranteed to work, as I've confirmed. If you wanna know how to open it, you can follow this video, which is roughly the same model (screws are all the same, they are below the stickers on the bottom. Unscrew those, remove the small plastic cover, then remove the two screws that are revealed. Then, push the board out of the unit, fairly easy.). After opening it, connect UART serial. Now, this is where I had the most issues. I've had success with the following method and settings:
Softwares needed: PuTTY Terminal for serial, Tftpd64, any SSH client (I use Termius, you can use PuTTY)
Factory Image with LuCI (to avoid having to install it later through SSH, which is a hassle): https://sysupgrade.openwrt.org/store/3f7988724fb3797f730d69dd74a78b52/openwrt-e0952e76964d-ramips-mt7621-linksys_e7350-squashfs-factory.bin
Make sure to rename your downloaded factory.bin/openwrt.bin to something easy and short, like "openwrt_tftp.bin" or "factory_tftp.bin", you will need it later. Also, put it in a folder you'll easily find.
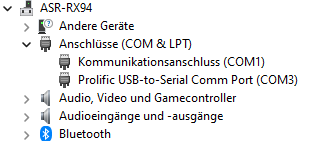
Settings for PuTTY for serial connection: (Note: Your "COM" port will vary. Check in your Windows Device Manager for the right one. Refer to the image below:)
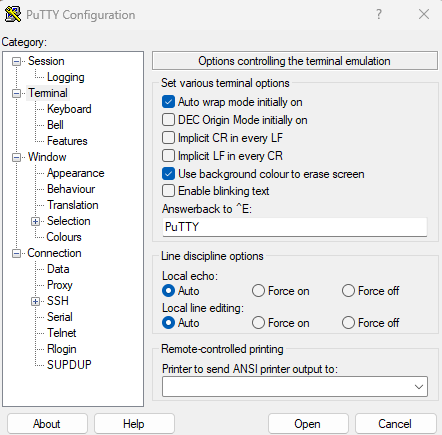
Now, open PuTTY, and on the "Session" tab, select "Serial", then on the left side panel, select "Serial" and configure as below:

(Note: "Flow control" might have to be put to "None" instead of "XON/XOFF". The default "XON/XOFF" should work, but if you have issues, toggle it to "None")
Then, find "Terminal" on the left side panel, and make sure that "Local echo:" and "Local line editing:" are left on "Auto". Do NOT force these on, otherwise you get duplicate input and you'll face issues when trying to enter numbers or text in U-Boot. Refer below:
Now comes the tricky part, which is what took me a while to figure out. First, the pinout has to be viewed from the ports. Meaning that, make sure the side with the LAN ports, power switch, etc. faces towards you when you apply the pins in the following order ("X" is unused, and you won't be needing the 3.3V connector, skip it, all you need is GND, TXD and RXD)(from left to right, 1-5):
GND-X-TXD-RXD-3.3V
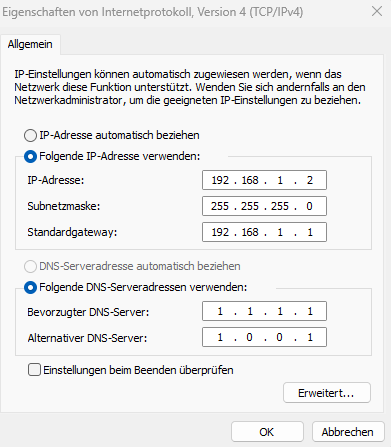
Now, do NOT connect anything to the serial port yet. What you do, is connect the power cable and have the router off, and connect your LAN cable to LAN Port 1 on the router and your Ethernet adapter on your PC. Configure on your PC the Ethernet adapter with the following values (the DNS server is irrelevant, but I'd recommend it for later ![]() ):
):
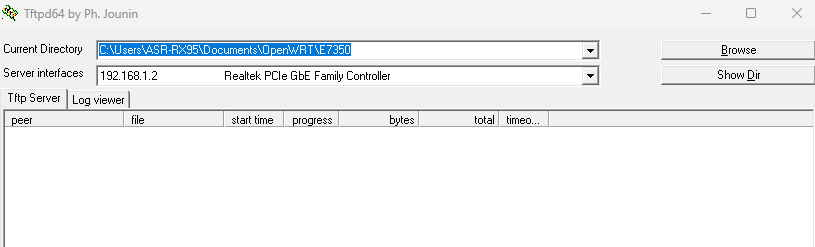
After that, start Tftp64, and point the "Current Directory" to where you downloaded your flashable OpenWRT.bin (the one you downloaded in this post if you want LuCI). Then, for the "Server interfaces", choose your Ethernet adapter that is connected to the Router. If you configured it correctly earlier, it should be easy to identify as it will have the IP Address of "192.168.1.2", and it should look like this (roughly):
Last but not least, and this is very important: Make sure you disable your Windows Firewall. Not Antivirus, but Firewall. If you don't, then the transfer for Tftp64 will fail. This took me a while to figure out as I had come to the stage where the transfer should have happened, but didn't. So make sure to disable your Firewall.
And now that all preparations have been made, on to the last part.
Now, you start your router. Flip the power switch on, and wait for your router to get out of the initial boot phase. If you don't, you'll get scrambled garbage data in your PuTTY Serial Console window and your router will get stuck on that boot phase (I was stuck there many times). You can tell if your router is out of that phase by watching the LEDs on the front. When starting the router, the power LED on the left (right if seen from above or when seen from the side where the ports face you), should glow dimly blue. It does this for a couple of seconds, make sure to NOT connect anything to serial yet. Once it starts to glow a little brighter and might even flicker, connect TXD and RXD, and then follow it up with GND. If done correctly, your PuTTY Serial Console window will now show you clean text of the bootloader.
Now, you already missed your window for U-Boot, but don't fret. In order to get into the early bootloader stage again, just hold the "Reset" button on the back for a couple of seconds after boot has completed. You'll see that your serial console window is telling you that it is trying to reset. Hold the button for a couple of seconds until you see the message that it is going to reset the device, then let go. Now, timing is crucial: Once the device reboots, it will display the U-Boot menu. You only got a couple of seconds to make a choice before it starts normally, so make sure to hit the 6 on your keyboard. If you fail this, just repeat the step with the reset to get back into U-Boot.
Now that you're in the 6th option for flashing firmware with a pattern, it's straight forward. Enter the IP of the U-Boot device that it asks of you (default: 192.168.1.1, leave it at the default). Then it asks you for the IP of your TFTP device, which we've set to "192.168.1.2", make sure this is typed correctly. Then it'll ask you for the name of the file that we changed to "factory_tftp.bin" earlier. If you've setup Tftpd64 correctly on your PC and followed everything in this guide, you'll see that once you hit enter, it will grab the .bin file from your PC and flash it to the device.
And that's it, really. Once it has flashed the OpenWRT image, wait for a while for it to boot. Once the messages on the serial terminal have come to a halt, you're ready to head into your LuCI interface at "192.168.1.1", and that's it. Setup SSH in LuCI additionally if you'd like, so that you can install awesome themes such as Argon, or other things you might need SSH for later.
Enjoy~
6 Likes
Thanks for the detailed instructions, do you mind if they're copied as verbatim to the wiki?
Wouldn't mind at all if it gets credited like as for everyone else ![]()
Is anyone else getting this notice in syslog?
daemon.notice procd: /etc/rc.d/S25packet_steering: uci: Entry not found
Examining /usr/libexec/network/packet-steering.sh shows that it points to a non-existent folder/file /usr/libexec/platform/packet-steering.sh
Restarting it from the command line gives sh write errors
Similar entry for me (but it's old now and has not appeared again), saying:
![]()
I see the same entries on boot with or without packetsteering enabled. At this point, I'm attributing it to the snapshot nature of support for this device. The packet steering script will need to be fixed before support for this device goes mainline.
So, the command to reset the bootcount is as follows:
fw_setenv bootcount 0
This is applied automatically at boot apparently, so nothing to worry about.
Interesting idea. I'll give a try.
wrong person ![]()
Hey, i got my uart cp2102. I did almost everything you said until i got stuck trying to boot into u-boot. Then when i change my plugs around, it connected but then my windows stop recognizing it. All the lights comes on the uart. Even i downloaded the proper uart driver. But my computer still doesnt detect it.
i managed to install openwrt with LokeYourC3PH's guide. thank you very much~
but this snapshot version seems very buggy. i just randomly lose access to the router and have to reset. is there a way to download previous snapshots
No.
You can wait for new snapshot(s) to be released.
Download via Firmware Selector, so that you can add packages (e.g. LuCI, irqbalance...) to it.
That way you can save the snapshot for backup/reinstall if later releases are not to your liking.
Another option would be to build the commit that you want to use yourself.
with today's snapshot (r23086-3591353f51), i get random mac addresses for all ports after every reboot.
Thu May 25 18:44:24 2023 kern.err kernel: [    2.476347] mtk_soc_eth 1e100000.ethernet: generated random MAC address ae:2e:2f:d3:a8:49
.
Thu May 25 18:44:24 2023 kern.err kernel: [    2.496913] mtk_soc_eth 1e100000.ethernet: generated random MAC address fa:7a:50:5e:ac:38
I've read on how to manually set the mac address, which should be in luci--network--interfaces-devices--configure...
the mac address printed on the device's label is the wan address.
what should I use for lan's mac address? (from comparing another router's lan and wan mac address, only the last group is different, but what should I use?) thanks
Iyou can use lan = wan ( sticker ) + 1
Hey, i had to buy a new cp2102 usb as my old one had fried. But everything seems to connect but the router isn't loading into u-boot. So is it software related?
No you either wrongly connected Rx, Tx and GND, or you miss the timing.
1 Like
Ill send a picture