Here my notes on TFTP recovery xiaomi factory FW:
(That I had wrote for someone else, following the wiki steps https://openwrt.org/toh/xiaomi/ax3600#tftp_recovery, maybe it helps):
-
Get tftpd64 https://bitbucket.org/phjounin/tftpd64/downloads/tftpd64.464.zip from http://tftpd32.jounin.net
-
Connect computer ethernet port to router LAN1 port, nothing else connected.
-
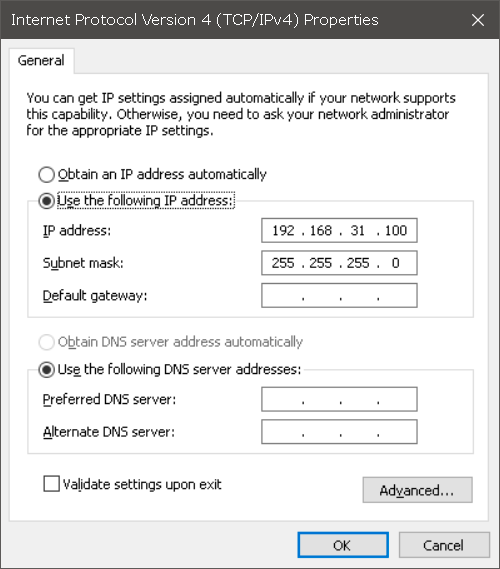
In windows, set computer IP to 192.168.31.100, 255.255.255.0:
-
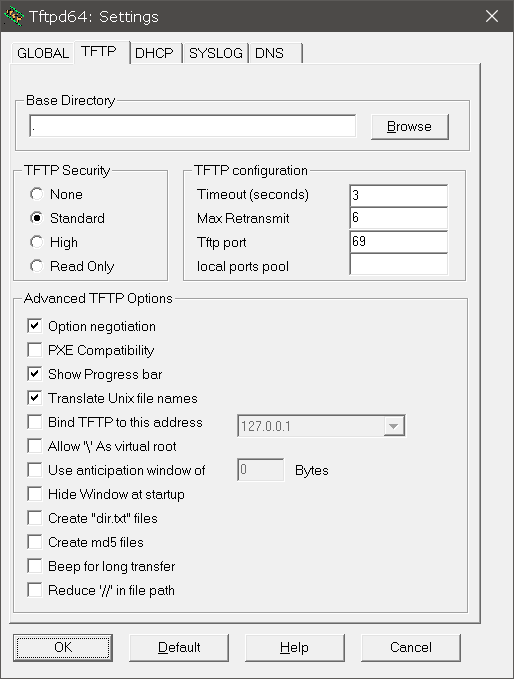
Allow tftp64 in windows firewall and conf. like this:
-
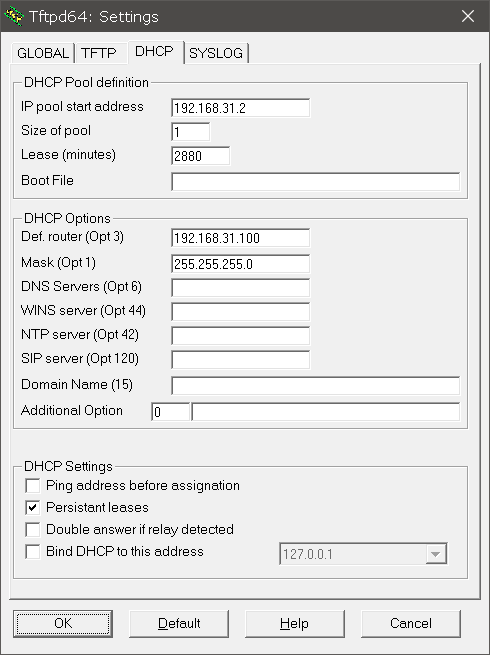
Configure tftp DHCP server to give IP 192.168.31.2 to the router:
-
Rename: miwifi_r3600_firmware_5da25_1.0.17.bin
to: C0A81F02.img
and copy it to tftpd64 folder
((Note: C0.A8.1F.02 = 192.168.31.2, router will get a file named with the IP it got from DHCP, but in HEX)

Now with TFTP Server running:
(Note: you'll see a msg. in the app when the FW file is downloaded by the router)
- Keep reset button pressed and power on your ax3600
Keep it pressed until you see the system led blinking orange - If the led is blinking blue led it means the device was flashed (wait some time).
- After xiaomi firmware is flashed, I think we need to power off and on again (can't remember), then the led will be solid orange for a few minutes (can't remember how long) while the xiaomi FW loads, when it is loaded it will blue, try connecting to it's web page.
- Notes: bellow are the copied led instructions from the wiki, I don't remember how the lights went on mine:
When the device finished loading the firmware, the led starts blink.
Wait for until blue led get solid!
It Might take some time for the Led go get to solid blue.
If the recovery doesn't accept the downloaded file the led switches to solid white - if this is the case, restart the recovery process with other file.
If the led is blinking blue led it means the device was flashed successfully and can be restarted.
I have serial/uart interface so I can see and access u-boot (I didn't use the terminal keyboard).
I used router LAN1 port, didn't try others.
I renamed the C0A81F02.img file to something else, so It would not load in this test bellow.
Power on the router while pressing reset, until orange led starts flashing, then release reset button.
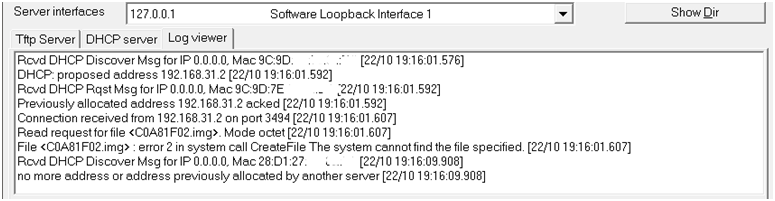
Here the log part with the process:
BOOTP broadcast 1
DHCP client bound to address 192.168.31.2 (19 ms)
*** Warning: no boot file name; using 'C0A81F02.img'
Using eth0 device
TFTP from server 192.168.31.100; our IP address is 192.168.31.2
Filename 'C0A81F02.img'.
Load address: 0x44000000
Loading: *
TFTP error: 'File not found' (1)
Not retrying...
ipq807x_eth_halt: done
ipq807x_eth_halt: done
Here the logs from tftpd (I deleted the MACs):