This post is mostly to document the process I followed when setting up my old Raspberry Pi 2B with the Wi-Pi usb adapter (which has an Ralink RT5370 chipset). This is also my first time using OpenWRT. I also have a question at the last step about why ssh and LuCI both get "Connection Refused" errors over the WiFi interface.
My end goal with this project was to have the Raspberry Pi act as a wireless -> ethernet bridge. It would use the wireless adapter as the WAN and connect the ethernet port to the WAN port of a separate router. This was to simulate being able to use a public wifi as the source of internet for a local network (think network in an RV while camping for example).
The biggest challenge I ran into was not knowing I needed to install drivers for the wireless adapter (they're built in to the Raspian OS), and then figuring out the steps to allow the Pi to connect to the internet to download those drivers.
The Wi-Pi adapter was a very popular Wifi adapter for older Raspberry Pis before they had built in WiFi. It was manufactured by Element14, and uses an Ralink RT5370 internally. element14 docs. It doesn't have much information on its site about drivers, as they say have been merged to the main linux kernel.
Here are the steps I would suggest for others. I have run through them from scratch once, after taking quite a few wrong turns and restarting a few times while figuring it out.
0. Read quick start guide
Guide. Not all of it will match exactly with the Pi, but it's helpful to orient yourself.
1. Boot up with plain Raspbian
I would suggest starting the Pi once with the default Raspbian distro. I used the official Raspberry Pi Imager from their site, which I also used at a later step to flash OpenWRT onto the SD Card.
Starting with Raspbian let me confirm that the wireless adapter could work, and it allowed me to pre-emptively set the correct adapter country code, as mentioned on https://openwrt.org/toh/raspberry_pi_foundation/raspberry_pi#wireless_country_code_issue
2. Boot up with OpenWRT
After confirming everything looked good with Raspbian, I flashed OpenWRT onto the card, following the instuctions at
https://openwrt.org/toh/raspberry_pi_foundation/raspberry_pi#how_to_flash_openwrt_to_an_sd_card.
After booting, you may notice that the Wireless settings are completely missing from the Luci interface: the Wi-Pi adapter isn't fully functioning. We'll need to install some additional software to troubleshoot and fix that.
3. Enable DHCP on ethernet port so you can join existing network
Since the Pi has an HDMI out and usb ports, I found it convenient to attach a monitor and keyboard for these next steps. If everything works on the first try, this is great. For troubleshooting, I found that connecting the ethernet port directly to my laptop and using ssh was very convenient for copy pasting command outputs for searching for help / writing this guide.
Make sure to plug in HDMI to the monitor and power it on before booting the raspberry pi.
I basically followed the instructions at https://openwrt.org/toh/raspberry_pi_foundation/raspberry_pi#how_to_connect_via_ethernet.
When starting up, the Pi will have the fixed address of 192.168.1.1. I confirmed this by running ifconfig. Since this is incompatible with many routers, I enabled a dynamic ip address with DHCP by running the following
uci set network.lan.proto=dhcp
uci commit
/etc/init.d/network restart
4. plug raspberry pi ethernet into router LAN
Now that the pi was configured to use DHCP on its ethernet port, when plugging into my home router, it acquired a new ip address and access to the local network and internet.
I confirmed the new address by running ifconfig on the pi. I took note of this address, and switched to using my laptop, ssh, and the Luci web interface to make further changes, instead of the keyboard and monitor. This made it easier to copy past the commands for driver installation.
One time through, I had mistyped the uci set network.lan.proto command, and ifconfig was showing the pip still had a fixed ip address. I checked on the network config cat /etc/config/network, and then found my typo in the command history.
5. ssh to raspberry pi, set root password
Use the ip address you found earlier to ssh.
ssh root@XXX.XXX.XXX.XXX
set the password for the root user
passwd
6. Update, install usb tools, confirm missing drivers
Now that we have internet access, we can install drivers and other useful tools. We will use lsusb to confirm the device is somewhat detected. lsusb is in the package usbutils
([Solved] Lsusb not found), and we need to first run opkg update.
opkg update
opkg install usbutils
You may see something like the following, which makes it look like everything is working fine.
root@OpenWrt:~# lsusb
Bus 001 Device 003: ID 0424:ec00
Bus 001 Device 004: ID 05e3:0608  USB2.0 Hub
Bus 001 Device 005: ID 148f:5370 Ralink 802.11 n WLAN
Bus 001 Device 002: ID 0424:9514
Bus 001 Device 001: ID 1d6b:0002 Linux 5.4.188 dwc_otg_hcd DWC OTG Controller
However, if we use some of the tools mentioned in the Installing and troubleshooting USB Drivers, we can see that it has Driver=(none) in the final line.
root@OpenWrt:~# cat /sys/kernel/debug/usb/devices
...


T:  Bus=01 Lev=02 Prnt=02 Port=04 Cnt=03 Dev#=  5 Spd=480  MxCh= 0
D:  Ver= 2.00 Cls=00(>ifc ) Sub=00 Prot=00 MxPS=64 #Cfgs=  1
P:  Vendor=148f ProdID=5370 Rev= 1.01
S:  Manufacturer=Ralink
S:  Product=802.11 n WLAN
S:  SerialNumber=1.0
C:* #Ifs= 1 Cfg#= 1 Atr=80 MxPwr=450mA
I:* If#= 0 Alt= 0 #EPs= 7 Cls=ff(vend.) Sub=ff Prot=ff Driver=(none)
7. Install Wi-Pi drivers
Since the WiPi / Ralink RT5370 drivers are built into the default Raspbian distro, and it works out of the box with Raspbian, I was confused why the adapter didn't work right away. For a while I didn't even realize I needed to be looking for drivers, and then as a newbie to OpenWRT, it was hard to find out which drivers to install. I spent a lot of time searching for Wi-Pi, wipi, etc. because that was the product name of the adapter. Eventually, looking at the output of lsusb, I realized I needed to search for Ralink
Searching for "Ralink" in the Package Table unfortunately didn't help me, as none of the drivers listed anything like RT5370 or RT5XXX in their top level description. It wasn't until I found the post How to figure out which driver should I use with my usb wifi adapter that I realized I should have been googling for RT5370 the whole time, instead of WiPi, and that the Ralink drivers might be compatible with more devices than listed in their description.
So, following the instructions from the post, I installed the drivers by running
opkg install kmod-rt2800-lib kmod-rt2800-usb kmod-rt2x00-lib kmod-rt2x00-usb
Aftewards, I confirmed this had worked. /sys/kernel/debug/usb/devices showed a driver had been associated.
root@OpenWrt:~# cat /sys/kernel/debug/usb/devices

T:  Bus=01 Lev=02 Prnt=02 Port=04 Cnt=03 Dev#=  5 Spd=480  MxCh= 0
D:  Ver= 2.00 Cls=00(>ifc ) Sub=00 Prot=00 MxPS=64 #Cfgs=  1
P:  Vendor=148f ProdID=5370 Rev= 1.01
S:  Manufacturer=Ralink
S:  Product=802.11 n WLAN
S:  SerialNumber=1.0
C:* #Ifs= 1 Cfg#= 1 Atr=80 MxPwr=450mA
I:* If#= 0 Alt= 0 #EPs= 7 Cls=ff(vend.) Sub=ff Prot=ff Driver=rt2800usb
lsusb looked the same
root@OpenWrt:~# lsusb
Bus 001 Device 003: ID 0424:ec00
Bus 001 Device 004: ID 05e3:0608  USB2.0 Hub
Bus 001 Device 005: ID 148f:5370 Ralink 802.11 n WLAN
Bus 001 Device 002: ID 0424:9514
Bus 001 Device 001: ID 1d6b:0002 Linux 5.4.188 dwc_otg_hcd DWC OTG Controller
ifconfig still showed that wifi was missing however. I only saw br-lan, eth0, and lo. And this is because WiFi is disabled by default (https://openwrt.org/docs/guide-quick-start/walkthrough_wifi). I ran a quick reboot just to ensure before moving on.
8. Switch ethernet back to a fixed ip address
Before we enable the wifi adapter we want to switch the ethernet port back to a fixed ip and connect directly to our laptop. This avoids the Pi getting confused by joining the same home network twice (once on ethernet, once on Wifi). I tried doing this step after joining the wifi network a few times, but always lost network connectivity to the pi.
I used the command line for this step, instead of the LuCI web interface. I think because the ip address changes when you do this, the web interface can no longer reach the router, and I think that by default this triggers a rollback of the configuration change.
In this example, I chose 192.168.3.1, to ensure my Pi did not conflict with my home router, which had the address 192.168.1.1 and subnet mask 255.255.255.0
uci set network.lan.ipaddr=192.168.3.1
uci set network.lan.proto=static
uci commit
/etc/init.d/network restart
This will break your ssh connection (since the ethernet port now has a new fixed ip address). Remove the ethernet cable connecting the pi to your home router, and move on to the next step.
9. Enabling WiFi and joining network
At this point, we're basically back where we started after a fresh flash of OpenWRT, but with one critcal difference: the usb drivers for the adapter are installed and working.
Now we just need to turn on wifi.
- Temporarily disable wireless network on your laptop
- Plug your laptop ethernet directly into the Pi ethernet
- (Optional) You may need to assign a fixed IP address to your laptop. DHCP seemed to still be working for me, but if it isn't working for you, a configuration like the following might work well
ip address: 192.168.3.20
subnet mask: 255.255.255.0
-
Visit
192.168.3.1, or whatever ip you configured in the previous step in a web browser to open the LuCI interface (you can useifconfigif you forget to find the right ip). I chose LuCI over cli, but believe this should be doable over cli as well. -
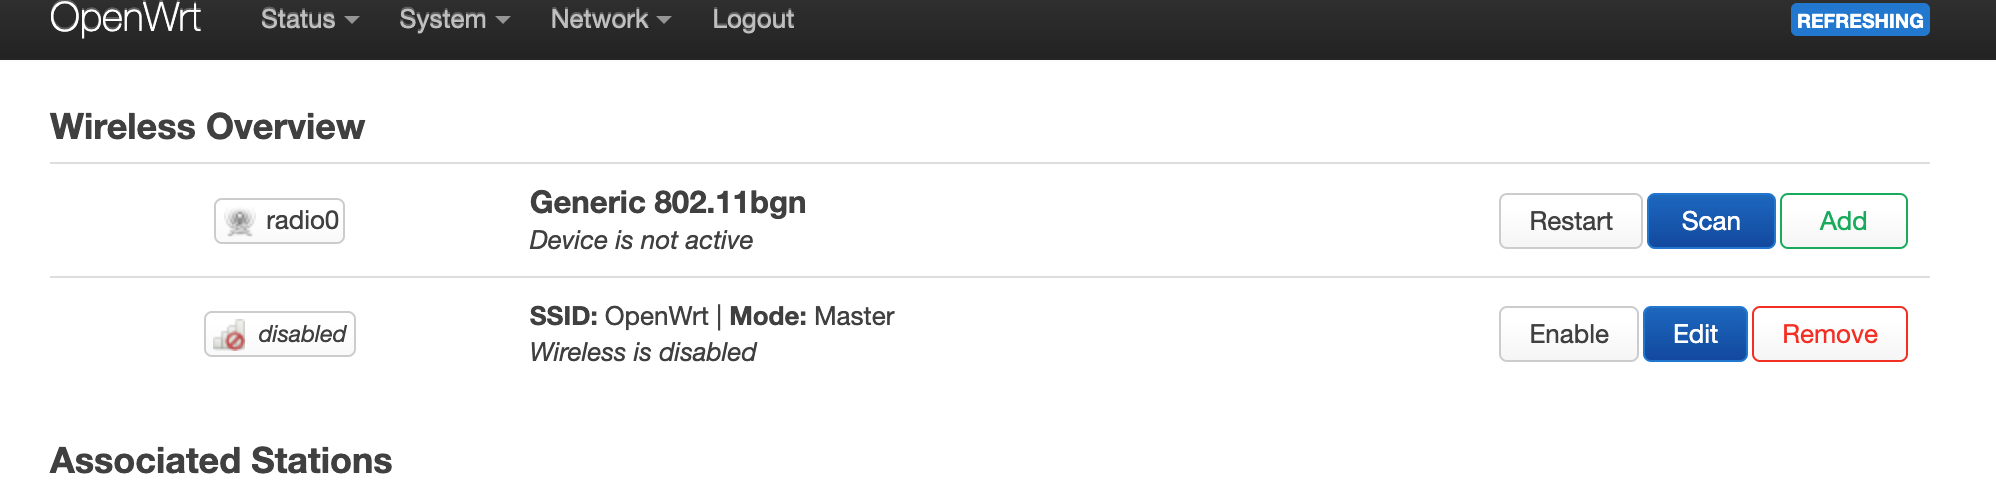
Go to Network > Wireless
-
Remove the currently disabled "interface" that would be used if the Pi was going to broadcast a wifi network (SSID OpenWRT). Since we'll be using our wifi in Client (STA) mode, we don't need to broadcast a wifi network from the Pi. I don't know if this was totally required, but it seemed to make everything work correctly when I connected the wifi. Do not remove
radio0.
-
Save and apply the changes of removing the disabled interface.
-
On
radio0, click "Scan" and find your network. Allow it to create its default wwan interface. -
Enter the network credentials, and make sure you pick
Clientas the mode. I also made sure to chooseAutofor the channel instead of the default channel 1. -
Save and apply changes
You can now run ifconfig (through keyboard and monitor, or through new ssh session to 192.168.3.1) to see your new wlan0 interface show up, and to get your ip address. LuCI also makes this available in the Network > Interfaces section.
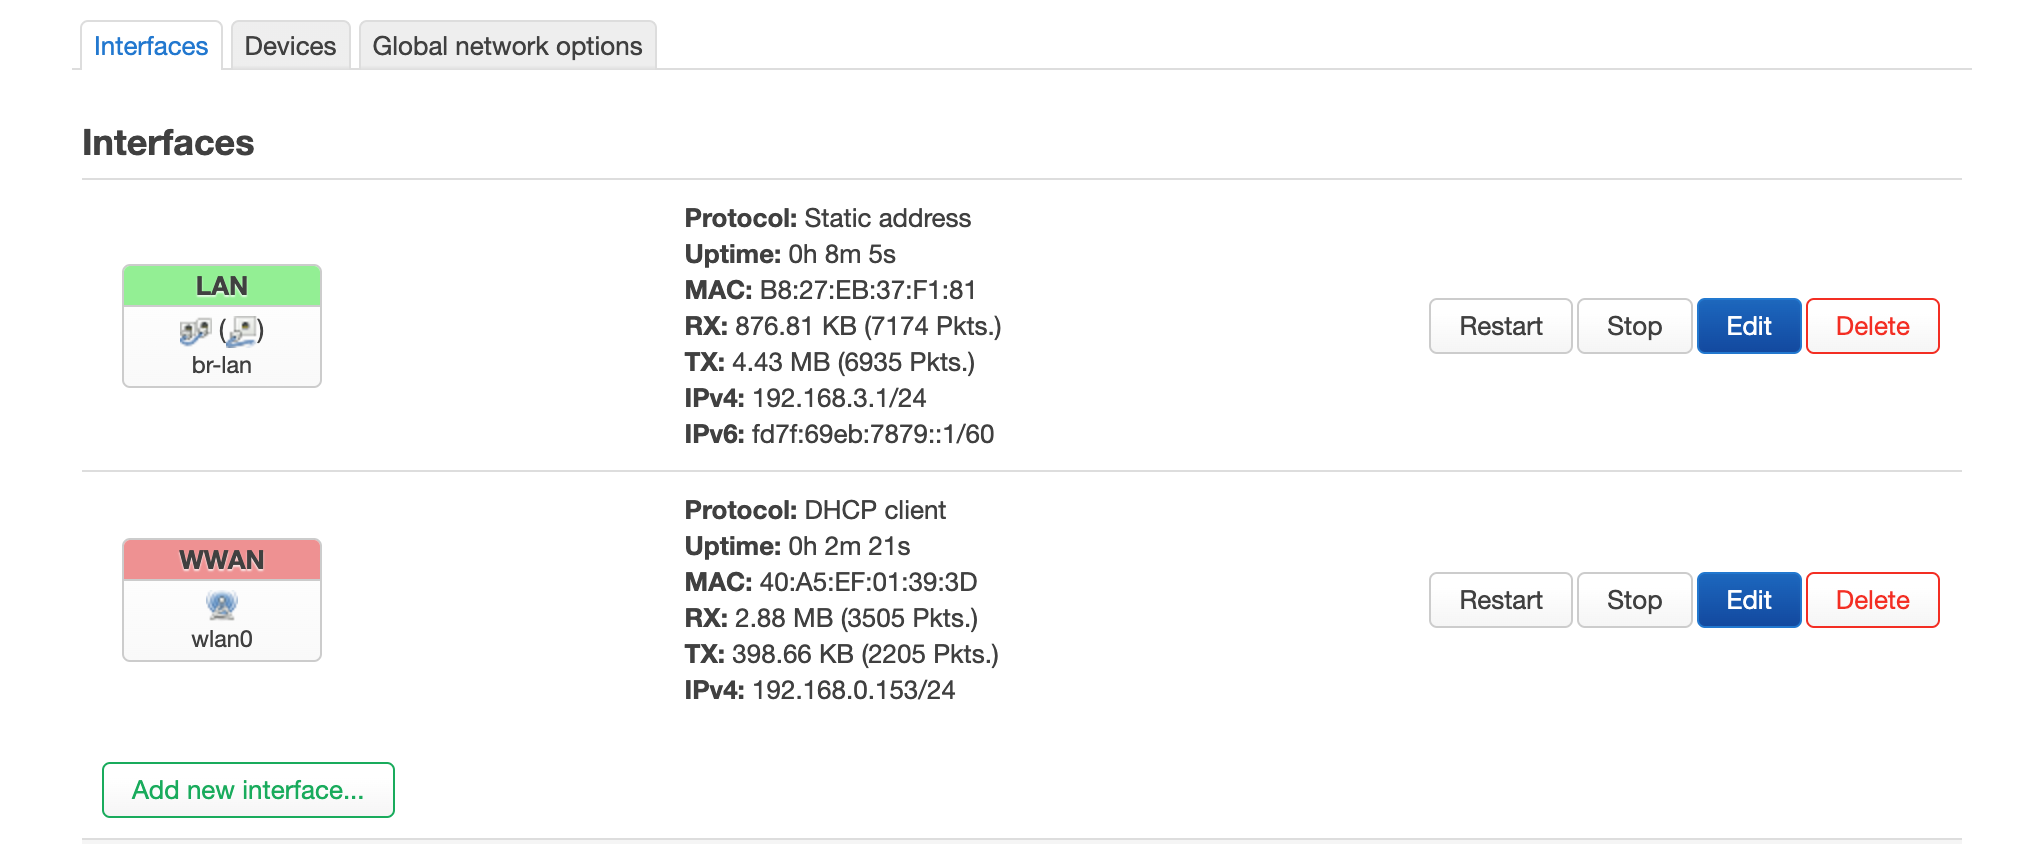
And we should be done! The pi has joined the home network through the wireless adapter!
Note: this procedure joins the wireless network as a client, which may be much different than others use cases, that would rather have the Pi act as a wireless access point. I may eventually write a more detailed blog post about why I want to use the Pi to bridge from wireless -> wired, instead of the other way around.
10. managing your Pi going forward
Once you unplug the ethernet cable, your ssh session and LuCI session will die, and you'll need to set up one using the new wifi ip address. However, I found that I could not access either ssh or LuCI through the wifi network. I had to re-connect ethernet directly to my laptop, and use the fixed ip 192.168.3.1.
What are some good steps to help troubleshoot this? Is this an intended firewall or something?
Appendix
Here are some commands that were useful to me while troubleshooting
dmesgshows the log of startup / when low level things change (like detecting new hardware after usb drivers)lsusb. You will need to install this withopkg install usbutils. It helps you see what's going on with the usb devices.lsusb -vgives more detail
Some other helpful docs
- Joining the wireless network for the first time. How to check on
/etc/config/network
https://openwrt.org/docs/guide-user/base-system/basic-networking