I recently bought a Raspberry Pi 5 and I am trying to configure it with OpenWrt but once I log into it, there is no internet access. These are the steps I follow:
| |.-----.-----.-----.| | | |.----.| |_
| - || _ | -| || | | || || |
|_____|| |||||___||| |____|
|| W I R E L E S S F R E E D O M
OpenWrt SNAPSHOT, r27995-57f2c72505
=== WARNING! =====================================
There is no root password defined on this device!
Use the "passwd" command to set up a new password
in order to prevent unauthorized SSH logins.
Also:
Please connect to your OpenWrt device using ssh and copy the output of the following commands and post it here using the "Preformatted text </> " button:
Remember to redact passwords, MAC addresses and any public IP addresses you may have:
root@OpenWrt:~# cat /etc/config/firewall
config defaults
        option syn_flood        1
        option input            REJECT
        option output           ACCEPT
        option forward          REJECT
# Uncomment this line to disable ipv6 rules
#       option disable_ipv6     1

config zone
        option name             lan
        list   network          'lan'
        option input            ACCEPT
        option output           ACCEPT
        option forward          ACCEPT

config zone
        option name             wan
        list   network          'wan'
        list   network          'wan6'
        option input            REJECT
        option output           ACCEPT
        option forward          REJECT
        option masq             1
        option mtu_fix          1

config forwarding
        option src              lan
        option dest             wan

# We need to accept udp packets on port 68,
# see https://dev.openwrt.org/ticket/4108
config rule
        option name             Allow-DHCP-Renew
        option src              wan
        option proto            udp
        option dest_port        68
        option target           ACCEPT
        option family           ipv4

# Allow IPv4 ping
config rule
        option name             Allow-Ping
        option src              wan
        option proto            icmp
        option icmp_type        echo-request
        option family           ipv4
        option target           ACCEPT

config rule
        option name             Allow-IGMP
        option src              wan
        option proto            igmp
        option family           ipv4
        option target           ACCEPT

# Allow DHCPv6 replies
# see https://github.com/openwrt/openwrt/issues/5066
config rule
        option name             Allow-DHCPv6
        option src              wan
        option proto            udp
        option dest_port        546
        option family           ipv6
        option target           ACCEPT

config rule
        option name             Allow-MLD
        option src              wan
        option proto            icmp
        option src_ip           fe80::/10
        list icmp_type          '130/0'
        list icmp_type          '131/0'
        list icmp_type          '132/0'
        list icmp_type          '143/0'
        option family           ipv6
        option target           ACCEPT

# Allow essential incoming IPv6 ICMP traffic
config rule
        option name             Allow-ICMPv6-Input
        option src              wan
        option proto    icmp
        list icmp_type          echo-request
        list icmp_type          echo-reply
        list icmp_type          destination-unreachable
        list icmp_type          packet-too-big
        list icmp_type          time-exceeded
        list icmp_type          bad-header
        list icmp_type          unknown-header-type
        list icmp_type          router-solicitation
        list icmp_type          neighbour-solicitation
        list icmp_type          router-advertisement
        list icmp_type          neighbour-advertisement
        option limit            1000/sec
        option family           ipv6
        option target           ACCEPT

# Allow essential forwarded IPv6 ICMP traffic
config rule
        option name             Allow-ICMPv6-Forward
        option src              wan
        option dest             *
        option proto            icmp
        list icmp_type          echo-request
        list icmp_type          echo-reply
        list icmp_type          destination-unreachable
        list icmp_type          packet-too-big
        list icmp_type          time-exceeded
        list icmp_type          bad-header
        list icmp_type          unknown-header-type
        option limit            1000/sec
        option family           ipv6
        option target           ACCEPT

config rule
        option name             Allow-IPSec-ESP
        option src              wan
        option dest             lan
        option proto            esp
        option target           ACCEPT

config rule
        option name             Allow-ISAKMP
        option src              wan
        option dest             lan
        option dest_port        500
        option proto            udp
        option target           ACCEPT


### EXAMPLE CONFIG SECTIONS
# do not allow a specific ip to access wan
#config rule
#       option src              lan
#       option src_ip   <<REDACTED>>
#       option dest             wan
#       option proto    tcp
#       option target   REJECT

# block a specific mac on wan
#config rule
#       option dest             wan
#       option src_mac  <<REDACTED>>
#       option target   REJECT

# block incoming ICMP traffic on a zone
#config rule
#       option src              lan
#       option proto    ICMP
#       option target   DROP

# port redirect port coming in on wan to lan
#config redirect
#       option src                      wan
#       option src_dport        80
#       option dest                     lan
#       option dest_ip          <<REDACTED>>
#       option dest_port        80
#       option proto            tcp

# port redirect of remapped ssh port (22001) on wan
#config redirect
#       option src              wan
#       option src_dport        22001
#       option dest             lan
#       option dest_port        22
#       option proto            tcp

### FULL CONFIG SECTIONS
#config rule
#       option src              lan
#       option src_ip   <<REDACTED>>
#       option src_mac  <<REDACTED>>
#       option src_port 80
#       option dest             wan
#       option dest_ip  <<REDACTED>>
#       option dest_port        120
#       option proto    tcp
#       option target   REJECT

#config redirect
#       option src              lan
#       option src_ip   <<REDACTED>>
#       option src_mac  <<REDACTED>>
#       option src_port         1024
#       option src_dport        80
#       option dest_ip  <<REDACTED>>
#       option dest_port        120
#       option proto    tcp
Please note that I get the same behavior with the OOTB files you listed from the SNAPSHOT, I have just made some minimal changes as suggested in the OpenWRT documentation.
Since I went through similar hurdle with my Pi 5 in the beginning, I am posting my steps. Hopefully will help you too.
Before Instructions, let me explain how my setup is,
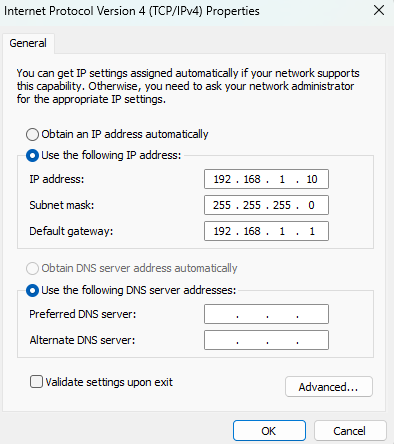
I have a main internet router with 4 downstream lan ports (This router is what I want to replace with pi5). My windows desktop is connected to this router via LAN and Ethernet on Windows is set to automatic ip.
Power up the Pi by connecting the onboard LAN of Pi to Windows PC LAN (yes disconnect windows pc from router) using an ethernet cable.
At this point Windows pc would have automatically got an IP address of 192.168.1.1/24 subnet as DHCP server is running on Pi5. Just ping 192.168.1.1 from windows PC and make sure that connectivity is there.
Using putty ssh to 192.168.1.1 with root as user. Port will be 22
Now run below commands on ssh session, Basically to turn off DHCP on lan and change Pi IP to 192.168.0.2. Also setting gateway as 192.168.0.1 (which is existing main internet router ip)
uci set dhcp.lan.ignore='1'
uci set network.lan.ipaddr='192.168.0.2'
uci set network.lan.gateway='192.168.0.1'
uci set network.lan.dns='8.8.8.8'
uci commit
/etc/init.d/network restart
Now disconnect the Pi from windows PC and connect Pi to Router's one of LAN port.
Connect Windows PC back to router LAN port
At this point if you ping 192.168.0.2(Pi) from Windows PC, you should be able to reach it. Then you can ssh back to Pi with same address. Also Pi should have internet access at this point.
If you are interested in further configuration, Run below in ssh sessions,
Access LUCI by 192.168.0.2 and go under Network->Interface click add interface
Give name wan choose protocol as ppoe (for me it is ppoe) Device as eth1 in the next screen make sure wan is selected under firewall also set ppoe username and password
change timezone according to yours.
Also edit lan interface and enable dhcp back (which we turned off in the beginning)
Now power off openwrt and connect main internet wan cable to usb to Ethernet adapter, and Pi onboard lan to Windows PC (or to a switch, or to your existing router one of LAN ports, you can make it as switch . But you will have to turn off DHCP on it)
Power On Pi and give 2 minutes or so, once WAN is connected, you should be able to access Internet in Windows PC.
I suspect that this thread is no longer relevant since the OP hasn't commented in about a month.
That said, the existing configuration has many potential issues, so if @regp is still looking for assistance, it's probably worth getting a fresh look at everything from the configs to the physical network topology.
Just out of curiosity does any of you know if the Raspberry Pi loaded with OpenWRT factory image comes up with just the LAN on the Interfaces screen ?
Or with both LAN + WAN already in the config but only LAN having any underlying devices (br-lan consisting of the ethernet port + the default disabled wifi radio) and WAN being an "empty" / unbound interface ?
I actually just tried to flash an SD to put in an RPi to check myself... But the only SD card I had in the box of gadgets (an official rpi sd card no less) had apparently exceeded its limits. It wrote bits for a little while but then started ignoring writes, and even came up as a read-only device when reseated..
That's the obvious issue here. He neglected to setup the built in wireless radio to connect to his wifi. Normally, this is easiest done with Luci. If he can SSH to 192.186.1.1 he can connect to Luci web interface by browsing to that address. Since RP5 is only supported in SNAPSHOT, he'll likely have to install Luci from the command line to do this, but without the Internet, he won't be able to install the package. I suggest he build a firmware again with Luci included and start over.
It would be real nice with an "OpenWRT Image Generator" where you could select your device and click "i want the wifi enabled, use this password" or "i want the config to start with routed / bridged mode" or "set the default lan ip to this", wouldn't it?
Just like the rpi has the "Raspberry Pi Imager" that takes an image as the input, modifies the .txt config files according to options, and spits out a new image.
(rpi imager also writes to sdcards and has a desktop app and various unnecessary bells and whistles but whatever, but thats besides)
Recently I've been doing a lot of setups of various factory images to test a problem. For someone who wants to work with a factory image instead of a custom build, below is what I did (annotated).
# This is a setup for a stock factory image that has been
# flashed to a micro-SD card.
#
# Since release 24.10.0 and SNAPSHOT both support bootable external
# SSD drives, the factory image could also be flashed to a USB SSD drive.
#
# The hardware setup is a Raspberry Pi model 5B
# with a power supply, an HDMI monitor, a keyboard, and a TRENDnet gigabit
# ethernet adapter (which will be used as the LAN port when setup is complete).
#
# Note that this also works for a Raspberry Pi model 4B.
# Also for a Raspberry Pi model 3B+, although the network throughput
# is more modest than for the model 4B and 5B.

# I start with the eth0 port unplugged, since both the cable modem and port eth0
# are initially trying to serve IP addresses to each other.

uci show network

uci set network.@device[0].ports='eth1'
uci set network.lan.defaultroute='0'
uci set network.lan.delegate='0'

uci set network.wan=interface
uci set network.wan.device='eth0'
uci set network.wan.proto='dhcp'
uci set network.wan.defaultroute='1'
uci set network.wan.delegate='0'

uci commit network
service network restart

# Connect the WAN ethernet cable to eth0 port and
# wait for WAN IP address assignment from cable modem.

# Check to see that a WAN address has been assigned before proceeding.
ifconfig

# The commands to install packages up until SNAPSHOT release are:

opkg update
opkg install kmod-usb-net-asix-ax88179
opkg install nano

# The commands to install packages for a SNAPSHOT release are:

apk update
apk add kmod-usb-net-asix-ax88179
apk add luci luci-ssl
apk add nano

# Optional - To enable rudimentary Wi-Fi on LAN port with WPA2-PSK security.
# Useful if there's no second ethernet port to connect to.

uci set wireless.radio0.disabled='0'
uci set wireless.radio0.country='US'
uci set wireless.default_radio0.disabled='0'
uci set wireless.default_radio0.ssid='my-network-name'
uci set wireless.default_radio0.encryption='psk2'
uci set wireless.default_radio0.key='mywifipassword'
uci commit wireless
service network restart

# Once this setup is complete, one should be able to connect in via Luci and finish
# the setup.
Very nice method. Quick question I have is are you just booting the factory image and hooking it up to a monitor and keyboard to enter the UCI commands since you aren't connected to anything? I am being a little Captain Obvious here but often beginners may not know the obvious.
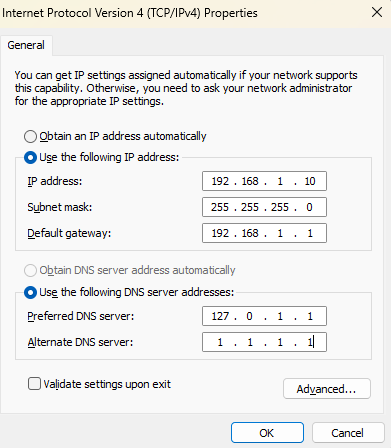
I usually just set my PC to the static address while connected to the eth0 and turn on the radio through luci, then switch my PC back to DHCP and the Pi has Internet through the wireless and you can do all the setup after that.
The 24.10.0 includes luci in the default image, so it will work. But knowing your basic UCI method is quite valuable. I bought a dozen cheap 4GB microSD cards and experimented with lots of Raspberry Pi setups. Very versatile single board computer. I'm not using my RP5 as a router. The hardware is too good and I have a very nice complete desktop setup for that. My older RP4 is a router, AdBlock DNS and Wireguard VPN server all in one and I haven't touched it in months since it's running it all so well.