In June I had installed OpenWrt 21 for the first time on a WNDR4700. I just saw where 22 was released for it so I downloaded the sysupgrade and ran it from the interface. Now the router just keeps power cycling. Please help!
Something is wrong with openwrt-22.03.0-apm821xx-nand-netgear_wndr4700-squashfs-factory.img. I used nmrpflash to revert back to Netgear and then tried this factory img instead of the sysupgrade like I originally tried and ended up with the same results where it keeps power cycling. So I once again used nmrpflash reverted back to Netgear and then installed the openwrt-21.02.3-apm821xx-nand-netgear_wndr4700-squashfs-factory.img that I was originally using. Hopefully somebody with this model can get it worked out.
I want to +1 this post! I had the same issue. Had a perfectly well working WNDR4700 running 21.02. Tried to upgrade to 22.03 and it partially bricked the router. It wouldn't start up and was just power cycling.
I ended up using tftp to revert it back to Netgear firmware, and then reinstalled 21.02 with zero problems. (And fortunately had a backup of all my configurations.) But two hours later, was very annoyed!
I did see a post about having to using the serial console on a RC of 22.03 to fix this issue, but I haven't opened up my router yet, so don't have access to the serial port and thus don't know if that works for the actual release. Seems odd taht this bug would exist into the actual release! Hope it gets fixed soon!
https://forum.openwrt.org/t/openwrt-snapshot-and-22-03-0-rc4-boot-issue-on-netgear-wndr4700/130838/7
Hi All - I'm following up on this in case it helps future folks. I was able to get OpenWRT 22.03.3 running on my Netgear WNDR4700. Opening up the router and connecting to the serial interface to change the boot commands ended up being very easy. I had to buy like a <$4 piece of hardwear and that's it. (Your mileage may vary.) Here's what I did. (I'm using MacOS, but I imagine that it will work highly similarly in other environments.)
1) I had to purchase a TTL-to-USB device. I bought this one: https://www.aliexpress.us/item/3256802733401893.html because it was cheap and I was ordering other stuff from AliExpress. But I imagine that almost any other TTL-to-USB converter you could find on there or on Amazon or whatever would work
2) Open up the WNDR4700. This requires having some Torx security bits for your screw driver. (Or, I guess, just cutting it all apart). I happen to already have this $6 set from Menards: https://www.menards.com/main/tools/power-tool-accessories/drive-bits-accessories/tool-shop-reg-security-insert-drive-bit-set-33-piece/534/p-1444421217846-c-10156.htm . Worked fine.
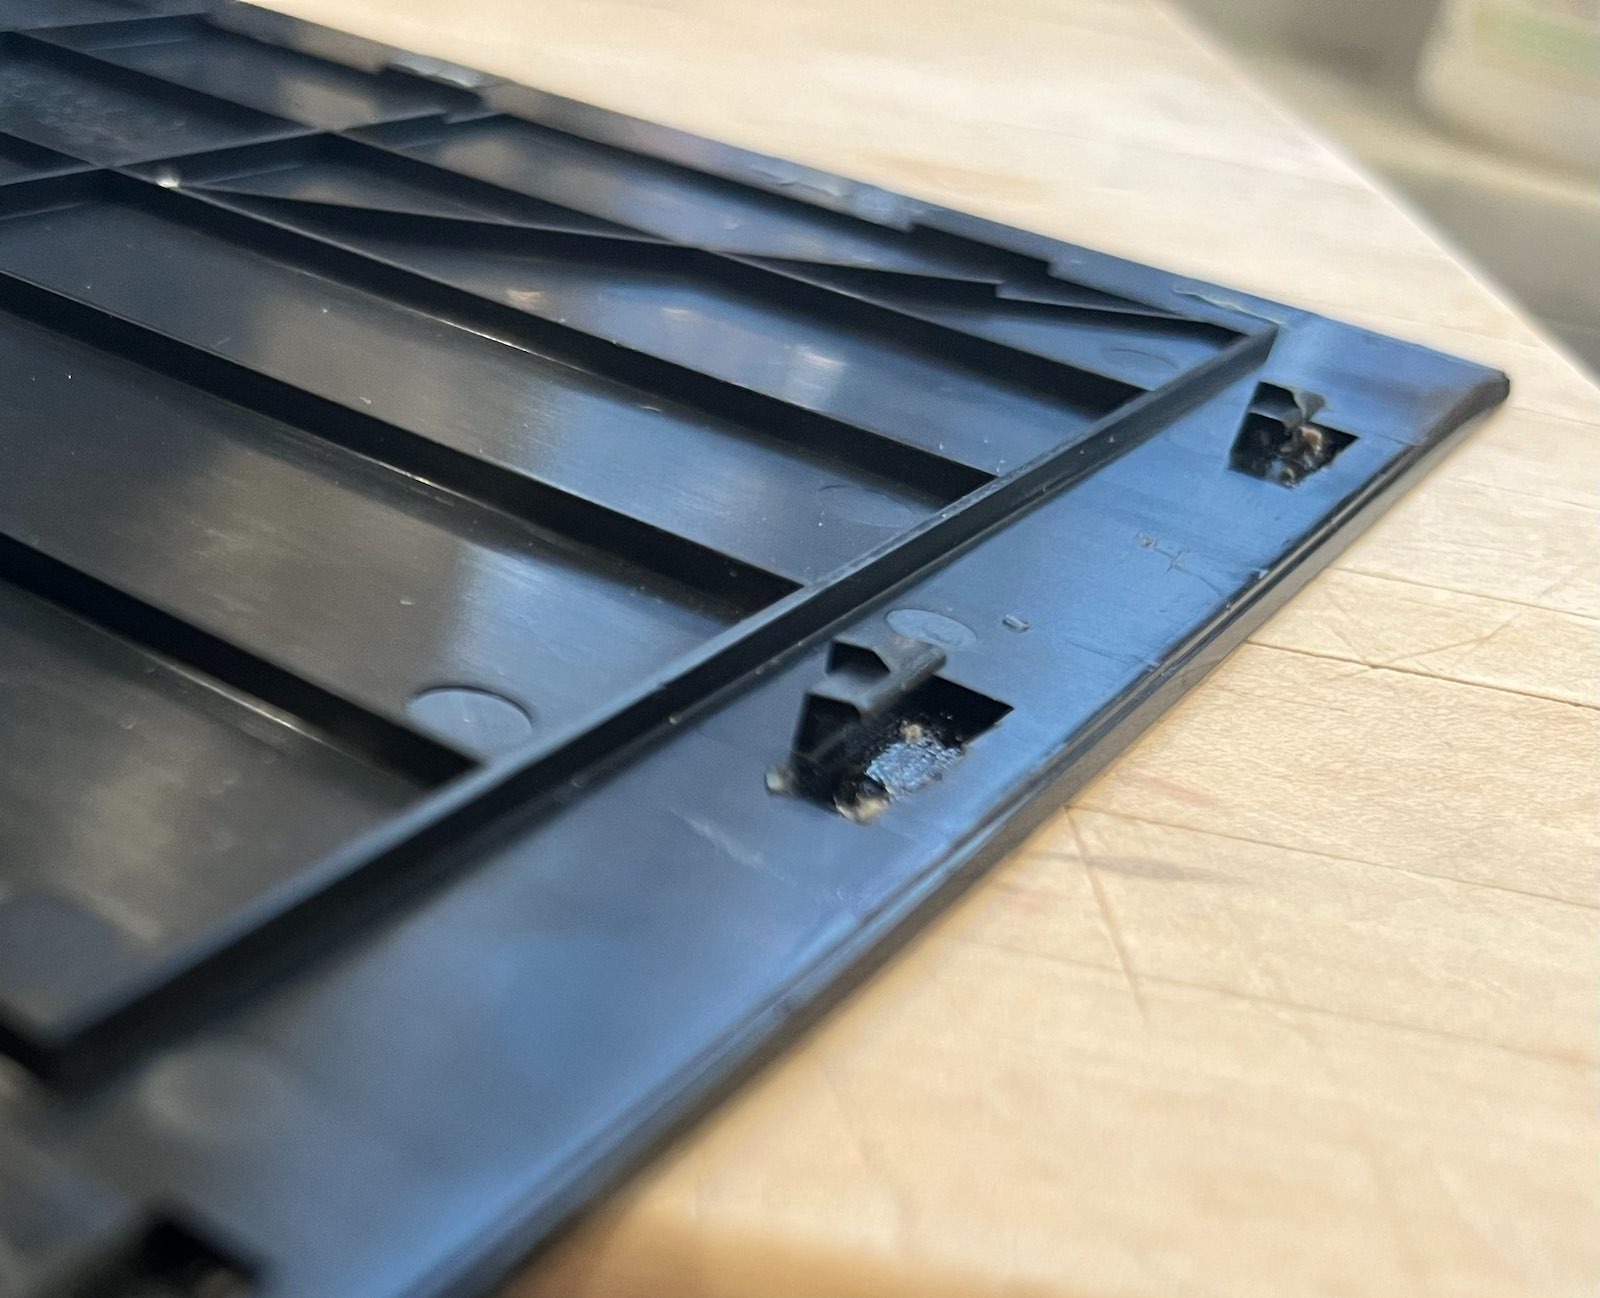
There are two screws on the bottom stand of the router to take out. Then you can take off the stand. This will uncover two more screws to take out. Then you can pry off the front face of the router. There are some plastic clips that hold it on. (3 on the side the hard drive goes in, 2 on the other side, and 6 along the top.) I just used a small flathead screw driver to et in there and try to undo the clips. Some of them broke. C'est la vie. Here's a picture of the inside of the front panel and a closeup of the clip profile, so you can see what you're dealing with:

Once you have the front cover off, there are three more big Torx screws to remove (that hold the motherboard to the plastic casing. Then carefully detach the cables that lead to the hard drive and the fan, then it should lift out.
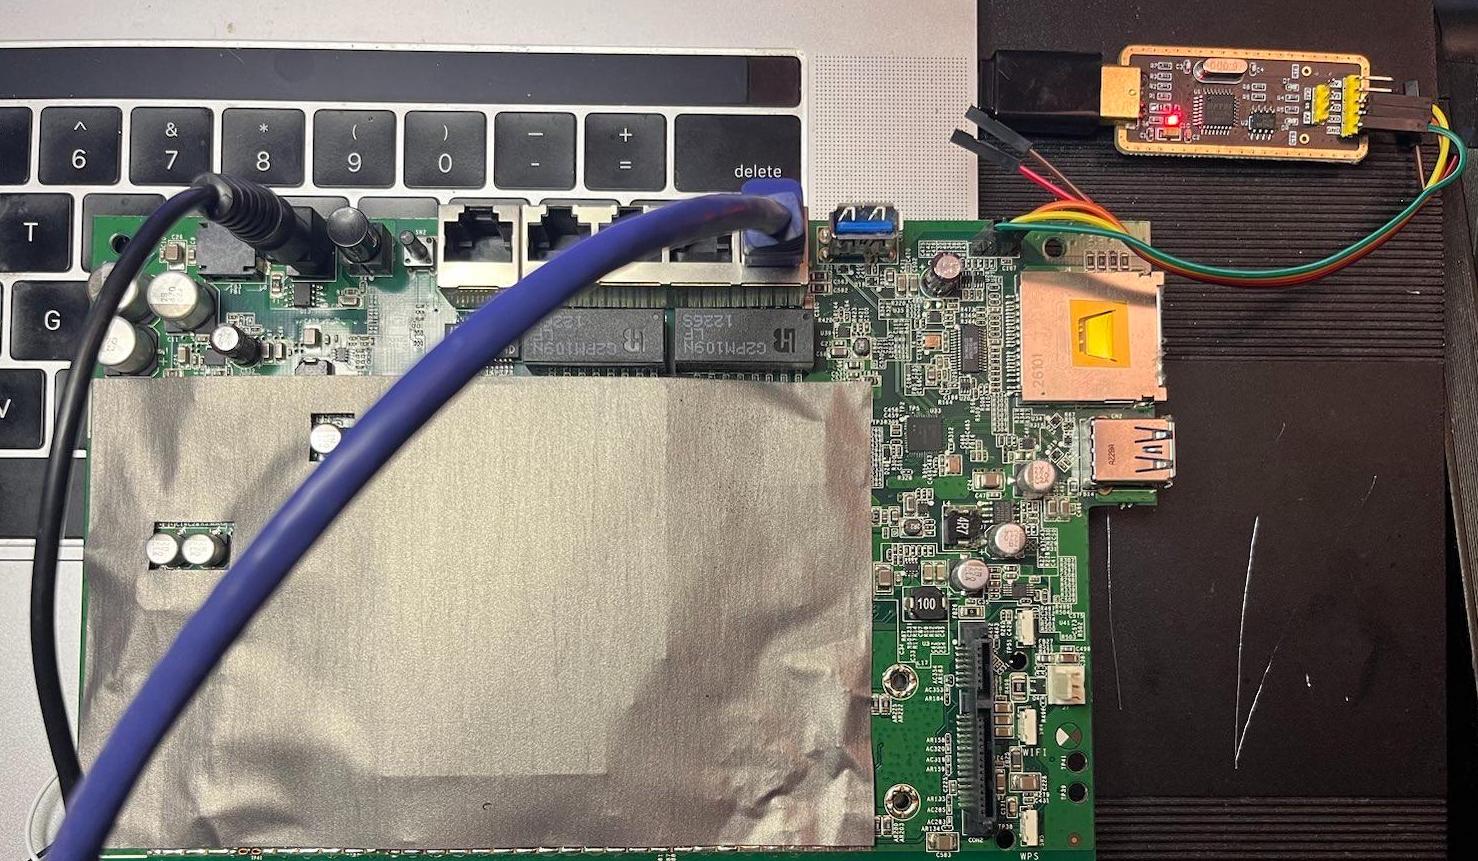
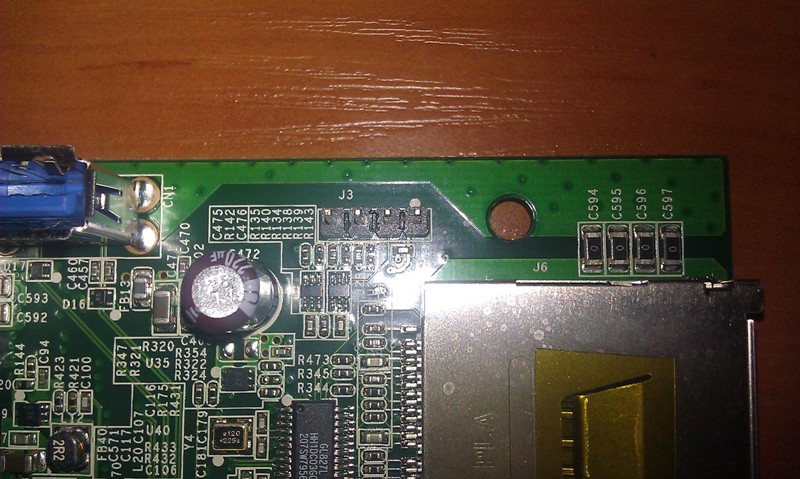
The serial pins you're looking for are 4 pins next to the usb slot, under a marking that says J3. This picture shows it: https://openlinksys.info/images/centria/IMAG0813.jpg
3) Connect the TTL-to-USB converter. Oriented so that the pins are at the top of the board and to the right of the USB input, the first three pins are: GND, TXD, and RXD. The fourth pin (one to the farthest right) isn't needed.
Connect the leads of the TTL-to-USB converter to those three pins in the correct order. Note that on my TTL-to-USB converter itself the order is GND ,RXD, TXD, so you need to flip the order of the second and third cable.
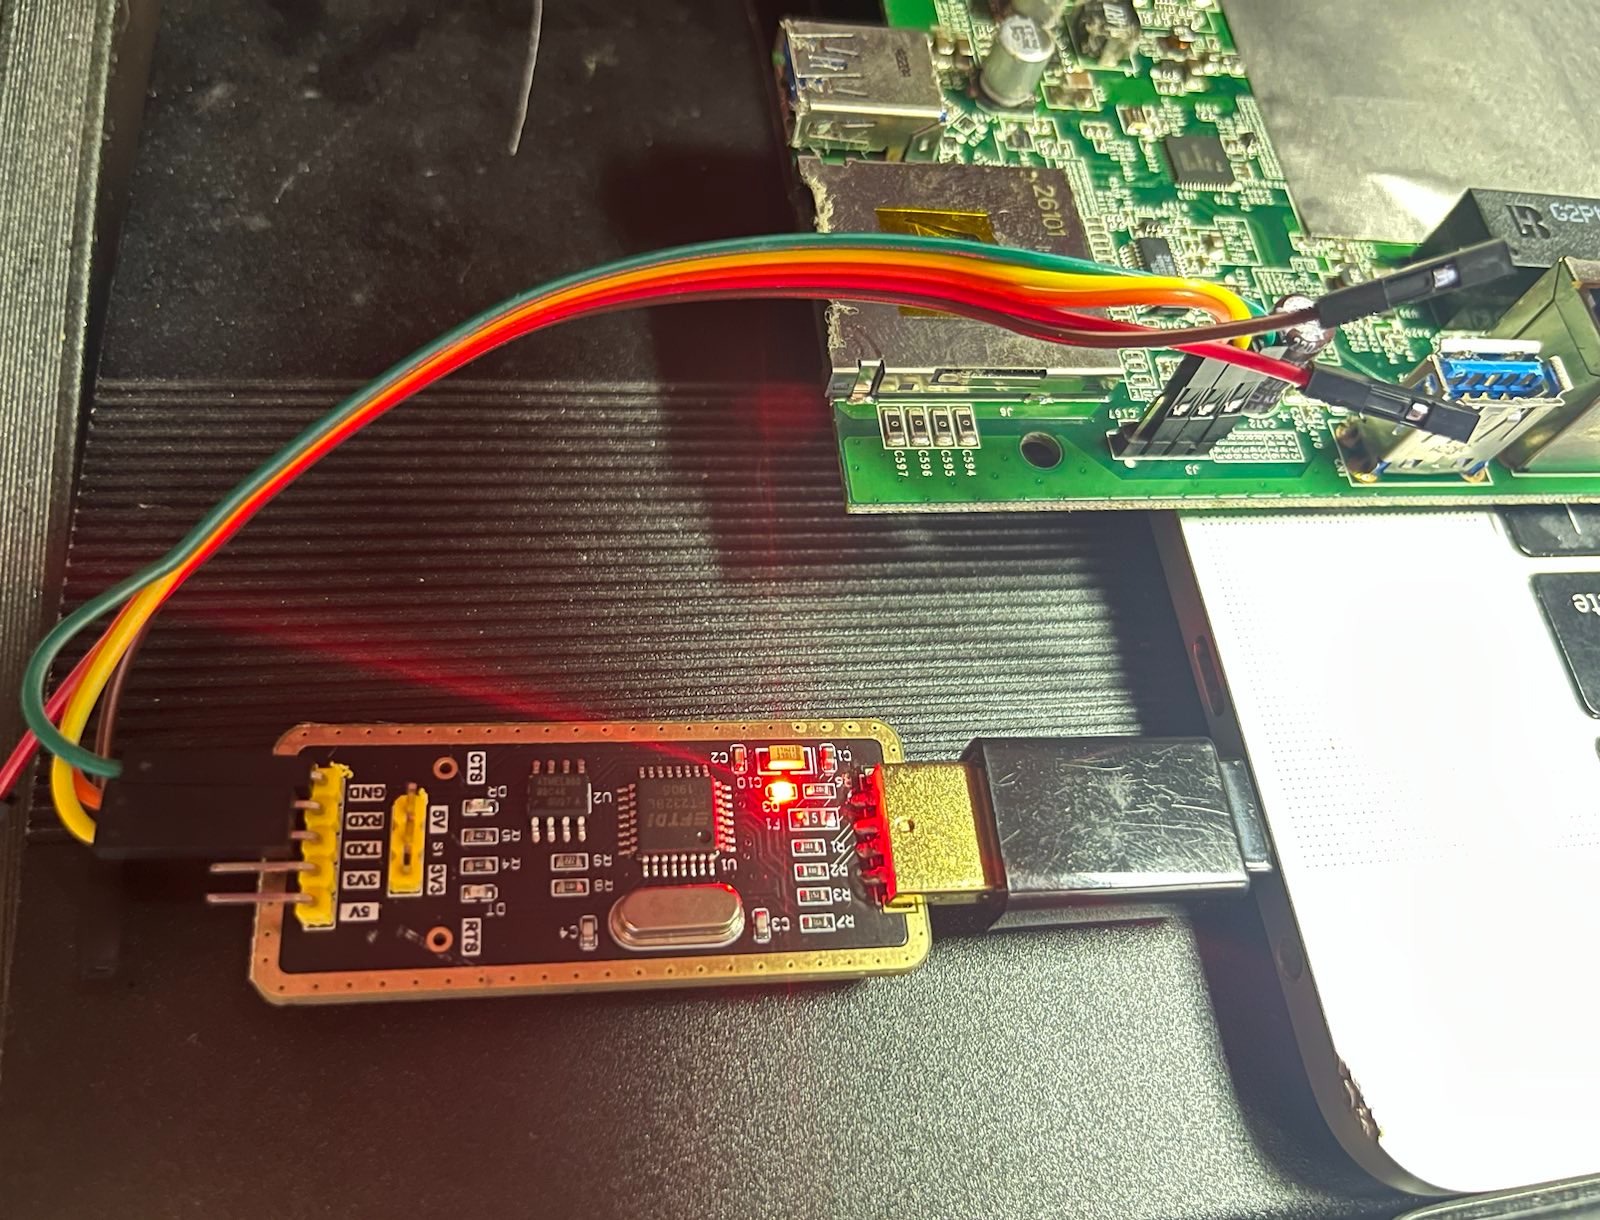
Here are pictures of it plugged into my mac. (Green cable plugged into ground, Yellow to TXD, and Orange to RXD. Other two cables are not connected.) Also note that my TTL-to-USB converter came with some jumpers plugged into some of the pins when I got it. I removed those.
4) Connect it to your computer. First you figure out which device it is in your computer. So, before plugging in the TTL-to-USB into your computer, run this command:
ls /dev/{tty,cu}.*
Then plug in the TTL-to-USB converter and run the command again. You sould see one new entry in the list. For me it was /dev/tty.usbserial-1410. So, I then ran:
screen /dev/tty.usbserial-1410 115200
Your terminal screen will go blank. Now, finally plug in and turn on the WNDR4700. Your screen should come to life!
5) Modify the boot command to make it work. All credit for this goes to: https://github.com/openwrt/openwrt/issues/9833
A few seconds after starting up, you'll see on your screen:
Hit any key to stop autoboot
You then have about 2 seconds to hit a key. Once you do it will drop you to a command prompt. In the prompt enter:
 setenv bootcmd "if loadn_dniimg 0 0x180000 0xae0000 && chk_dniimg 0xae0000; then bootm 0xb00000 - 0xae0040;else fw_recovery; fi"
 saveenv
 run bootcmd
The router should then restart.
6) Upgrade. After that I connected my laptop to the ethernet port, and logged into the LUCI interface like usual through a web browser. Then upgraded using the "netgear_wndr4700-squashfs-sysupgrade.bin" package from here: https://downloads.openwrt.org/releases/22.03.3/targets/apm821xx/nand/
It all worked without an issue. Router restarted and am now running 22.03.3.
So this fix comes down to changing a boot parameter. That may be possible from within OpenWrt (the old version of course) by using uboot-envtools.
Well...you learn something every day! Hopefully saves some time for future folks. I didn't know that package existed. Would have saved some time! It's funny that the other posts on this topic didn't mention that at all. Maybe it's just common knowledge and I'm out of the loop.
(But it was also sort of fun to crack open my router, so I got that out of it.)
I've installed the uboot-envtools package but it does not have /etc/fw_env.config defined. I manually created the file but I don't know what the right settings are to get it to show the uboot environment. So currently the upgrade to 22.03 does require serial connection unless someone can define the correct settings for /etc/fw_env.config
There's some information here about it which may prove useful
The wiki has a page that describes how to find the uboot settings:
However when I search the following file I can't find anything related to 'ENV' so I don't know how to define /etc/fw_env.config.
Can you post the output of dmesg, in particular the part that looks similar to
[    0.505477] 0x000000000000-0x000000030000 : "uboot"
[    0.512242] 0x000000030000-0x000000040000 : "uboot_env"
[    0.518030] 0x000000040000-0x0000007f0000 : "firmware"
[    0.563673] 0x000000040000-0x0000001c906c : "kernel"
[    0.570525] 0x0000001c906c-0x0000007f0000 : "rootfs"
[    0.586168] 0x000000720000-0x0000007f0000 : "rootfs_data"
[    0.639581] 0x0000007f0000-0x000000800000 : "board_config"
This example looks promising
You can then run fw_printenv and if the values are correct it will print the uboot variables, if not, no harm done as its just reading.
Edit:
Looks as though you can use the following to make partitions writable! No need to create a new image especially.
opkg update
opkg install kmod-mtd-rw
insmod mtd-rw i_want_a_brick=1
There is no clear uboot-env mtd part in dmesg. It could be that the environment is included as part of uboot mtd but messing with that will have a high risk of bricking the device.
[    7.186686] nand: device found, Manufacturer ID: 0xad, Chip ID: 0xf1
[    7.193060] nand: Hynix H27U1G8F2BTR-BC
[    7.196888] nand: 128 MiB, SLC, erase size: 128 KiB, page size: 2048, OOB size: 64
[    7.204448] Scanning device for bad blocks
[    7.222571] Bad eraseblock 228 at 0x000001c80000
[    7.277311] 12 fixed-partitions partitions found on MTD device 4e4000000.ndfc.nand
[    7.284890] Creating 12 MTD partitions on "4e4000000.ndfc.nand":
[    7.290876] 0x000000000000-0x000008000000 : "NAND 128MiB 3,3V 8-bit"
[    7.298613] 0x000000000000-0x000000180000 : "uboot"
[    7.304071] 0x000000180000-0x0000001a0000 : "device-tree"
[    7.310048] 0x000000180000-0x000000500000 : "kernel"
[    7.315633] 0x000000500000-0x0000019e0000 : "ubi"
[    7.321012] 0x0000019e0000-0x000001a60000 : "config"
[    7.326567] 0x000001a60000-0x000001ae0000 : "pot"
[    7.331862] 0x000001ae0000-0x000001de0000 : "traffic_meter"
[    7.338020] 0x000001de0000-0x000001fa0000 : "language"
[    7.343737] 0x000001fa0000-0x000007fc0000 : "ecos"
[    7.349688] 0x000007fc0000-0x000008000000 : "wifi_data"
[    7.355513] 0x000000180000-0x0000019e0000 : "firmware"
Its definitely inside the uboot mtd. The wiki page says
Some devices seem not to have the
uboot_envsection and the environment appears with an offset in the section containinguboot(/dev/mtd0) here. In the latter case expect that the environment address (offset) is a multiple of Flash sector size.
Just need to find where CONFIG_ENV_OFFSET and CONFIG_ENV_SECT_SIZE are set. I tried to download the GPL source code from tplink but it wasn't obvious what the values were.
Once the values have been found, might be useful to update the following file so they're set on install (if I understand correctly).
From the file there seem to be some common values. According to the wiki if it's wrong you'll just get a CRC error when you do fw_printenv, just shouldn't do fw_setenv. Might be worth giving the values in the above file a shot, if you feel like doing so. Nothing to lose as far as I can see.
I've tried a few of those settings but none work unfortunately. When I dump mtd1 from within openwrt and then run the strings command on linux I can see the environment variables at the end of mtd1. So they are included and it just requires the right settings in /etc/fw_env.config to be able to modify them from the running system. The router is at my parents place so it will stay on OpenWrt 21 and next time I visit I'll investigate further or I will bring a serial adapter and some torx screwdriver to do the update.
Do you have a copy of the mdt1 that you could share? Should be able to find something in a hex editor perhaps. Would be interesting to poke around.
Hello,
I use https://downloads.openwrt.org/releases/22.03.3/targets/apm821xx/nand/openwrt-22.03.3-apm821xx-nand-netgear_wndr4700-squashfs-factory.img to flash my WNDR4700, everything seems Okay during fireware update on manufacture web interface, however after reboot, the router can not come back.
power LED keeps reflashing.
Hello Quadari,
can you put all details about tftp setup?
Quite a few netgear routers can be unbricked using nmrpflash. Have a look at the link below for the details:
I've uploaded mtd1 over here:
1 Like
Could you try
/dev/mtd1 0x40000 0x2000 0x20000 2
I think read should work but I wouldn't write using those settings.
In theory I guess someone could make the mtd partitions read write using kmod-mtd-rw and write a mtd1 dump with updated bootcmd command to their mdt1. This would then be picked up on next boot. I wouldn't recommend this and I'm just thinking out loud.
Defintely needs someone with more knowledge providing the values for fw_env.config. I'll give up now ![]()
I have tried all 3 major version(19.07, 21.02, 22.03), none of them can boot my wndr4700, so I have to use nmrpfalsh to recovery to Netgear factory img.