Ok, have you a nice day without putty)
I cant do anything to restore partitions in that openwrt console.
Maybe it is another way to enter recovery menu but i could not enter it

What's stopping you from doing something? Can you give details or should we consult a magic ball?
Hello everyone. I decided to write my FAQ on how to restore this device (AN8855, foresee) to working condition after brick. It's possible that other router models can also be restored this way.
ATTENTION! My English not good and i'm lazy, so i AI_translated it from Russian version(4pda.to) to English with my corrections. Sorry for mistakes. If you find them - say it to me.
ATTENTION! We will assume that all backups were made before the brick process began. But if there are no backups, they can be found here.
ATTENTION! Here the experiences and FAQs of both 4pda.to users and Openwrt community are used. I will add all the links to the original posts at the end.
ATTENTION! All operations performed under Windows administrator account. On Linux, it will be similar but slightly different...
PREPARATION
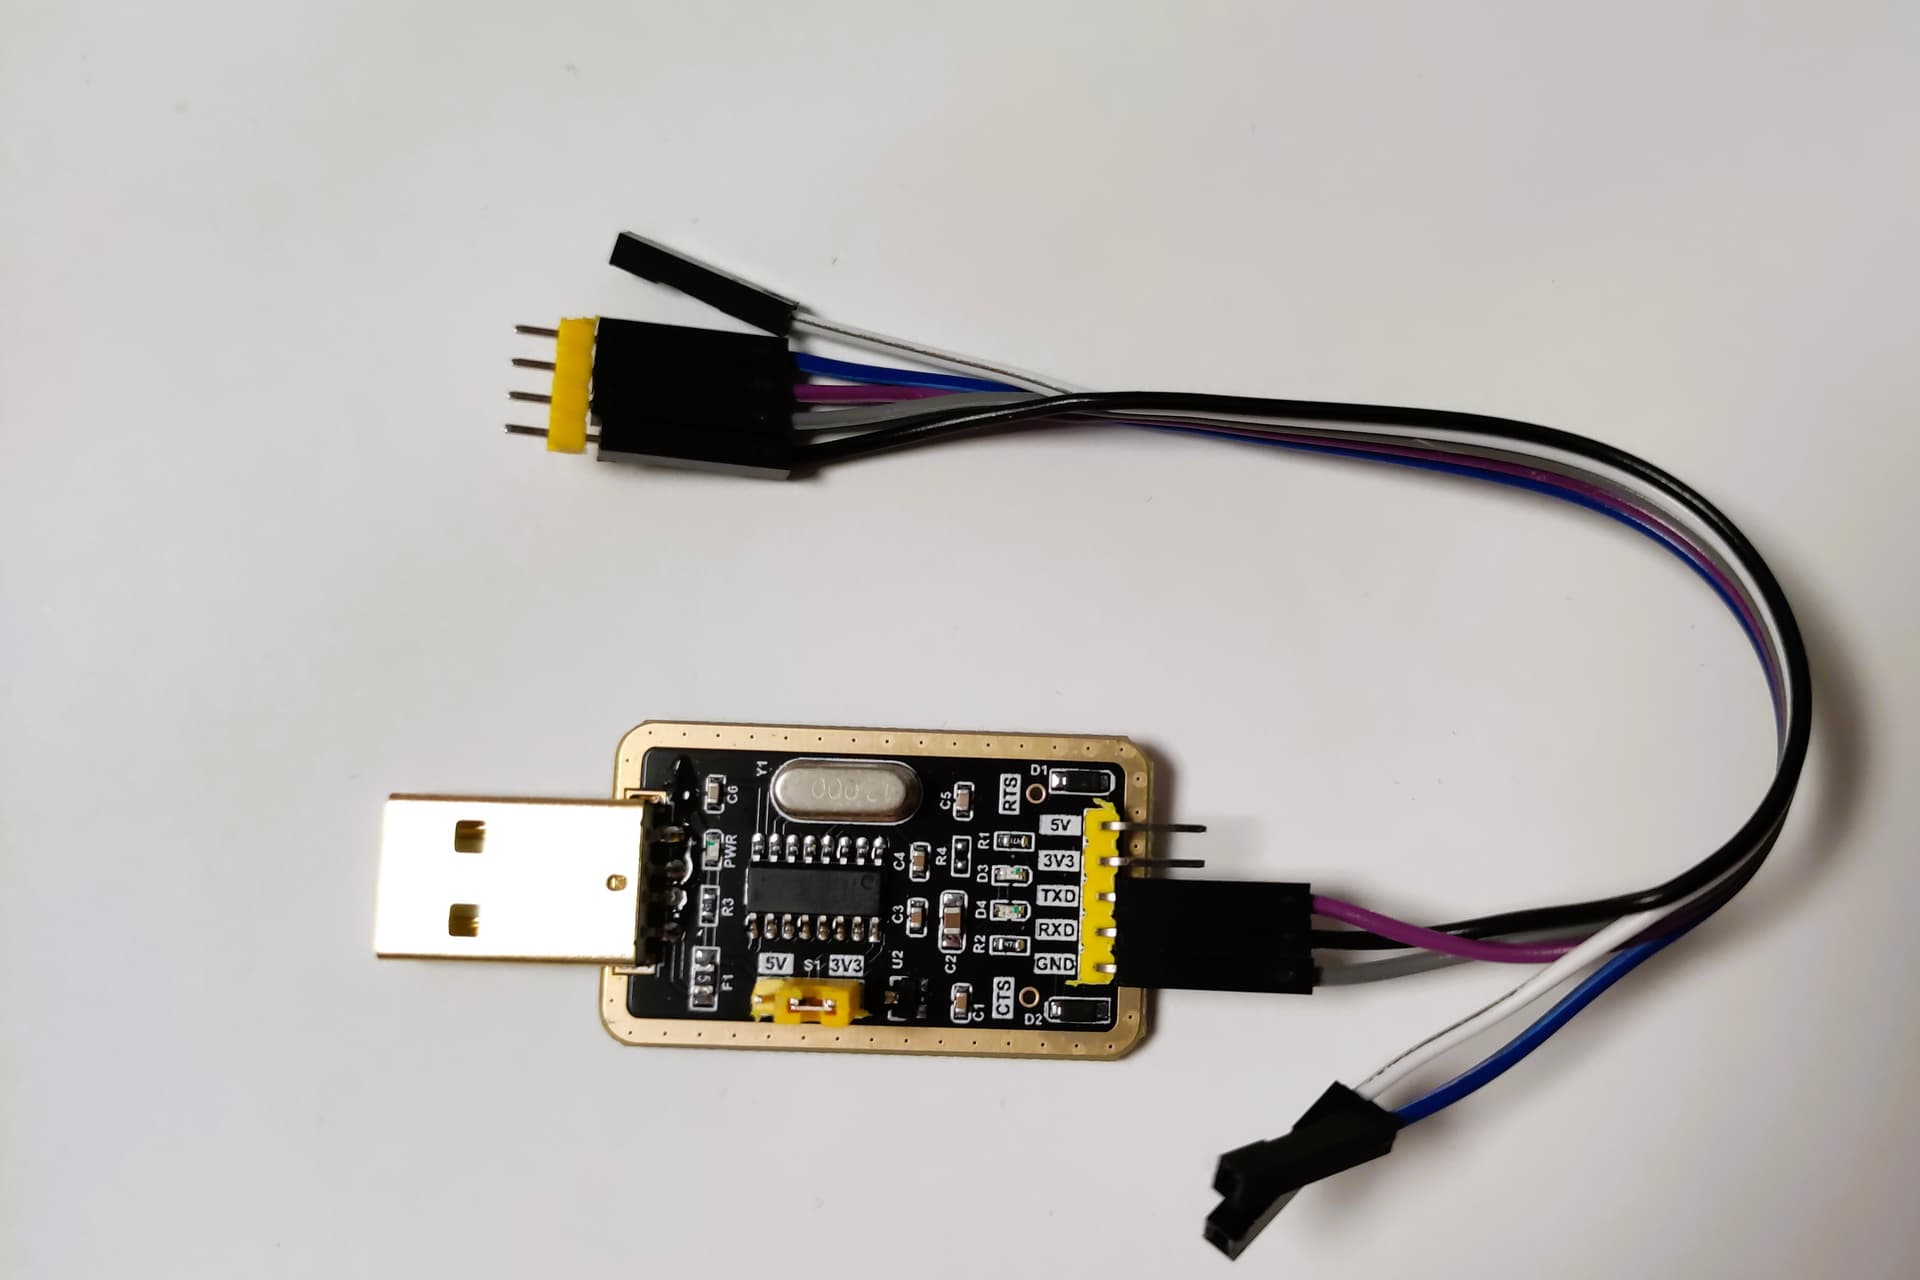
As far as I understand, everyone here thinks that a person who wants to restore their router should already know everything about UART. But that's not the case. So, I'm just posting an example of a converter for connecting to the router here. Attention! You need a ch340 chip.
100% of screenshots and photos are from openwrt forum ![]()
So, before you start:
-
Buy/find UART adapter and 3 pins for connecting to the router.
-
Download the necessary archive and unpack it FAQ.zip
-
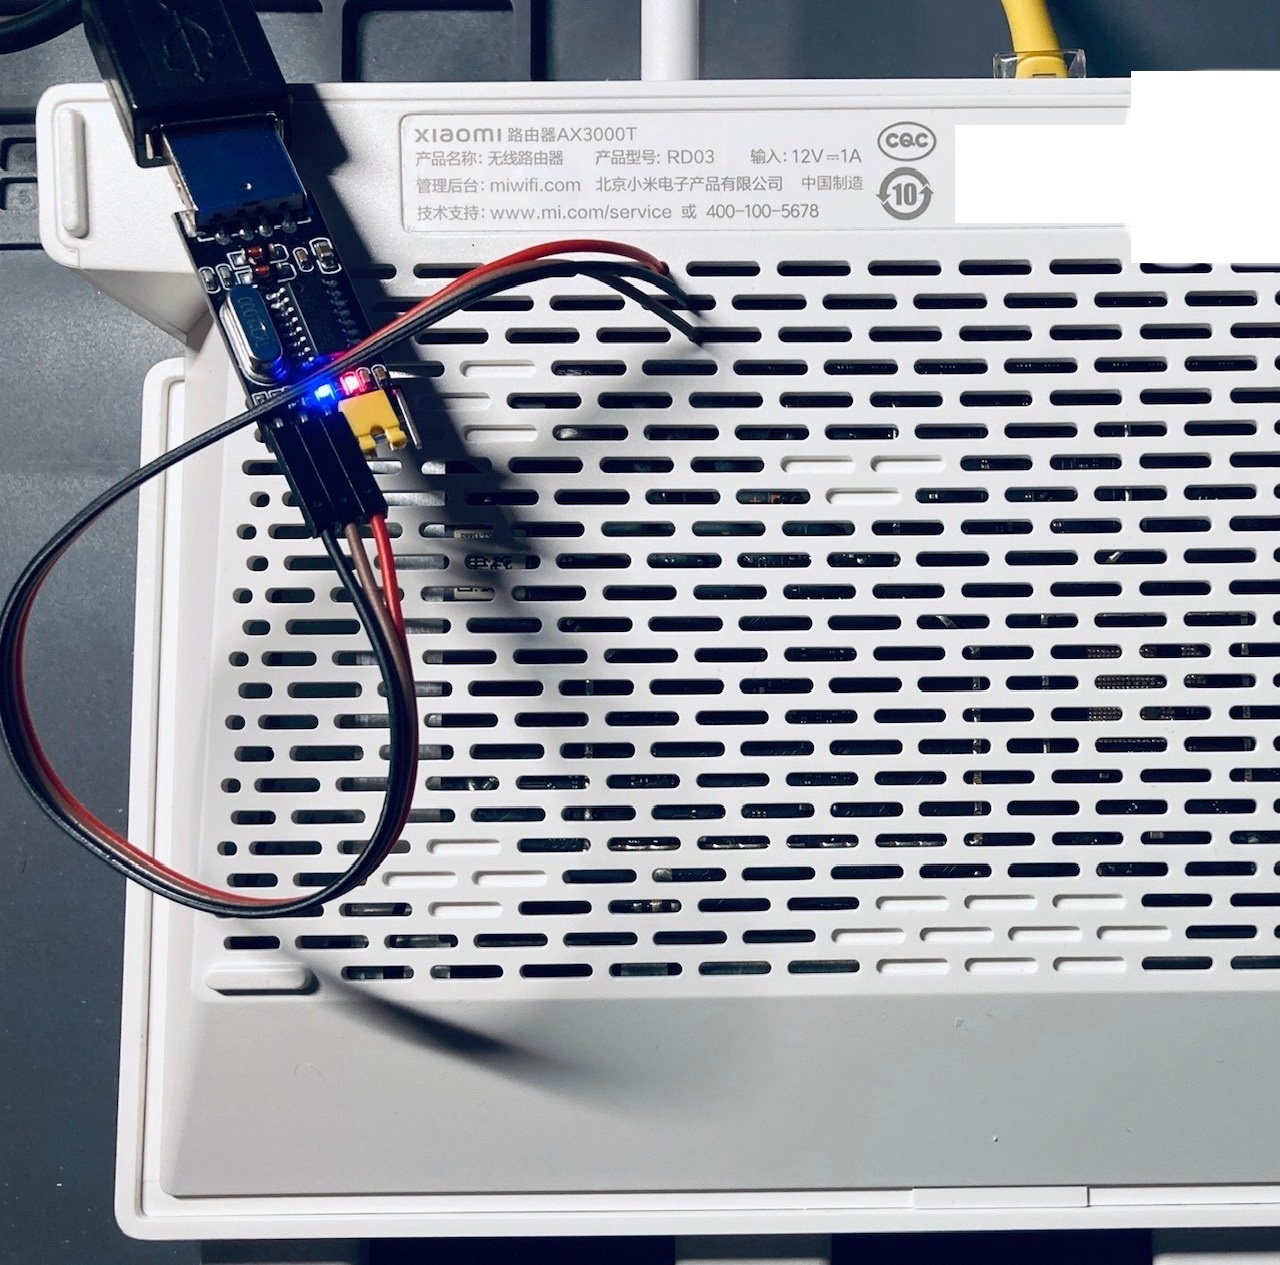
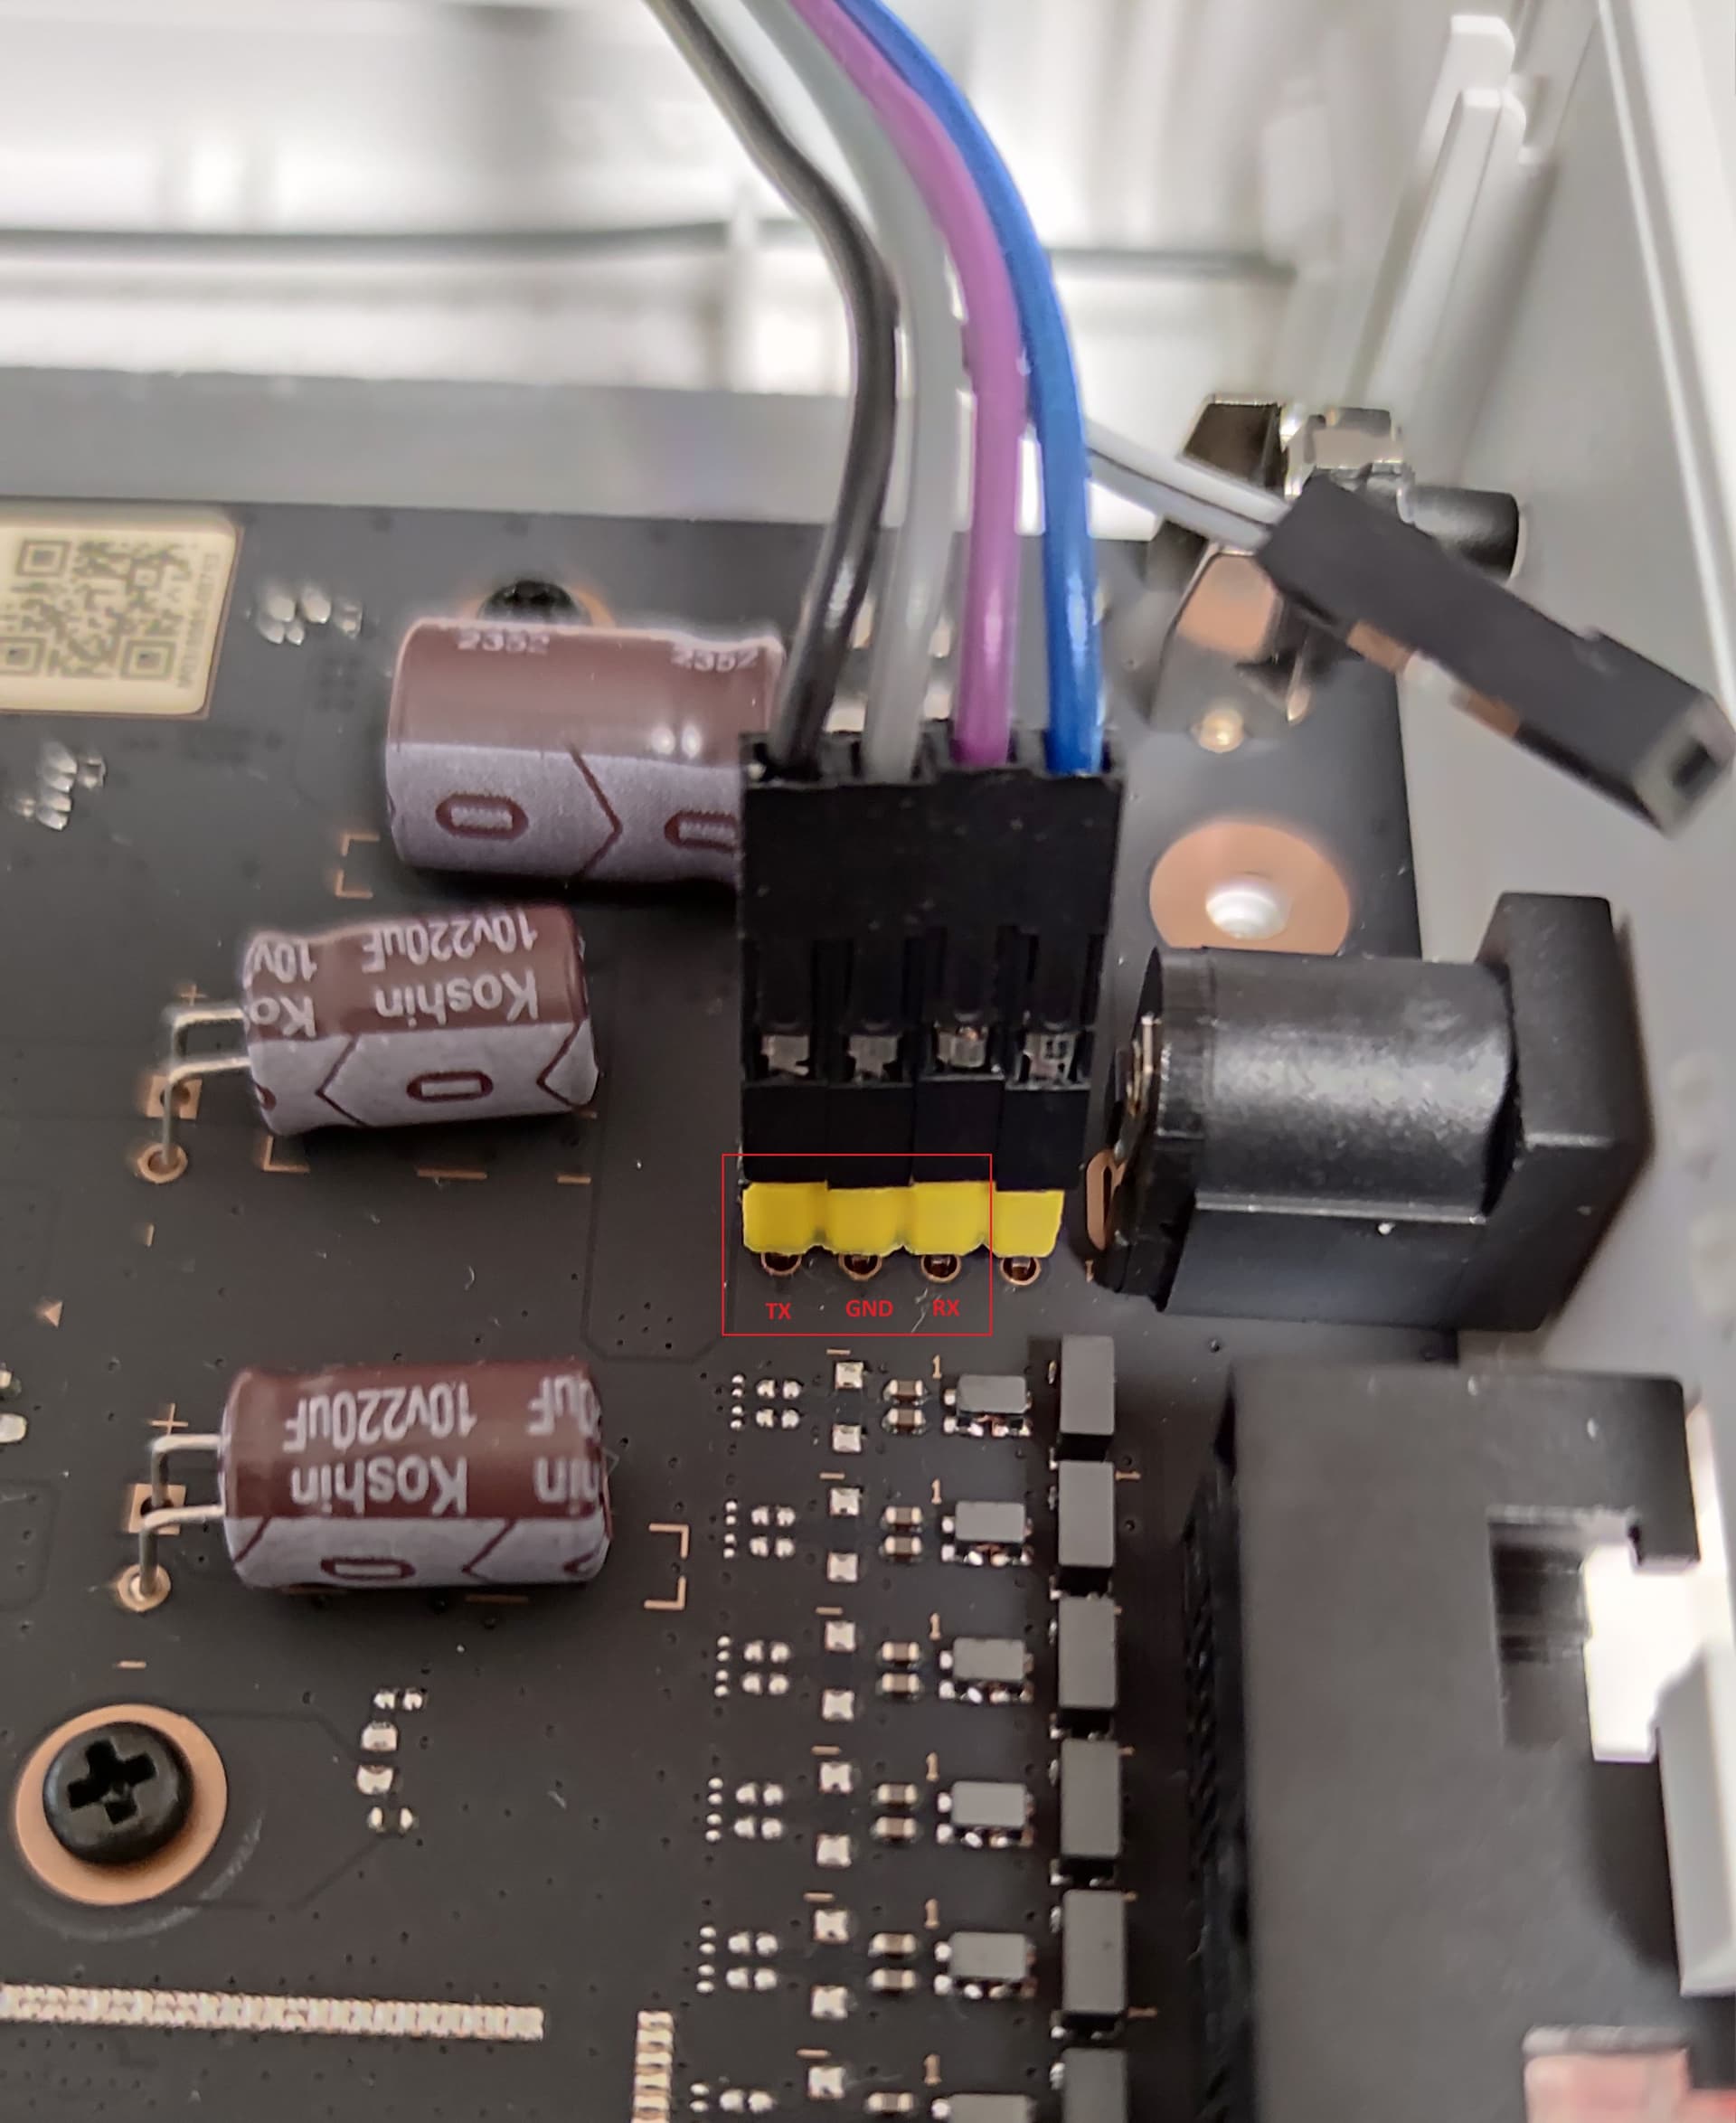
Open the router (yes, you don't have to open it, look here OpenWrt support for Xiaomi AX3000T - #1543 by Ser9ei) and connect the pins. Attention! Reverse pin connection is used. That is, you should connect the TX from the adapter to the RX of the router, and vice versa:
TX -> RX
GND -> GND
RX -> TX


- Perform a test connection and check if everything is working. Connect the adapter to the computer (of course, the pins should already be connected to the router and adapter in the correct order), check if a new COM port has appeared in the device manager, launch Putty (yes, it is in the installer archive, install it) and enter everything as on the screenshot (the number of the COM port should be checked in the device manager and the correct one should be entered), and then click Open. If everything is fine, a black window will open. ATTENTION! If the black window does not open but instead displays an error message like "Can't communicate...", you need to replace the device driver with the older one (in the archive, there is a driverCOM), and then check again.

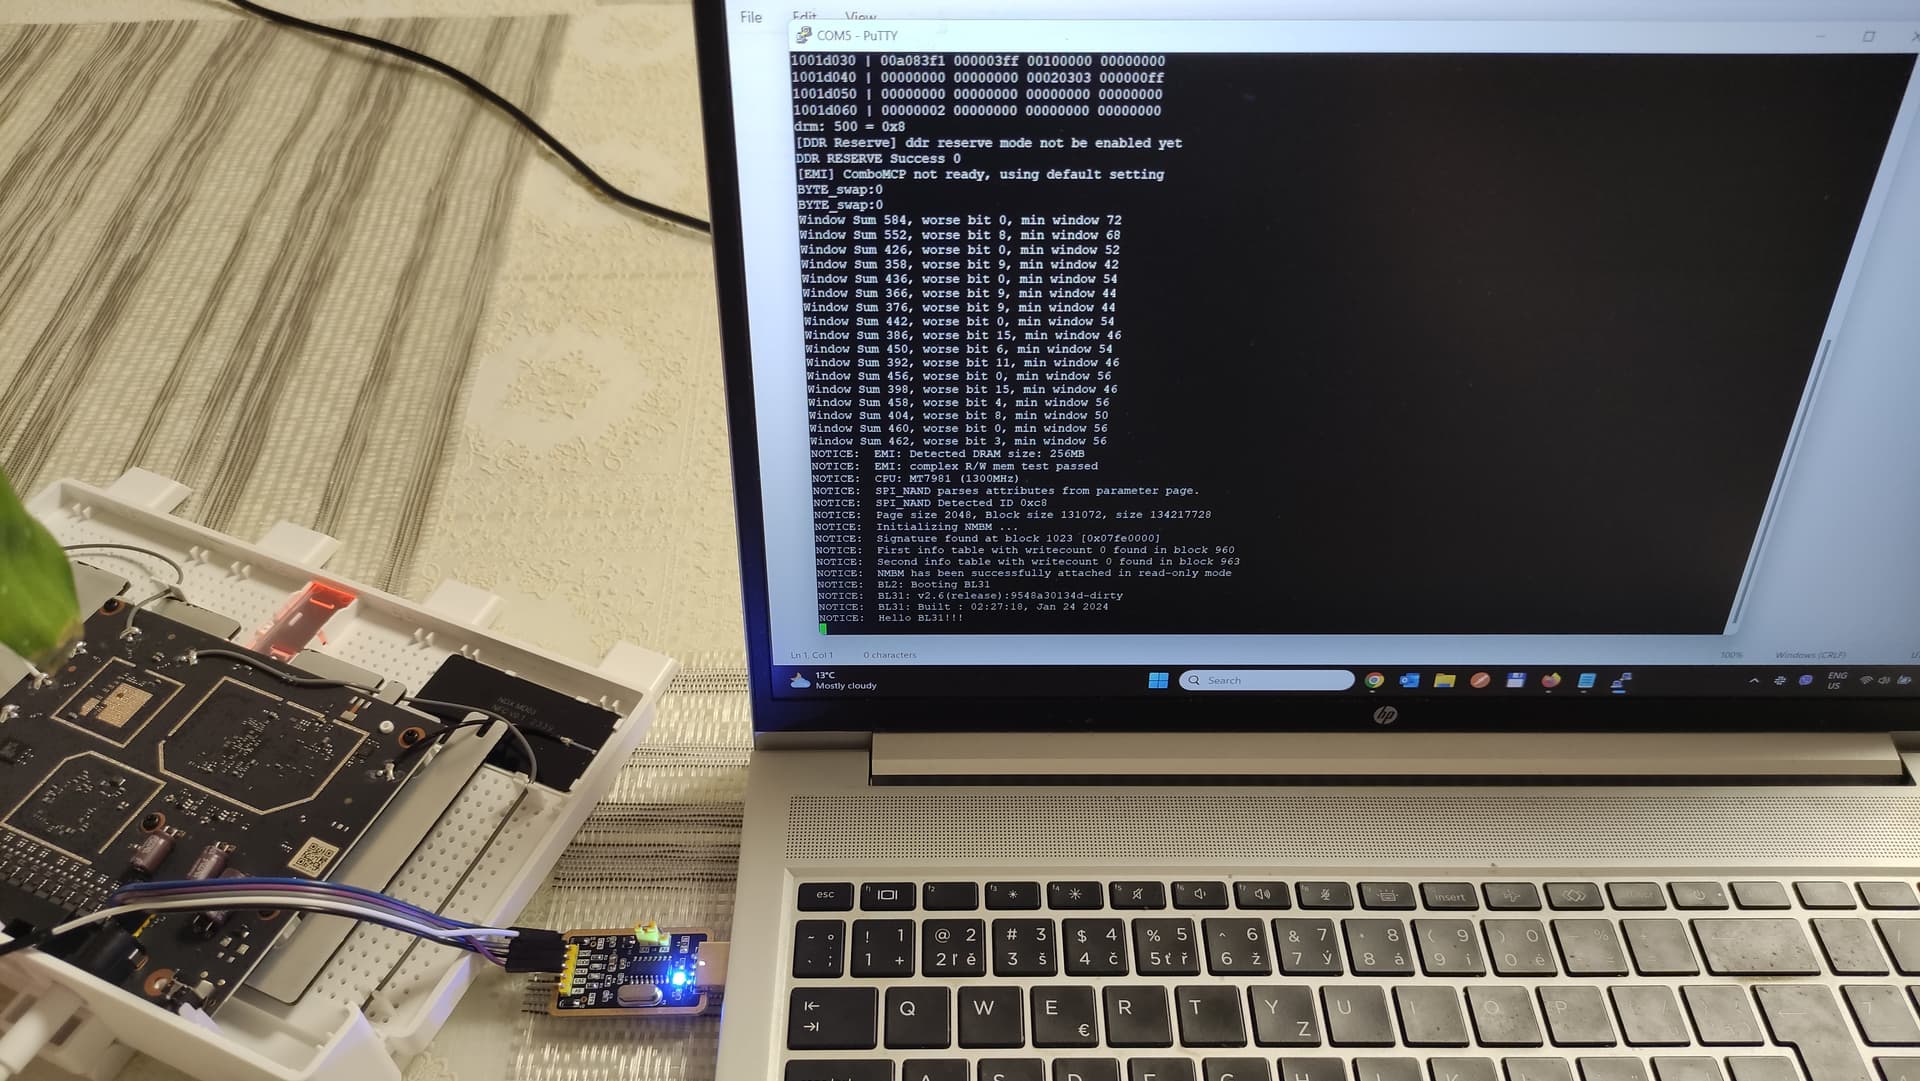
Next, plug the router on, logs will appear in a black window. If all good, turn off the router, close the window.
-
Change the IP address in Windows to 192.168.1.100, subnet mask to 255.255.255.0, gateway to 192.168.1.1, and connect the router to the computer with a network cable. ATTENTION! Connect ONLY to the 2nd or 3rd port of the router(on one of the photos above it is already connected).
-
Copy backup files to the tftpd64 folder and rename them to more readable names. Example: rename mtd1_BL2.bin to BL2.bin, etc. Run tftpd64.exe
MAIN PART
The main part is all about upload bootloader into the router and running it from there with the possibility of upload backups and restoring from them.
FIRST WAY OF CONNECTION!
Navigate to the mtk_uartboot folder, right-click anywhere except files and click open command prompt and input (twice change the COM port in this line to the one you found above):
mtk_uartboot -s COM5 --payload bl2-mt7981-bga-ddr3-ram.bin --aarch64 --fip openwrt-mediatek-filogic-xiaomi_mi-router-ax3000t-ubootmod-bl31-uboot.fip && putty.exe -serial COM5 -sercfg 115200,8,n,1,N
If everything is correct, the loader will be installed, and then a Putty window will open, where either the system will start loading quickly or simply be a black screen.
Next:
a) If there is a black screen without loading - quickly press Esc or Ctrl+C (you need to prevent the system from loading), and enter the bootloader console, from which you can already upload backups and restore them. Immediately move to the "Restoration" point. Skip point b and the second method of connection and move directly to the MAIN PART of MAIN PART.
b) If the system loading has started:
you can still check the name of the switch and the memory chip(if you haven't checked it or don't know it yet), press Enter and use command:
dmesg | grep -iEo "( an8855 | mt7531 |: .{1,} spi nand)" | sed -r "s/: //; s/(^ | $)//g" | uniq -i
Close putty and cmd windows, poweroff router.
SECOND WAY OF CONNECTION! Use only if during the first try it loads directly into the system and does not respond to Ctrl+C.
Run the run.bat file in the same folder. Window will open where you first need to enter the COM port number, and then select the switch type. After first way of connection you know your switch type ![]() Power on router after "handshake..." is appear.
Power on router after "handshake..." is appear.
If everything was entered correctly, a window called Kitty will open, in which you need to quickly press Esc or Ctrl+C to prevent the system from loading.
MAIN PART of MAIN PART
Now you connected to loader console, so enter:
Set the router address:
setenv ipaddr 192.168.1.1
Set the TFTP server address:
setenv serverip 192.168.1.100
Erase the entire flash drive to clear bad blocks:
nand erase.force 0x0 0x8000000
Next, upload the files using a tftp server and immediately restore them:
(Check your file names, you renamed them earlier)
tftpboot 0x46000000 BL2.bin
nand write 0x46000000 0x0 0x100000

tftpboot 0x46000000 FIP.bin
nand write 0x46000000 0x380000 0x200000

tftpboot 0x46000000 Nvram.bin
nand write 0x46000000 0x100000 0x40000

tftpboot 0x46000000 Bdata.bin
nand write 0x46000000 0x140000 0x40000

tftpboot 0x46000000 Factory.bin
nand write 0x46000000 0x180000 0x200000
Upload and write iniramfs-kernel to RAM:
tftpboot 0x46000000 openwrt-mediatek-filogic-xiaomi_mi-router-ax3000t-initramfs-kernel.bin
And launch it from RAM:
bootm 0x46000000
After boot go to the address 192.168.1.1 in your browser, login root, no password, next System - Backup/Flash Firmware and at the bottom choose Flash Firmware(browse openwrt-mediatek-filogic-xiaomi_mi-router-ax3000t-squashfs-sysupgrade.bin in unzipped folder)
Reboot! And have fun ![]()
Some links:
Openwrt Forum - Thanks for the First Part of the FAQ ![]()
Openwrt Forum - Thanks for connection to router without opening it
4pda.to - Thanks for second way of connection
4pda.to - Thanks for MAIN PART
AlexQ - Thanks this member for his FAQ and UART explanations
PS Backup from AN8855/Foresee router - backup
9 Likes
Because i cant edit my post anymore, i'll give you link for updated archive with files.
Changes:
Made run1.bat for First way of connection and run2.bat for second way of connection. No need for input something in command line
FAQ_Updated.zip
I noticed a new warning in the Wiki with the new hardware device version. @dimfish, would you mind sharing some details with the community about your findings?
Yep new model RD03V2 is already on the market.
CPU: Qualcomm IPQ5018
Other Info:
config misc hardware
option model RD03v2
option displayName 'Xiaomi路由器AX3000T'
option recovery 0
option gpio 0
option flash_per 0
option bbs 'http://bbs.xiaomi.cn/f-354'
option verify 'cd /tmp;mkxqimage -v '
option camera '/userdisk/data/'
option usbmode 0
option rom_up_path '/userdisk/data/upload/'
option rom_up_file 'customrom.bin'
option rom_down_path '/userdisk/data/otadownload/'
option cpufreq '1000MHz'
option wanspeed '1000'
option memtype 'DDR3'
option memfreq '1333MHz'
option memsize '256MB'
3 Likes
Sad news. dead path of ax3000t evolution...
I hope that this new RD03v2 is a model only for the China market, though.
3 Likes
Calls v2, but it's an outright downgrade in both specs and customizability (for Xiaomi, this is probably an upgrade).
Most of us only have access to imports from China for this model, so RIP. Gotta be on the lookout for another cheap filogic model out there.
NOTE: Someone should change the wiki warning from is appeared to has appeared or simply appeared.
NOTE: That wiki picture of the device is quite a bad one. White device on a white background, you can barely see anything. We should replace it.
2 Likes
Thanks for raising. I will take care of it and process minor typos/styling in the Wiki this weekend.
update: @Cthulhu88, it's done.
1 Like
Hi! Installed 24 version of OWRT. Cannot find easy way to convert WAN port to LAN (I need all physical ports). AN8855 version of switch. Thans if someone help.
- Delete
wanandwan6interfaces - Add
wanport tobr-lan
Your /etc/config/network should be something like this (no WAN nor WAN6 interfaces):
(...)
config device
	option name 'br-lan'
	option type 'bridge'
	list ports 'lan2'
	list ports 'lan3'
	list ports 'lan4'
	list ports 'wan'

config interface 'lan'
	option device 'br-lan'
	option proto 'static'
(...)
2 Likes
Hi everyone,
I'm kinda new to OpenWRT. I already configured one Xiaomi 3000T and it works. Procured second one, same version. Tried to do uboot and messed something in the process and router seems to be bricked.
I tried to recover it using MiWiFiRepairTool and tftpd64. Router downloads firmware and led never goes blue, just same orange without any change.
Is it beyond repair and i should buy new one?
your thing is kinda bricked but not fully rip. Cop UART and try reviving it. Dig up some guides to see if there's a way to slap some life back into it.
p.s> if we switch to normal English, here is where you can start: Uboot boot loop on Xiaomi AX3000T
UART is the method that required router tear-down and special cable to connect?
I tried to install uboot directly from the start using xmir-patcher. I've been able to access the page after factory file installation, it gave me warning when i did sys upgrade and after that it doesn't want to factory reset even via tftp. Later i red that uboot requires you to install normal openwrt and then modify bootloader.
Such a mess that xiaomi releases different hardware under the same model with just a tiny letter changed. Why the hell do they do that?
Basically you get a completely different device ![]()
2 Likes
Link is invalid. Can you re-upload the updated archive somewhere else?
PS Requested review by google to open download
And here it is nextcloud link
Hi everyone,
I have the first model of the RD03 (ESMT + MediaTek), and until now I have used it without problems, but suddenly my router restarted and now it is only booting in OpenWrt U-Boot mode (initramfs), I have already tried to update the sysupgrade, but without success.
What can I do?
Kernel Log
[    0.000000] Booting Linux on physical CPU 0x0000000000 [0x410fd034]
[    0.000000] Linux version 6.6.73 (builder@buildhost) (aarch64-openwrt-linux-musl-gcc (OpenWrt GCC 13.3.0 r28427-6df0e3d02a) 13.3.0, GNU ld (GNU Binutils) 2.42) #0 SMP Mon Feb  3 23:09:37 2025
[    0.000000] Machine model: Xiaomi Mi Router AX3000T (OpenWrt U-Boot layout)
[    0.000000] OF: reserved mem: 0x0000000042ff0000..0x0000000042ffffff (64 KiB) map non-reusable ramoops@42ff0000
[    0.000000] OF: reserved mem: 0x0000000043000000..0x000000004302ffff (192 KiB) nomap non-reusable secmon@43000000
[    0.000000] OF: reserved mem: 0x0000000047c80000..0x0000000047d7ffff (1024 KiB) nomap non-reusable wmcpu-reserved@47c80000
[    0.000000] OF: reserved mem: 0x0000000047d80000..0x0000000047dbffff (256 KiB) nomap non-reusable wo-emi@47d80000
[    0.000000] OF: reserved mem: 0x0000000047dc0000..0x0000000047ffffff (2304 KiB) nomap non-reusable wo-data@47dc0000
[    0.000000] Zone ranges:
[    0.000000]   DMA      [mem 0x0000000040000000-0x000000004fffffff]
[    0.000000]   DMA32    empty
[    0.000000]   Normal   empty
[    0.000000] Movable zone start for each node
[    0.000000] Early memory node ranges
[    0.000000]   node   0: [mem 0x0000000040000000-0x0000000042ffffff]
[    0.000000]   node   0: [mem 0x0000000043000000-0x000000004302ffff]
[    0.000000]   node   0: [mem 0x0000000043030000-0x0000000047c7ffff]
[    0.000000]   node   0: [mem 0x0000000047c80000-0x0000000047ffffff]
[    0.000000]   node   0: [mem 0x0000000048000000-0x000000004fffffff]
[    0.000000] Initmem setup node 0 [mem 0x0000000040000000-0x000000004fffffff]
[    0.000000] psci: probing for conduit method from DT.
[    0.000000] psci: PSCIv1.1 detected in firmware.
[    0.000000] psci: Using standard PSCI v0.2 function IDs
[    0.000000] psci: MIGRATE_INFO_TYPE not supported.
[    0.000000] psci: SMC Calling Convention v1.4
[    0.000000] percpu: Embedded 18 pages/cpu s35560 r8192 d29976 u73728
[    0.000000] pcpu-alloc: s35560 r8192 d29976 u73728 alloc=18*4096
[    0.000000] pcpu-alloc: [0] 0 [0] 1
[    0.000000] Detected VIPT I-cache on CPU0
[    0.000000] CPU features: detected: GIC system register CPU interface
[    0.000000] CPU features: kernel page table isolation disabled by kernel configuration
[    0.000000] alternatives: applying boot alternatives
[    0.000000] Kernel command line: console=ttyS0,115200n8 console_msg_format=syslog root=/dev/fit0 rootwait
[    0.000000] Dentry cache hash table entries: 32768 (order: 6, 262144 bytes, linear)
[    0.000000] Inode-cache hash table entries: 16384 (order: 5, 131072 bytes, linear)
[    0.000000] Built 1 zonelists, mobility grouping on.  Total pages: 64512
[    0.000000] mem auto-init: stack:off, heap alloc:off, heap free:off
[    0.000000] software IO TLB: SWIOTLB bounce buffer size adjusted to 0MB
[    0.000000] software IO TLB: area num 2.
[    0.000000] software IO TLB: SWIOTLB bounce buffer size roundup to 0MB
[    0.000000] software IO TLB: mapped [mem 0x000000004fe41000-0x000000004fec1000] (0MB)
[    0.000000] Memory: 235592K/262144K available (9024K kernel code, 998K rwdata, 1672K rodata, 448K init, 305K bss, 26552K reserved, 0K cma-reserved)
[    0.000000] SLUB: HWalign=64, Order=0-3, MinObjects=0, CPUs=2, Nodes=1
[    0.000000] rcu: Hierarchical RCU implementation.
[    0.000000] rcu: 	RCU restricting CPUs from NR_CPUS=4 to nr_cpu_ids=2.
[    0.000000] 	Tracing variant of Tasks RCU enabled.
[    0.000000] rcu: RCU calculated value of scheduler-enlistment delay is 10 jiffies.
[    0.000000] rcu: Adjusting geometry for rcu_fanout_leaf=16, nr_cpu_ids=2
[    0.000000] NR_IRQS: 64, nr_irqs: 64, preallocated irqs: 0
[    0.000000] GICv3: GIC: Using split EOI/Deactivate mode
[    0.000000] GICv3: 640 SPIs implemented
[    0.000000] GICv3: 0 Extended SPIs implemented
[    0.000000] Root IRQ handler: 0xffffffc080010080
[    0.000000] GICv3: GICv3 features: 16 PPIs
[    0.000000] GICv3: CPU0: found redistributor 0 region 0:0x000000000c080000
[    0.000000] rcu: srcu_init: Setting srcu_struct sizes based on contention.
[    0.000000] arch_timer: cp15 timer(s) running at 13.00MHz (phys).
[    0.000000] clocksource: arch_sys_counter: mask: 0xffffffffffffff max_cycles: 0x2ff89eacb, max_idle_ns: 440795202429 ns
[    0.000001] sched_clock: 56 bits at 13MHz, resolution 76ns, wraps every 4398046511101ns
[    0.000080] Calibrating delay loop (skipped), value calculated using timer frequency.. 26.00 BogoMIPS (lpj=130000)
[    0.000088] pid_max: default: 32768 minimum: 301
[    0.003030] Mount-cache hash table entries: 512 (order: 0, 4096 bytes, linear)
[    0.003038] Mountpoint-cache hash table entries: 512 (order: 0, 4096 bytes, linear)
[    0.005213] cacheinfo: Unable to detect cache hierarchy for CPU 0
[    0.005743] RCU Tasks Trace: Setting shift to 1 and lim to 1 rcu_task_cb_adjust=1 rcu_task_cpu_ids=2.
[    0.005882] rcu: Hierarchical SRCU implementation.
[    0.005885] rcu: 	Max phase no-delay instances is 1000.
[    0.006322] smp: Bringing up secondary CPUs ...
[    0.006687] Detected VIPT I-cache on CPU1
[    0.006731] GICv3: CPU1: found redistributor 1 region 0:0x000000000c0a0000
[    0.006759] CPU1: Booted secondary processor 0x0000000001 [0x410fd034]
[    0.006829] smp: Brought up 1 node, 2 CPUs
[    0.006835] SMP: Total of 2 processors activated.
[    0.006838] CPU features: detected: 32-bit EL0 Support
[    0.006842] CPU features: detected: CRC32 instructions
[    0.006873] CPU features: emulated: Privileged Access Never (PAN) using TTBR0_EL1 switching
[    0.006877] CPU: All CPU(s) started at EL2
[    0.006878] alternatives: applying system-wide alternatives
[    0.011013] clocksource: jiffies: mask: 0xffffffff max_cycles: 0xffffffff, max_idle_ns: 19112604462750000 ns
[    0.011030] futex hash table entries: 512 (order: 3, 32768 bytes, linear)
[    0.012316] pinctrl core: initialized pinctrl subsystem
[    0.013382] NET: Registered PF_NETLINK/PF_ROUTE protocol family
[    0.013978] DMA: preallocated 128 KiB GFP_KERNEL pool for atomic allocations
[    0.014005] DMA: preallocated 128 KiB GFP_KERNEL|GFP_DMA pool for atomic allocations
[    0.014025] DMA: preallocated 128 KiB GFP_KERNEL|GFP_DMA32 pool for atomic allocations
[    0.014414] thermal_sys: Registered thermal governor 'fair_share'
[    0.014418] thermal_sys: Registered thermal governor 'bang_bang'
[    0.014420] thermal_sys: Registered thermal governor 'step_wise'
[    0.014423] thermal_sys: Registered thermal governor 'user_space'
[    0.014504] ASID allocator initialised with 65536 entries
[    0.015503] pstore: Using crash dump compression: deflate
[    0.015508] pstore: Registered ramoops as persistent store backend
[    0.015511] ramoops: using 0x10000@0x42ff0000, ecc: 0
[    0.017282] /soc/interrupt-controller@c000000: Fixed dependency cycle(s) with /soc/interrupt-controller@c000000
[    0.023045] Modules: 29616 pages in range for non-PLT usage
[    0.023053] Modules: 521136 pages in range for PLT usage
[    0.024020] cryptd: max_cpu_qlen set to 1000
[    0.025148] SCSI subsystem initialized
[    0.025346] libata version 3.00 loaded.
[    0.026894] clocksource: Switched to clocksource arch_sys_counter
[    0.029133] NET: Registered PF_INET protocol family
[    0.029234] IP idents hash table entries: 4096 (order: 3, 32768 bytes, linear)
[    0.030584] tcp_listen_portaddr_hash hash table entries: 256 (order: 0, 4096 bytes, linear)
[    0.030600] Table-perturb hash table entries: 65536 (order: 6, 262144 bytes, linear)
[    0.030608] TCP established hash table entries: 2048 (order: 2, 16384 bytes, linear)
[    0.030626] TCP bind hash table entries: 2048 (order: 4, 65536 bytes, linear)
[    0.030677] TCP: Hash tables configured (established 2048 bind 2048)
[    0.030998] MPTCP token hash table entries: 256 (order: 0, 6144 bytes, linear)
[    0.031103] UDP hash table entries: 256 (order: 1, 8192 bytes, linear)
[    0.031129] UDP-Lite hash table entries: 256 (order: 1, 8192 bytes, linear)
[    0.031402] NET: Registered PF_UNIX/PF_LOCAL protocol family
[    0.031435] PCI: CLS 0 bytes, default 64
[    0.031594] Unpacking initramfs...
[    0.038114] workingset: timestamp_bits=46 max_order=16 bucket_order=0
[    0.043017] squashfs: version 4.0 (2009/01/31) Phillip Lougher
[    0.043026] jffs2: version 2.2 (NAND) (SUMMARY) (LZMA) (RTIME) (CMODE_PRIORITY) (c) 2001-2006 Red Hat, Inc.
[    0.076261] Block layer SCSI generic (bsg) driver version 0.4 loaded (major 251)
[    0.087135] Serial: 8250/16550 driver, 16 ports, IRQ sharing enabled
[    0.090768] printk: console [ttyS0] disabled
[    0.111186] 11002000.serial: ttyS0 at MMIO 0x11002000 (irq = 72, base_baud = 2500000) is a ST16650V2
[    0.111228] printk: console [ttyS0] enabled
[    0.918734] loop: module loaded
[    0.924971] spi-nand spi0.0: ESMT SPI NAND was found.
[    0.930350] spi-nand spi0.0: 128 MiB, block size: 128 KiB, page size: 2048, OOB size: 64
[    1.302065] Freeing initrd memory: 4260K
[    1.314145] 9 fixed-partitions partitions found on MTD device spi0.0
[    1.321042] Creating 9 MTD partitions on "spi0.0":
[    1.326097] 0x000000000000-0x000000100000 : "BL2"
[    1.332541] 0x000000100000-0x000000140000 : "Nvram"
[    1.338804] 0x000000140000-0x000000180000 : "Bdata"
[    1.344521] 0x000000180000-0x000000380000 : "Factory"
[    1.351597] 0x000000380000-0x000000580000 : "FIP"
[    1.358114] 0x000000580000-0x0000005c0000 : "crash"
[    1.363863] 0x0000005c0000-0x000000600000 : "crash_log"
[    1.370019] 0x000007600000-0x000007640000 : "KF"
[    1.375505] 0x000000600000-0x000007600000 : "ubi"
[    1.432904] ubi0: default fastmap pool size: 40
[    1.437727] ubi0: default fastmap WL pool size: 20
[    1.442774] ubi0: attaching mtd8
[    1.823571] ubi0: scanning is finished
[    1.833599] ubi0: attached mtd8 (name "ubi", size 112 MiB)
[    1.839373] ubi0: PEB size: 131072 bytes (128 KiB), LEB size: 126976 bytes
[    1.846500] ubi0: min./max. I/O unit sizes: 2048/2048, sub-page size 2048
[    1.853540] ubi0: VID header offset: 2048 (aligned 2048), data offset: 4096
[    1.860758] ubi0: good PEBs: 896, bad PEBs: 0, corrupted PEBs: 0
[    1.867017] ubi0: user volume: 5, internal volumes: 1, max. volumes count: 128
[    1.874485] ubi0: max/mean erase counter: 32/17, WL threshold: 4096, image sequence number: 1581409696
[    1.884039] ubi0: available PEBs: 0, total reserved PEBs: 896, PEBs reserved for bad PEB handling: 20
[    1.893515] ubi0: background thread "ubi_bgt0d" started, PID 261
[    1.894245] block ubiblock0_3: created from ubi0:3(fit)
[    2.557081] an8855-switch: probe of an8855-switch.2.auto failed with error -110
[    2.587035] mtk_soc_eth 15100000.ethernet eth0: mediatek frame engine at 0xffffffc081300000, irq 75
[    2.597078] i2c_dev: i2c /dev entries driver
[    2.604193] mtk-wdt 1001c000.watchdog: Watchdog enabled (timeout=31 sec, nowayout=0)
[    2.614020] NET: Registered PF_INET6 protocol family
[    2.620292] Segment Routing with IPv6
[    2.624232] In-situ OAM (IOAM) with IPv6
[    2.628506] NET: Registered PF_PACKET protocol family
[    2.633853] bridge: filtering via arp/ip/ip6tables is no longer available by default. Update your scripts to load br_netfilter if you need this.
[    2.647337] 8021q: 802.1Q VLAN Support v1.8
[    2.675182] FIT: Detected U-Boot 2024.10-OpenWrt-r28427-6df0e3d02a
[    2.681657] FIT: Selected configuration: "config-1" (OpenWrt xiaomi_mi-router-ax3000t-ubootmod)
[    2.690630] FIT:           kernel sub-image 0x00001000..0x00560599 "kernel-1" (ARM64 OpenWrt Linux-6.6.73)
[    2.700632] FIT:          flat_dt sub-image 0x00561000..0x00567d9c "fdt-1" (ARM64 OpenWrt xiaomi_mi-router-ax3000t-ubootmod device tree blob)
[    2.713669] FIT:       filesystem sub-image 0x00568000..0x009e2fff "rootfs-1" (ARM64 OpenWrt xiaomi_mi-router-ax3000t-ubootmod rootfs)
[    2.726550] block ubiblock0_3: mapped 1 uImage.FIT filesystem sub-image as /dev/fit0
[    2.827030] mt7530-mdio mdio-bus:1f: configuring for fixed/2500base-x link mode
[    2.836008] mt7530-mdio mdio-bus:1f: Link is Up - 2.5Gbps/Full - flow control rx/tx
[    2.847705] mt7530-mdio mdio-bus:1f wan (uninitialized): PHY [mt7530-0:00] driver [MediaTek MT7531 PHY] (irq=80)
[    2.870126] mt7530-mdio mdio-bus:1f lan2 (uninitialized): PHY [mt7530-0:01] driver [MediaTek MT7531 PHY] (irq=81)
[    2.892396] mt7530-mdio mdio-bus:1f lan3 (uninitialized): PHY [mt7530-0:02] driver [MediaTek MT7531 PHY] (irq=82)
[    2.914649] mt7530-mdio mdio-bus:1f lan4 (uninitialized): PHY [mt7530-0:03] driver [MediaTek MT7531 PHY] (irq=83)
[    2.926456] mtk_soc_eth 15100000.ethernet eth0: entered promiscuous mode
[    2.933475] DSA: tree 0 setup
[    2.937181] clk: Disabling unused clocks
[    2.941942] Freeing unused kernel memory: 448K
[    2.946691] Run /init as init process
[    2.950628]   with arguments:
[    2.953844]     /init
[    2.956365]   with environment:
[    2.959759]     HOME=/
[    2.962367]     TERM=linux
[    3.161638] init: Console is alive
[    3.165513] init: - watchdog -
[    3.173546] kmodloader: loading kernel modules from /etc/modules-boot.d/*
[    3.183886] gpio_button_hotplug: loading out-of-tree module taints kernel.
[    3.193915] kmodloader: done loading kernel modules from /etc/modules-boot.d/*
[    3.209759] init: - preinit -
[    3.317539] mtk_soc_eth 15100000.ethernet eth0: configuring for fixed/2500base-x link mode
[    3.326991] mtk_soc_eth 15100000.ethernet eth0: Link is Up - 2.5Gbps/Full - flow control rx/tx
[    3.358437] mt7530-mdio mdio-bus:1f lan4: configuring for phy/gmii link mode
[    6.906902] random: crng init done
[    7.537683] procd: - early -
[    7.540972] procd: - watchdog -
[    8.080534] procd: - watchdog -
[    8.084184] procd: - ubus -
[    8.238236] procd: - init -
[    8.430765] kmodloader: loading kernel modules from /etc/modules.d/*
[    8.448965] crypto-safexcel 10320000.crypto: EIP97:230(0,1,4,4)-HIA:270(0,5,5),PE:150/433(alg:7fcdfc00)/0/0/0
[    8.463946] Loading modules backported from Linux version v6.12.6-0-ge9d65b48ce1a
[    8.471706] Backport generated by backports.git v6.1.110-1-35-g410656ef04d2
[    8.636431] urngd: v1.0.2 started.
[    8.817061] mt798x-wmac 18000000.wifi: HW/SW Version: 0x8a108a10, Build Time: 20240823161240a
[    8.817061]
[    8.839505] mt798x-wmac 18000000.wifi: WM Firmware Version: ____000000, Build Time: 20240823161304
[    8.881573] mt798x-wmac 18000000.wifi: WA Firmware Version: DEV_000000, Build Time: 20240823161841
[    8.979332] mt798x-wmac 18000000.wifi: registering led 'mt76-phy0'
[    9.028875] mt798x-wmac 18000000.wifi: registering led 'mt76-phy1'
[    9.083492] PPP generic driver version 2.4.2
[    9.089556] NET: Registered PF_PPPOX protocol family
[    9.097904] kmodloader: done loading kernel modules from /etc/modules.d/*
[   10.253943] mtdblock: MTD device 'Bdata' is NAND, please consider using UBI block devices instead.
[   14.384019] mtk_soc_eth 15100000.ethernet eth0: Link is Down
[   14.401869] mtk_soc_eth 15100000.ethernet eth0: configuring for fixed/2500base-x link mode
[   14.413311] mtk_soc_eth 15100000.ethernet eth0: Link is Up - 2.5Gbps/Full - flow control rx/tx
[   14.431318] mt7530-mdio mdio-bus:1f lan2: configuring for phy/gmii link mode
[   14.443812] br-lan: port 1(lan2) entered blocking state
[   14.449381] br-lan: port 1(lan2) entered disabled state
[   14.454898] mt7530-mdio mdio-bus:1f lan2: entered allmulticast mode
[   14.461514] mtk_soc_eth 15100000.ethernet eth0: entered allmulticast mode
[   14.472175] mt7530-mdio mdio-bus:1f lan2: entered promiscuous mode
[   14.495886] mt7530-mdio mdio-bus:1f lan3: configuring for phy/gmii link mode
[   14.522698] br-lan: port 2(lan3) entered blocking state
[   14.528232] br-lan: port 2(lan3) entered disabled state
[   14.533750] mt7530-mdio mdio-bus:1f lan3: entered allmulticast mode
[   14.545664] mt7530-mdio mdio-bus:1f lan3: entered promiscuous mode
[   14.574829] mt7530-mdio mdio-bus:1f lan4: configuring for phy/gmii link mode
[   14.590982] br-lan: port 3(lan4) entered blocking state
[   14.596478] br-lan: port 3(lan4) entered disabled state
[   14.602072] mt7530-mdio mdio-bus:1f lan4: entered allmulticast mode
[   14.622598] mt7530-mdio mdio-bus:1f lan4: entered promiscuous mode
[   14.655360] mt7530-mdio mdio-bus:1f wan: configuring for phy/gmii link mode
[   17.268273] mt7530-mdio mdio-bus:1f lan2: Link is Up - 1Gbps/Full - flow control off
[   17.268297] br-lan: port 1(lan2) entered blocking state
[   17.281758] br-lan: port 1(lan2) entered forwarding state
[   17.829920] mt7530-mdio mdio-bus:1f wan: Link is Up - 1Gbps/Full - flow control off
[  126.952501] br-lan: port 4(phy0-ap0) entered blocking state
[  126.958423] br-lan: port 4(phy0-ap0) entered disabled state
[  126.964291] mt798x-wmac 18000000.wifi phy0-ap0: entered allmulticast mode
[  126.971556] mt798x-wmac 18000000.wifi phy0-ap0: entered promiscuous mode
[  126.978675] br-lan: port 4(phy0-ap0) entered blocking state
[  126.984504] br-lan: port 4(phy0-ap0) entered forwarding state
[  126.991280] br-lan: port 4(phy0-ap0) entered disabled state
[  127.140235] br-lan: port 4(phy0-ap0) entered blocking state
[  127.146077] br-lan: port 4(phy0-ap0) entered forwarding state
[  134.980197] br-lan: port 5(phy1-ap0) entered blocking state
[  134.986071] br-lan: port 5(phy1-ap0) entered disabled state
[  134.991924] mt798x-wmac 18000000.wifi phy1-ap0: entered allmulticast mode
[  134.999248] mt798x-wmac 18000000.wifi phy1-ap0: entered promiscuous mode
[  135.006472] br-lan: port 5(phy1-ap0) entered blocking state
[  135.012305] br-lan: port 5(phy1-ap0) entered forwarding state
[  135.018839] br-lan: port 5(phy1-ap0) entered disabled state
[  135.740615] br-lan: port 5(phy1-ap0) entered blocking state
[  135.746466] br-lan: port 5(phy1-ap0) entered forwarding state