Is there a non-squash (e.g. ext4fs) version of this image?
I'm trying to install new opkg modules and can't under the squash read-only fs.
Thanks.
Is there a non-squash (e.g. ext4fs) version of this image?
I'm trying to install new opkg modules and can't under the squash read-only fs.
Thanks.
Thanks for your kindness
I did all and everything is the same except Asus G-onhub and no multipe colors(in my case, Green).
I checked to ping 192.168.1.1 and tried to connect 'ssh root@192.168.1.1'. It seems to be OK.
Now, I typed and saw the massage
 scp -O openwrt-ipq806x-chromium-asus_onhub-squashfs-factory.bin root@192.168.1.1:
unknown option -- O
usage: scp [-346BCpqrTv] [-c cipher] [-F ssh_config] [-i identity_file]
            [-J destination] [-l limit] [-o ssh_option] [-P port]
            [-S program] source ... target
I checked
Get-WindowsCapability -Online | ? Name -like 'OpenSSH*

Name  : OpenSSH.Client~~~~0.0.1.0
State : Installed

Name  : OpenSSH.Server~~~~0.0.1.0
State : Installed
I think I don't understand SSH commnads. Can anyone explain what wrong I did?
It looks like you are issuing the scp command from within the OnHub shell itself. If so, that is incorrect.
You need to run scp from the workstation that is connected to the OnHub. Mine happens to be a Linux laptop so I use the actual scp command, as shown. Yours looks like Windows (Powershell)... I don't know what the equivalent is there but I used to use a program called WinSCP. It really doesn't matter what program you use as long as you copy the .bin file from your workstation to the OnHub.
After the bin is copied, then you expand it to your /mmcblk0 with the dd cmd.
Thanks.
I installed Ubuntu and tried.
I don't know why but sometimes I can't connect into onHub with "remove host identification has changed" or may connect. I don't know what it is different.
Anyway when 'ssh root@192.168.1.1' is working, I typed
~$ scp -O openwrt-ipq806x-chromium-asus_onhub-squashfs-factory.bin root@192.168.1.1:
openwrt-ipq806x-chromium-asus_onhub-squashfs-factory.bin: No such file or directory
Ping 192.168.1.1 is working but the router ring is just Green... I don't know what wrong I did.
I think I answered my own question. ![]()
It turns out the one package I chose to update (base-files) was the only one giving me the Read Only error. The opkg manager worked fine (add or remove) for any other package. Thanks.
That's fine and expected. It's basically just telling you the last time you tried connect to that device it had a different key. Just run the command it suggests to clear that IP address from your list. (e.g. from linux: ssh-keygen -R)
The problem with your scp is given in your error message: File not found. ![]()
Be sure to execute that cmd from the same folder where your .bin resides.
Hey all, I almost finished installing OpenWRT. I got to the last step:
“Now reboot, remove your USB drive, and enjoy!”
But I wasn’t sure how to reboot the device properly. I tried unplugging the power and plugged it back in. The ring became purple and beeped twice again, and then it became orange. I removed the USB per the instruction, and the light started blinking orange. It’s been blinking for several minutes now.
I can’t access 192.168.1.1 over LAN anymore. Anyone know how to resolve this?
One thing that also didn’t work was the -O option with scp. I removed that option and the command worked fine. MacOS tells me that -O is an illegal option.
Also, does the snapshot URL come with the web UI? I read a warning (a little late ![]() ) that snapshots won’t include the UI and i’ll have to installed LuCI somehow. Is that true for the bin file downloded in the OnHub guide?
) that snapshots won’t include the UI and i’ll have to installed LuCI somehow. Is that true for the bin file downloded in the OnHub guide?
EDIT: I made some progress ![]()
I found out how to install LuCI after booting from usb. I can ssh into the device and run these commands:
opkg update
opkg install luci
And so I got everything working (when booted from the USB drive). But I want to boot from the eMMC.
However, after rebooting the device, I keep getting purple lights, 2 beeps, then an orange light on the reboot (I rebooted using the LuCI web gui). So I tried zero'ing the eMMC (which took several minutes) with these commands after SSH'ing into the device, but I get an error:
root@OpenWrt:~# dd if=/dev/zero bs=512 seek=7552991 of=/dev/mmcblk0 count=33
33+0 records in
33+0 records out
root@OpenWrt:~# dd if=/dev/zero bs=1M of=/dev/mmcblk0
dd: error writing '/dev/mmcblk0': No space left on device
3689+0 records in
3688+0 records out
Any tips on how to fix the boot from emmc? I am using a 128GB USB drive, and have seen some people elsewhere indicate that might be too big.
But maybe this "error" isn't actually an error, since we're just writing 0s from dev/zero. So, the flash command to run after the zero'ing is this command, right?
ssh root@192.168.1.1 -C "dd if=/dev/zero bs=512 seek=7552991 of=/dev/mmcblk0 count=33 && \ dd if=/root/openwrt-ipq806x-chromium-tplink_onhub-squashfs-factory.bin of=/dev/mmcblk0 bs=1M"
Edit 2: Booting from eMMC successfully!
I flashed back to the Google-provided stock firmware, and went through the setup guide again for OpenWRT, and eventually got it to work. I think a big part of making it work on my last attempt was (after flashing the eMMC) first unplugging the USB drive, then entering the command reboot into the device over ssh.
Thanks @regae
Silly question: Do you know if this mod made it into the latest snapshot build?
I tap out at around 250 mbps currently. Wondering if I need to make this chg manually in order to get your 350-450 mbps speed.
Thanks.
I don't think the NSS kernel modules are in any official OpenWRT build, as far as I know - it's all a community effort, since they're not fully open source. Try out one of the images out of the zip that dadogroove posted and see if it helps.
Thanks, tried different usb disks but before flashing recovery image and following all installation steps from beginning I wasn't able to boot from eMMC.
Interesting thing, after booting from eMMC all free space available to use (no need to resize).
Is hardware or software flow offloading supports? I had 1 core load by 100% while speedtesting via ETH and speed DL/UL around 100-150Mb
Well, software flow offloading working, looks like, speed increased to 200-250Mb, but still only one core using at 100%.
To unload CPU on high speed need to flash buils with NSS cores support, link above.
Quick note - I had been having issues with downloads failing on my NSS builds that I had isolated to being a bad interaction between the NSS kernel modules and software flow offloading being enabled at the same time. Had a bunch of logspam of mdio-gpio mdio eth1: nss_gmac_xmit_frames: dropping skb when this occurred. Apparently by enabling software flow offloading you are bypassing the NSS drivers.
So maybe don't do that. Kind of makes sense but I didn't figure it out until now testing out some new builds on a secondary device. I'm not seeing any prominent note in this in the thread about the NSS drivers or ACWifiDude's builds, so I figured I'd share. My speedtest seems to be better with it disabled on the NSS builds anyway.
I'll try to get a more complete guide on BT speaker configuration and maybe a premade build. I've been on and off the grid lately - bad storms, haven't had time or power to test often.
Thanks for the clear steps that you put together.
I'm having problems at the step after the 2 beeps. I tried to press developer button immediately, after 1 second, etc, I tried with several USB sticks(containing openwrt-ipq806x-chromium-tplink_onhub-squashfs-factory.bin file), formatted both FAT32 and ext4, the low-tone beep still appear.
I start your steps after I performed the factory reset using chromeos_9334.41.3_whirlwind_recovery_stable-channel_mp.bin image.
Please let me know if you have any ideea what I should further try.
Many thanks!
Are you dragging the OpenWRT .bin file onto a pre-formatted flash drive instead of 'burning' it with dd or something like Balena Etcher? You shouldn't have to choose a filesystem, there's already a filesystem inside the .bin.
:-))))
Indeed, I just copied the openwrt-ipq806x-chromium-tplink_onhub-squashfs-factory.bin onto the stick, I did not think that is just another image like the factory reset image was. I thought that is just a special bin file that will be recognized by the OnHub and will load it. I was also being tricked by the fact that I was using in the past several openwrt bin files for some other routers and none of them were images, is true that they were not loaded through USB.
Anyway, your reply made things clear and everything is working perfectly now.
Thanks a lot, I really appreciate.
Interesting. I was able to get 450 Mbps (I have 500 from ISP, so I'm guessing this is as good as I'll get) by using precompiled NSS image from dadogroove and his rc.local cmds. But then I also achieved the same using SQM cake. To be honest, I wasn't paying attention to what my s/w flow controls were set to... I'll have to check tonight and report back here.
One thing I noticed, there's an NSS init script that simply will not start for me. It doesn't seem to have any effect, but I'm wondering if it runs successfully for anyone else? (Exact name to follow, but you can find it in the LUCI Startup section). Thx.
To ryjelsum's point, Correct, there is no need to use software or hardware offloading either through the gui as it will negate the NSS advantages. I think there was something in ACwifidude's thread at some point about this. There are some that install and use irqbalance but I've read mixed reviews about that. It seems to be good for quad core devices, not so helpful for dual core like the onhub. I haven't had any luck getting any further with the bluetooth yet.
To Trigger31337, The SQM with cake works very well but with the NSS cores active it should keep the main cpus load lower than using cake for the same results. This will help the device speed up as a whole. I have read that the qca-nss-mirred is somehow needed with the NSS and the 5.15 kernel. It is disabled on all devices I've used and I cannot enable it either. I just leave it be, doesn't seem to harm anything. It is not present in the 5.10 NSS builds, which I use on my main router. This was one recent post in ACwifidude's thread, I believe there were one or two above it as well.
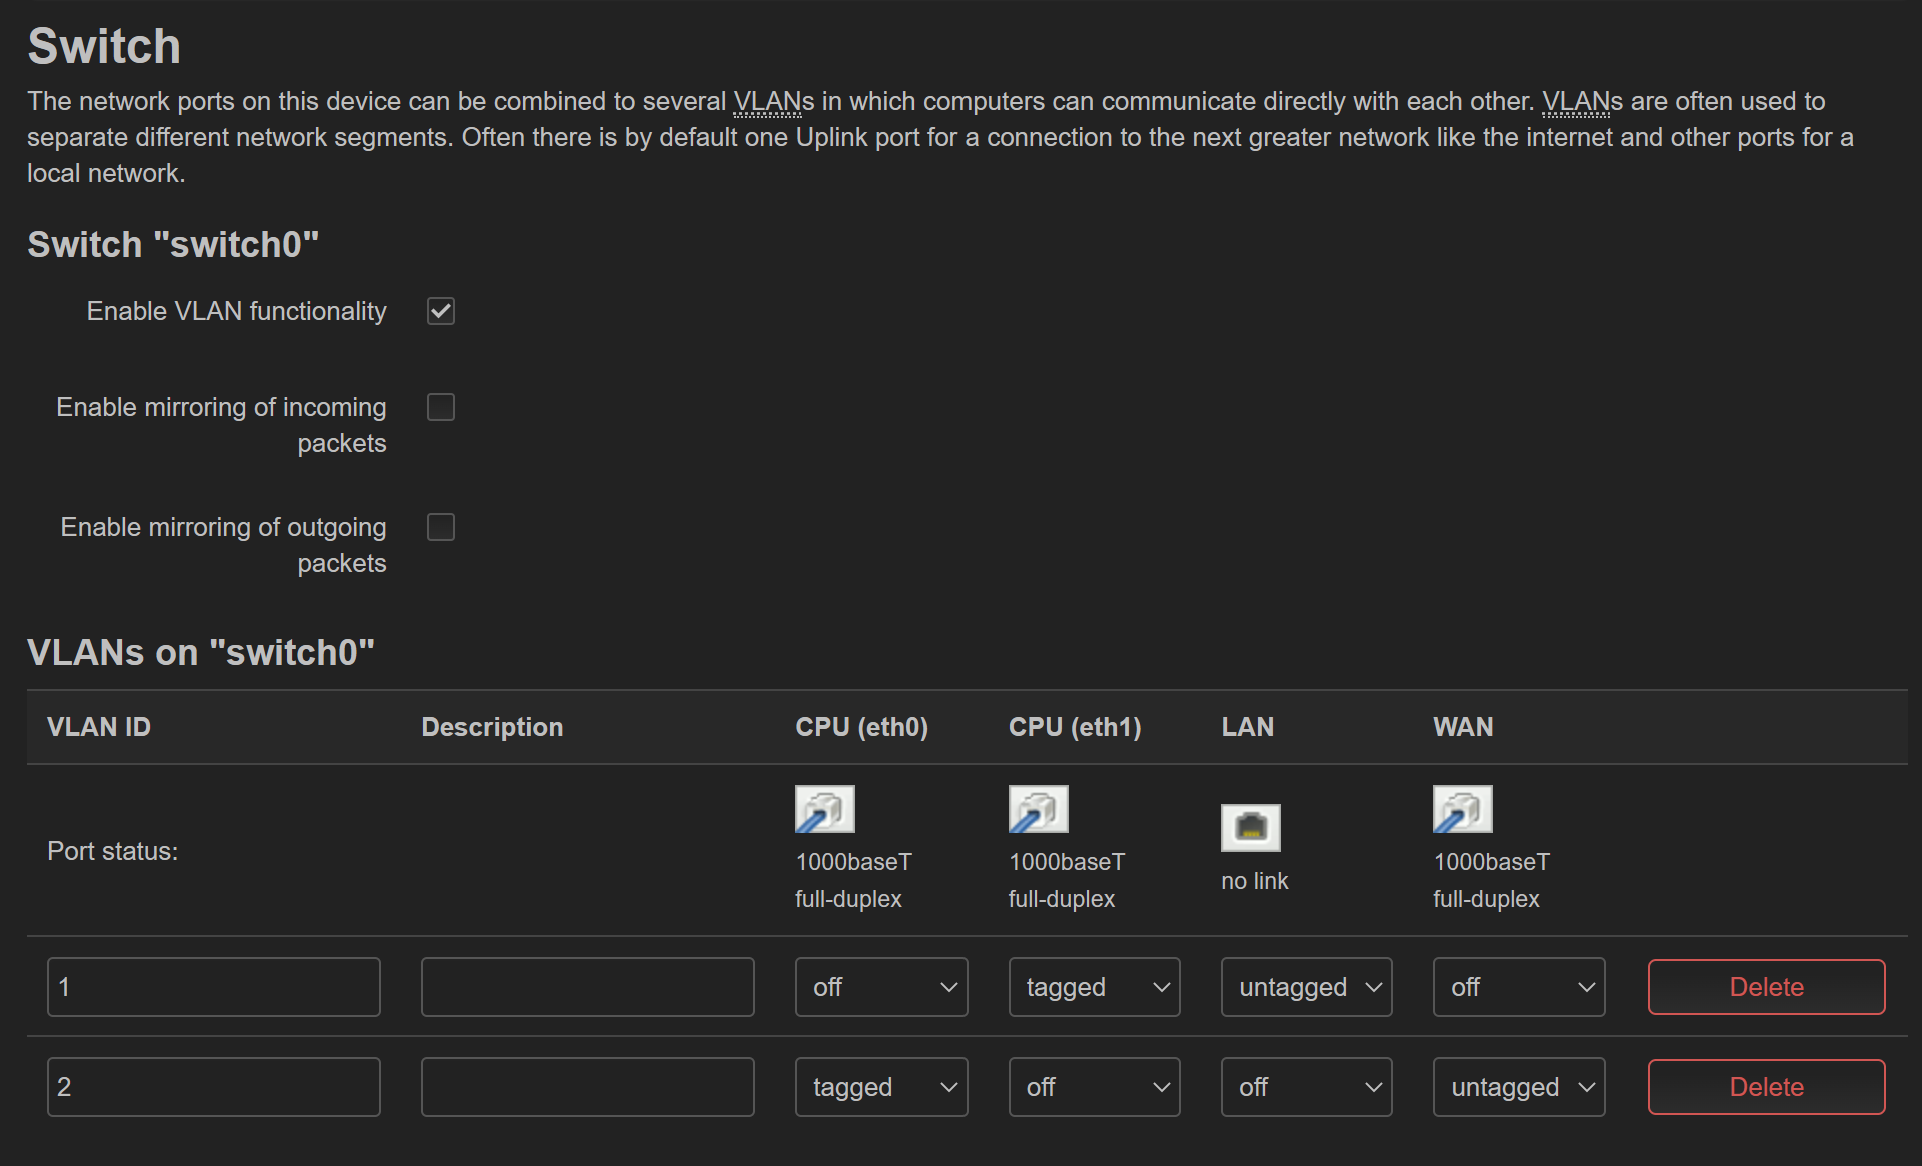
Guys, what for there are two VLANs after flashing?
And second question, how to bridge all interfaces to make a Wifi or LAN repeater? (WAN port need too). I tried relayd package, but OnHub reboots after setting up and reconnecting to router.
VLAN 1 = LAN
VLAN 2 = WAN
Is this what you are referring to?
This I can understand, but when I tries to bridge these 2 vLans, and connect to repeater and check connection, router reboots.
Yes, I used things from this article, but I need WAN port too and keep same subnet. And tried this https://openwrt.org/docs/guide-user/network/wifi/relay_configuration
Main goal: Main Router LAN -> WAN Second Router, so LAN port and Wifi clients will recieve DHCP settings from Main Router.
Current config: https://pastebin.com/xYSppqVS and if I try to connect to wifi on Router with static ip (or dhcp) (subnet 192.168.1.) on client, Router reboots.
If I connect to wifi with 192.168.10. subnet on client settings, Router not reboots, but no internet on LAN, WIFI clients, but Router have it.
Any way to covert WAN port to LAN?
I think there is too much going on there. No need for firewall on the AP, that is done at the router. Not sure about the ready bridge either. These are the instructions I have saved for doing this. I don't currently have any WRT APs setup.
Configuration via Web Interface LUCI

Of course you can achieve this with using the web interface:
Once you have configured your wireless network with LUCI you can start configuring your dumb AP.

1. Disconnect the (soon-to-be) Dumb AP from your network, and connect your computer to it with an Ethernet cable.

2. Use the web interface to go to Network → Interfaces and select the LAN interface.

3. Enter an IP address “next to” your main router on the field “IPv4 address”. (If your main router has IP 192.168.1.1, enter 192.168.1.2). Set DNS and gateway to point into your main router to enable internet access for the dumb AP itself

4. Then scroll down and select the checkbox “Ignore interface: Disable DHCP for this interface.”

5. Click “IPv6 Settings” tab and set everything to “disabled”.

6. In the top menu go to System → Startup, and disable dnsmasq and odhcpd in the list of startup scripts.

7. Click the Save and Apply button. Hard-Restart your router if you're not able to connect anymore.

8. Go to http://192.168.1.2 (or whatever address you specified) and check if the settings for the LAN interface are the same.

9. Use an Ethernet to connect one of the LAN ports on your main router to one of the LAN/switch ports of your “new” dumb AP. (There's no need to connect the WAN port of the Dumb AP.)
Once the AP is given a static address and DHCP turned off you will not be able to connect to it unless you connect it to the router or set a static IP on the computer you are using to configure it. To convert the WAN port to LAN by referring to your picture above, switch the items in WAN column. VLAN 1 = untagged and VLAN2 = off. Also under network - interfaces edit wan and wan6 general settings, uncheck bring up at boot since you will not be using them. Hope this helps.