This HOWTO is intended for the relatively new users who have some experience with general computing and system administration but are not (yet) comfortable with flashing firmware and need some friendly handholding to get through the process.
If you decide to go through with this procedure (which is not very difficult), I would suggest reading through this entire HOWTO before beginning the process and then referring to it as you go along.
Introduction
Sophos SG105w is a four-port router/firewall appliance with built-in Wireless AC networking. Architecture-wise, it's a fairly straightforward 64-bit PC, or, in OpenWrt terms, an x64 target. OpenWrt makes perfect sense for this unit, as the popular alternatives, pfSense and OPNsense, are based on FreeBSD and thus do not support Wireless AC at the moment.
Sophos does not have a stated retirement policy for the SG product line. Rather, they tie retirement of SG products running certain Sophos software to the retirement of the matching products from the XG line. In other words, end of life for SG105w (if it runs the specific Sophos software) should be the same as end of life for XG105w, which was August 2022.
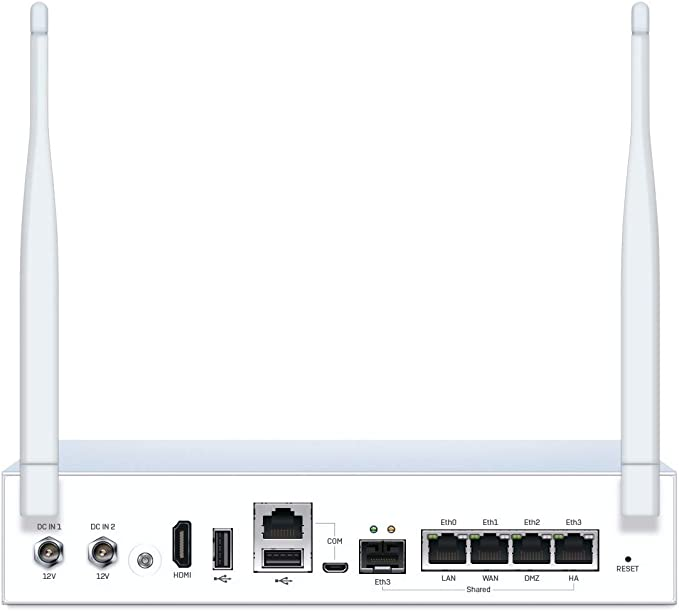
The unit on hand was a Revision 3 unit. Under the hood, the SG105w Rev.3 is sporting an Intel Atom E3930 processor, 2 GB or RAM, and a 64 GB SSD. Also present are an Intel I211 Gigabit Ethernet card and a Qualcomm Atheros QCA986x/988x wireless AC card. Connectivity options for management are plentiful; there are two options for console connection (RJ-45 and micro-USB), two USB type A ports, and an HDMI port.
There are several ways to get OpenWrt running on the SG105w. You can take out the SSD, write OpenWrt onto it, and start from there, or you could boot the unit off a USB stick, then write OpenWrt onto the internal SSD, shut down, remove the USB stick, and restart. I chose the latter (it felt nice to not have to take the router apart for a change).
We have two options for communicating with the router during installation and configuration. One is the familiar PC setup: connect a monitor to the HDMI port and a keyboard to one of the USB ports, and you're good to go. I chose the other: console connection to a PC (in my case, the PC is running Linux). Whichever you choose, the setup and configuration procedure should be the same; you're still communicating with the SG105w via the command line.
A word on console connection
If you decide to go the console route, keep in mind that OpenWrt requires console connection at 115200 bits per second (bps). The SG105w BIOS, meanwhile, expects a connection at a lower speed, 38400 bps. So if you want to work with OpenWrt, connect at 115200; if you need to get into BIOS, connect at 38400.
Getting Ready
Go to the OpenWrt downloads site:
https://downloads.openwrt.org/
Near the top of the page, there's a section titled Stable Release. Click on the version number (as of this writing, 22.03.2). This will take you to a list of "targets" (various systems for which OpenWrt is available). Scroll to the end of the page and click on x86. On the page that opens, click on 64; this will take you to the downloads for 64-bit PCs and derivatives.
There are several options to choose from. I chose generic-squashfs-combined.img.gz because I am lazy and therefore want to skip a step later in the process (I will explain what I got to skip when we get to it). A more responsible individual would have gone with generic-squashfs-combined-efi.img.gz. The difference is, my choice relies on the old-fashioned BIOS; the alternative would use a more modern and ostensibly more secure UEFI.
After the download is complete, use your favorite image writer program to write the image you downloaded to a USB stick. I used Rufus on a Windows machine; you can use anything you like.
First Boot
When you look at a four-port Sophos device (including the SG105w), you typically see that the leftmost Ethernet port is labeled LAN and the one immediately to its right, WAN; further to the right, there are DMZ and HA.
Before you turn on your SG105w, you should:
- Connect the port labeled WAN to an upstream router providing Internet access and DHCP service.
- Connect your command-and-control devices (either a console cable to a computer or a monitor to the HDMI port and a keyboard to one of the USB ports).
- Connect your bootable USB stick to the SG105w.
Turn the SG105w on, and it should boot from the USB stick. If it boots from the SSD instead and you see Sophos boot sequence, you'll need to figure out how to get into BIOS and change the boot order. I didn't have to do it, but I believe this is a straightforward "keep hitting Del on boot" situation familiar to anyone who ever managed a PC.
If all goes well, you will eventually see this message among others:
Please press Enter to activate this console.
When you see if, do as requested. You will be shown the OpenWrt logo and taken to the command line:
BusyBox v1.35.0 (2022-10-14 22:44:41 UTC) built-in shell (ash)

  _______                     ________        __
 |       |.-----.-----.-----.|  |  |  |.----.|  |_
 |   -   ||  _  |  -__|     ||  |  |  ||   _||   _|
 |_______||   __|_____|__|__||________||__|  |____|
          |__| W I R E L E S S   F R E E D O M
 -----------------------------------------------------
 OpenWrt 22.03.2, r19803-9a599fee93
 -----------------------------------------------------
root@OpenWrt:/#
OpenWrt may continue the start-up process (and spew messages) even after you get to the command line, so give it a moment to finish what it's doing. At this point, the SG105w should be able to connect to the upstream device and thus the Internet. Test it out:
ping -c 3 google.com
You should see the familiar output of ping.
Now we need to install OpenWrt onto the internal SSD. First, let's go to an out-of-the-way place where we can store some temporary files:
cd /tmp
Next, let's download OpenWrt (it can be the same image file you downloaded for writing onto the USB stick or a different one; say, you changed your mind and decided to try an ext4 image rather that a squashfs image). Right, now, with 22.03.2 being the current release and assuming we still like squashfs, we would do:
wget https://downloads.openwrt.org/releases/22.03.2/targets/x86/64/openwrt-22.03.2-x86-64-generic-squashfs-combined.img.gz
Now let's unzip the downloaded file:
gunzip openwrt-*.img.gz
For quality control, run ls and make sure a file named openwrt-22.03.2-x86-64-generic-squashfs-combined.img (note the .img, rather than .img.gz, ending) is present in your /tmp directory.
Next, we need to know where to write the image. Chances are, we are writing it to /dev/sda, but let's check anyway. For that, we will need a utility called lsblk. Before we download and install it, we need to let OpenWri's package manager, opkg, take an inventory of available packages, so let's do that:
opkg update
After opkg went online and downloaded the lists it needs, we can do some actual installation:
opkg install lsblk
After the installation is done, run:
lsblk
You will be shown a list of drives and partitions present on the system and their sizes. Most likely, the SSD will be identified as sda and the USB drive from which we're now running, as sdb. You should be able to tell which is which just by looking at sizes.
Now we can write OpenWrt onto the SSD:
dd if=openwrt-22.03.2-x86-64-generic-squashfs-combined.img bs=1M of=/dev/sda
Essentially, this means "take this image file and write its contents in one-megabyte chunks onto the /dev/sda drive".
Now our SSD should be ready to serve as a boot drive. Halt the SG105w:
halt
Wait until you see the message:
reboot: Power down
At this point, the power button on the SG105w should change from blue (the device is on) to red (the device is connected to power, but is off). Remove the USB stick from the SG105w.
Second Boot
Press the power button to restart the device. Once again, watch for the Please press Enter to activate this console message and do as requested.
Now that you're back on the command line, you may want to send another ping to the outside world to ensure you have connectivity. Speaking of connectivity, your connectivity right now is impaired. Your wired connections work, but your wireless card is not even being detected by OpenWrt. To remedy this, we will need a few extra packages. Which ones? Depends on what our Wi-Fi card is. To find out what we have, we can use a utility called lspci. But we don't have it, so let's install it; it is a part of the pciutils package. And once again, before downloading anything, we will need to let opkg download the inventory.
opkg update && opkg install pciutils
Now we can see what components we have on our unit:
lspci -nn
Here's the relevant line in the lspci output:
06:00.0 Network controller [0280]: Qualcomm Atheros QCA986x/988x 802.11ac Wireless Network Adapter [168c:003c]
I happen to know which packages are required to make this card work. If you end up with a different card, poke around online and figure out what's required for your card. Use the PCI identifier (in my case, it was 168c:003c) in your Internet searches.
So let's get our wireless networking going:
opkg install hostapd ath10k-firmware-qca988x kmod-ath10k
Once this is done, let's set the root password for out SG105w. Type passwd, press Enter, and follow the prompts. (In case you're wondering, you could have done this before or after; you can do it any time after you boot from the SSD.)
Now we need to configure the wireless networking. Connect to any of the LAN ports on the SG105w with an Ethernet cable, open your Web browser, and point it to https://192.168.1.1 (this is the default OpenWrt location). Enter your new password when prompted, then go to Network >> Wireless. On the Wireless screen, click the Edit button. A complicated-looking Device Configuration dialog will open. At the very least, you should do the following:
- Under Advanced Settings on top of the dialog, use the Country Code selector to choose the country you're in. This will tell the router which radio frequencies it is permitted to use (those are regulated to prevent interference with broadcasting, emergency services, and other uses of radio).
- Down the dialog, under General Setup make sure that (1) Mode is set to Access Point, (2) you set ESSID (wireless network name) to something you like, and (3) the Network is set to lan (this will make sure that all your client devices, wired and wireless, will be on the same local network).
- Also down the dialog, under Wireless Security, set Encryption to something secure (I chose WPA2-PSK) and enter the key (network password) under Key. Obviously, if you have a good knowledge of wireless security, you can choose other encryption and authentication options; I am just providing a minimal set of directions here...
When all of this is done, click Save at the bottom of the dialog. The dialog will close, and you will be back to the Wireless Overview. Click Save & Apply on the bottom of the screen and wait for the changes to be made (there will be a pop-up dialog informing you of what's going on). Next, take a look at the button to the left of Edit. Most likely, it says Enable. If so, click it to enable wireless networking. If it says Disable, leave it be; you probably clicked on it before, so wireless is enabled now.
At this point, your device should be fully operational. Just in case, I rebooted the device to verify that everything that should start at boot actually starts.
Optional Niceties
Your device is working, and you absolutely can use it as is. However, right now, only about 100 megabytes of your disk space is usable. This is plenty for OpenWrt, but if you want, you can still make your entire SSD accessible. This is also where my laziness, to which I alluded at the beginning of this HOWTO, comes in.
If you have a system with BIOS, you need to do two things to make the entire drive accessible:
- Resize the boot partition, and
- Resize the F2FS overlay to match the new size of the boot partition (SquashFS is a read-only file system, so it has an F2FS overlay that's writable).
On systems with UEFI, there's a step you need to do in-between, and that's updating your grub configuration. We are about to extend a partition by deleting an existing partition and setting up a new one with a different upper boundary. This will change the partition's ID, which needs to be communicated to grub; otherwise, grub will look for the old partition ID at boot, will not find it, and will halt the boot process. You can read more about all this on the official OpenWrt on x86 Hardware page:
https://openwrt.org/docs/guide-user/installation/openwrt_x86
Here's what I did in my specific case, which, again, did not involve updating grub configuration.
First, let's install all packages we will need to make this happen (we probably have some of them already, but opkg is smart enough to not overwrite an already-present package it its version is current):
opkg update && opkg install lsblk fdisk losetup f2fs-tools
Next, we'll resize the boot partition using the fdisk utility. The listing below shows the whole fdisk session I ran interactively. The manual inputs are shown [[in double square brackets]] ; the [[]] sequence indicates pressing Enter with no visible input. It's a bit confusing, but I can't come up with a better formatting scheme right now. So here goes:
root@OpenWrt:~# [[fdisk /dev/sda]]

Welcome to fdisk (util-linux 2.37.3).
Changes will remain in memory only, until you decide to write them.
Be careful before using the write command.

This disk is currently in use - repartitioning is probably a bad idea.
It's recommended to umount all file systems, and swapoff all swap
partitions on this disk.


Command (m for help): [[p]]

Disk /dev/sda: 59.63 GiB, 64023257088 bytes, 125045424 sectors
Disk model: ADATA_IM2S3134N-
Units: sectors of 1 * 512 = 512 bytes
Sector size (logical/physical): 512 bytes / 512 bytes
I/O size (minimum/optimal): 512 bytes / 512 bytes
Disklabel type: dos
Disk identifier: 0xc120d9f5

Device     Boot Start       End   Sectors  Size Id Type
/dev/sda1  *      512     33279     32768   16M 83 Linux
/dev/sda2       33792    246783    212992  104M 83 Linux

Command (m for help): [[d]]
Partition number (1,2, default 2): [[2]]

Partition 2 has been deleted.

Command (m for help): [[n]]
Partition type
   p   primary (1 primary, 0 extended, 3 free)
   e   extended (container for logical partitions)
Select (default p): [[p]]
Partition number (2-4, default 2): [[2]]
First sector (33280-31277231, default 34816): [[33792]]
Last sector, +/-sectors or +/-size{K,M,G,T,P}
    (33792-125045423, default 125045423): [[]]

Created a new partition 2 of type 'Linux' and of size 59.6 GiB.
Partition #2 contains a squashfs signature.

Do you want to remove the signature? [Y]es/[N]o: [[n]]

Command (m for help): [[w]]

The partition table has been altered.
Syncing disks.

root@OpenWrt:~#
Notes:
- This has worked despite the "bad idea" warning.
- Technically, we didn't "extend" the partition; rather, we deleted one, then created a new one starting at the same location and gobbling up all available disk space. However, since there was no write command in-between, the net result was a new, larger partition that "inherited" all data located on the old small partition.
- The number
33792specified in response to theFirst sectorprompt came from the disk information table output in response to thepcommand.
To verify that the changes have taken place, I ran fdisk /dev/sda again and executed another p command (alternatively, you can do fdisk -l; this will not enter the interactive mode, you'll just get the output, and then fdisk will exit). Changes were apparent:
Device     Boot Start       End   Sectors  Size Id Type
/dev/sda1  *      512     33279     32768   16M 83 Linux
/dev/sda2       33792 125045423 125011632 59.6G 83 Linux
Finally, we extend the F2FS overlay to match the newly extended partition:
LOOP="$(losetup -n -O NAME | sort | sed -n -e "1p")"
ROOT="$(losetup -n -O BACK-FILE ${LOOP} | sed -e "s|^|/dev|")"
OFFS="$(losetup -n -O OFFSET ${LOOP})"
LOOP="$(losetup -f)"
losetup -o ${OFFS} ${LOOP} ${ROOT}
fsck.f2fs -f ${LOOP}
mount ${LOOP} /mnt
umount ${LOOP}
resize.f2fs ${LOOP}
reboot
After the device reboots, we should be able to use the entire disk.
