This HOWTO is intended for the relatively new users who have some experience with general computing and system administration but are not (yet) comfortable with flashing firmware and need some friendly handholding to get through the process. Some potentially necessary general education will be provided along the way.
A big thank-you goes to @sophosap for suggesting a fix to a problem that I encountered when researching these devices and would never solve on my own.
Nomenclature
Sophos AP 55 and AP 100 are dual-band (2.4 GHz and 5 GHz) access points. They can be powered over Ethernet (PoE) or via a barrel connector that requires 12V / 4A DC power supply.
Externally, Sophos AP 55 and AP 100 are nondescript squarish blobs with two (AP 55) or three (AP 100) external antennas. Internally, they are very similar, except for one detail. AP 55 has two sets of transmitters and receivers (sometimes, this is referred to as 2T2R), while AP 100 has three (so it is 3T3R).
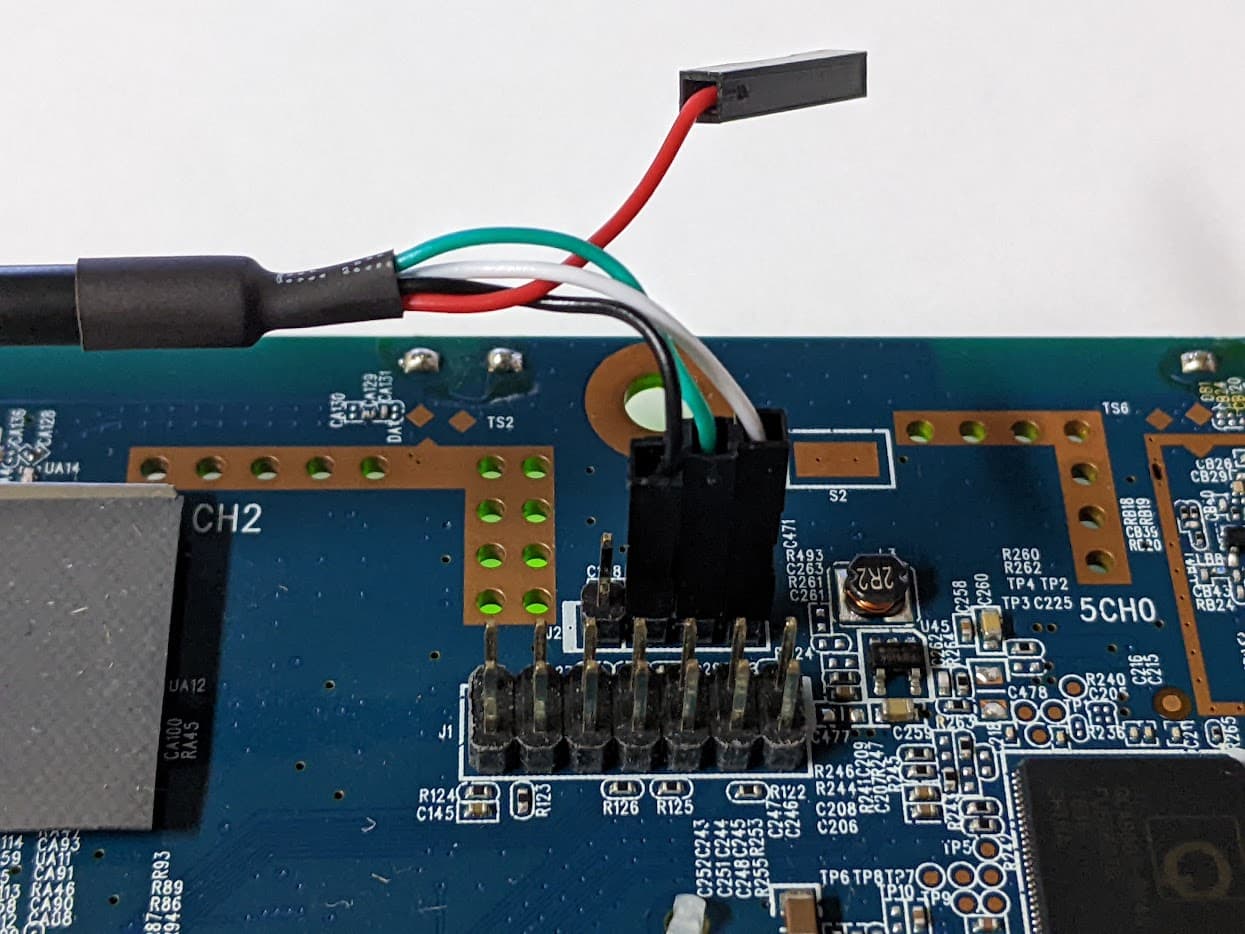
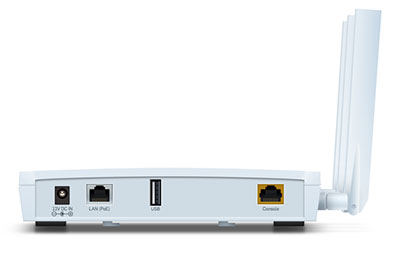
All connectivity is located on one side of the AP and includes a barrel plug for power supply, a PoE-capable Ethernet port, a USB port, and a console port.
There are two other related models, AP 55C and AP 100C. They are round and have internal, rather than external, antennas. Also, they do not have external console ports. Instead, they have console connectors on the motherboard. To access those connectors, the AP's cover must be removed. In this HOWTO, we will not be dealing with the peculiarities of the "C" models.
Preparations
To install OpenWrt on an AP 55 or AP 100, you will need:
- A console cable (I used the kind that connects the RJ-45 port on the AP to a USB port on my computer)
- A computer with software capable of console connection (I used
screenon Linux, but you can use Putty on Linux or Windows and probably many other terminal emulation programs), which we will call "administrator's workstation" - An Ethernet cable
- A TFTP server (I used a separate computer, but you can deploy the TFTP server software on your administrator's workstation)
Begin by setting up the TFTP server. Incidentally, TFTP stands for Trivial File Transfer Protocol. It is a simple, no-frills (and no-security) way for one machine to share files with another. A typical use case for TFTP is network boot, often used by thin clients and, occasionally, by fat servers. We'll use TFTP to boot our router into OpenWrt.
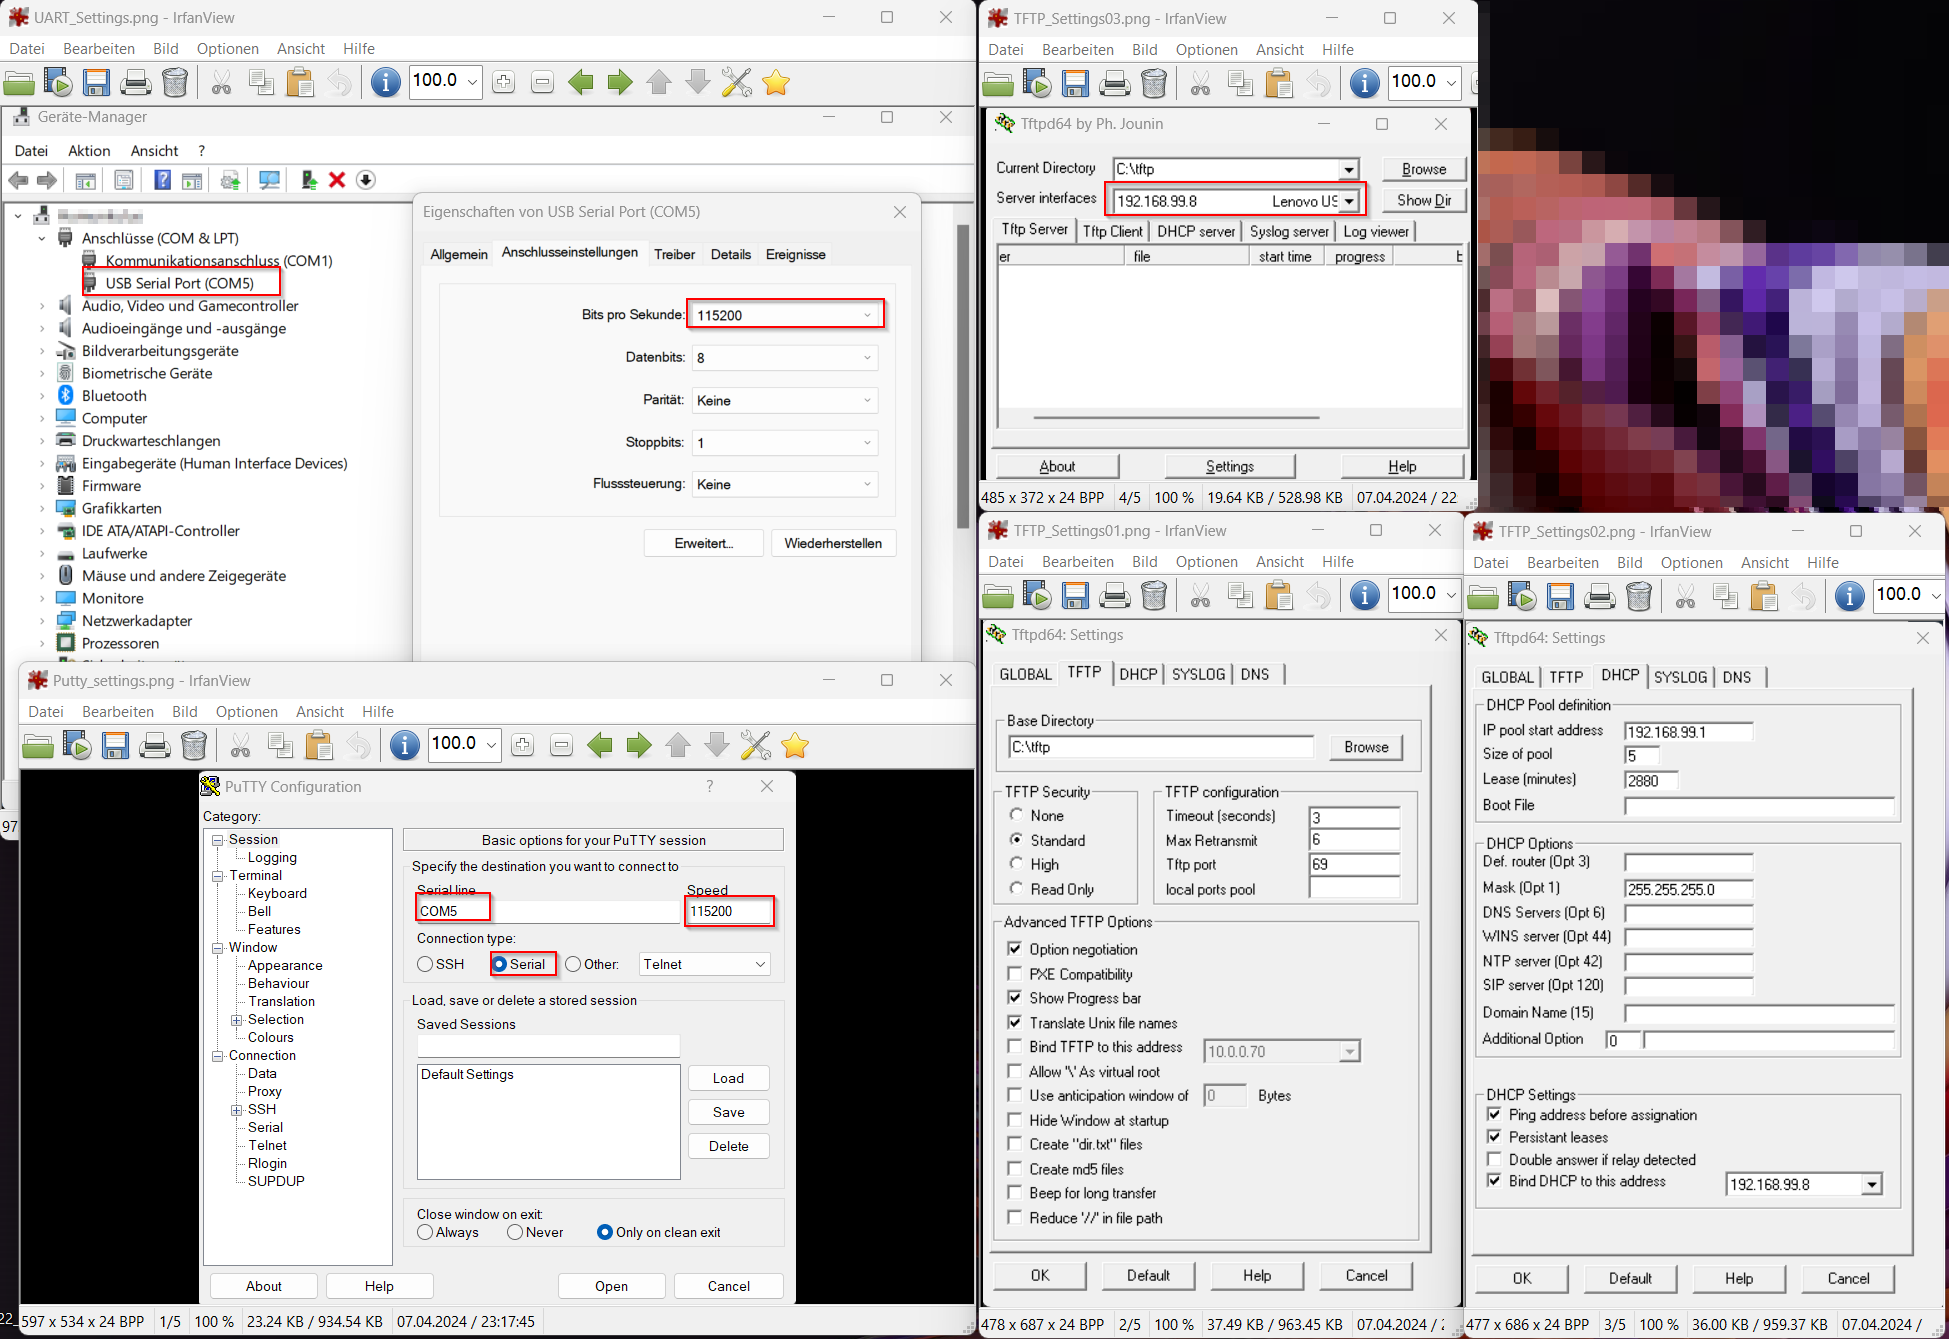
On most Linux flavors, spinning up a TFTP server involves a one-line command to the package manager and a glance at the newly created configuration file. My designated TFTP server was an Ubuntu Server 22.04, so I elevated myself to root and installed the TFTP server software:
apt install tftpd-hpa
When installation is complete, you can check how your new TFTP server is doing:
systemctl status tftpd-hpa
Next, take a look at your TFTP configuration file. Use your favorite text editor to open it; the example below uses nano:
nano /etc/default/tftpd-hpa
Find the line that starts with TFTP_DIRECTORY; this is where you will need to put files that you want to be accessible via TFTP. In my case, it was /srv/tftp. Write it down for future reference.
Next, change your network settings so that one of the Ethernet ports on your TFTP server has a fixed IP address, 192.168.99.8. Your AP will look for files to use at boot at this IP address. In my case, this was accomplished by editing the Netplan configuration file, which resides at:
/etc/netplan/00-installer-config.yaml
In your case... check your OS documentation.
Next, change to the TFTP files directory you identified earlier and wrote down for future reference:
cd /srv/tftp
and download the initial boot files for the AP 55 and AP 100. I suggest you download both, because occasionally, an AP 55 may for some reason identify itself as an AP 100 and reject the firmware intended for AP 55 but accept the firmware for AP 100.
To download current firmware, go to the OpenWrt downloads site:
https://downloads.openwrt.org/
Click on the link in the Stable Release section (as of this writing, it is 22.03.5). This will take you to the targets page (in the OpenWrt parlance, a "target" is a type of hardware for which firmware is intended; OpenWrt is available for dozens of targets). Today, we are interested in the ath79 target, so click on the ath79 link, then on the generic link. Find two files:
sophos_ap100-initramfs-kernel.binsophos_ap55-initramfs-kernel.bin
and download them to your TFTP server. The easiest way to do that is to copy a URL to clipboard and then paste it into the terminal accessing the TFTP server after manuallly typing wget. In my case, I ended up with
wget https://downloads.openwrt.org/releases/22.03.5/targets/ath79/generic/openwrt-22.03.5-ath79-generic-sophos_ap100-initramfs-kernel.bin
wget https://downloads.openwrt.org/releases/22.03.5/targets/ath79/generic/openwrt-22.03.5-ath79-generic-sophos_ap55-initramfs-kernel.bin
When you have the two files downloaded, rename them into uImage_AP100 and uImage_AP55.
Leave the browser window open; you will need another URL from it fairly soon.
Before booting the AP
Make sure you have the following in place:
- The AP is off (there's no power switch on it, so plug the power supply into the wall, but don't plug it into the AP yet)
- The LAN port on the AP is connected to the TFTP server
- The Console port on the AP is connected to the administrator's workstation
Next, start a console connection at 115200 bps on the administrator's workstation. In my case, this was done on the command line:
sudo screen /dev/ttyUSB0 115200
Now plug the AP in. Be sure to start watching the console output immediately.
First boot
A few seconds after the AP turns on, there will be a message telling you that you can press any key to stop the boot. As soon as you see it, press Enter. This will leave you with a command prompt that looks like this:
ath>
Time to push some keys... First, let's load what we downloaded:
tftpboot
When the AP receives this command, it will attempt to connect to a TFTP server at 192.168.99.8 and download uImage_AP100 or uImage_AP55. If it succeeds, you will see output similar to this:
Speed is 1000T
dup 1 speed 1000
Using eth0 device
TFTP from server 192.168.99.8; our IP address is 192.168.99.9
Filename 'uImage_AP55'.
Load address: 0x81000000
Loading:
         ### Hash marks indicating progress ###
done
Bytes transferred = 6422825 (620129 hex)
At this point, we have the firmware loaded, but it is loaded at the wrong address (the output above shows 0x81000000, but the AP needs it at 0x9f070000). So let's correct it:
setenv fwaddr 0x9f070000
Let's make sure that the setting actually changed:
echo $fwaddr
The command above should return 0x9f070000, indicating a successful change.
Next, we make room for the firmware on the AP's storage device:
erase $fwaddr +$filesize
This command will take a few seconds to execute; the output will tell you that a number of sectors (usually, eighty-some) have been erased.
Next, we copy the firmware to storage:
cp.b $fileaddr $fwaddr $filesize
Again, this will take a few seconds to execute. Look for done in the output. When you have command prompt again, see if the AP is ready to boot with OpenWrt:
iminfo $fwaddr
If everything went well, you will receive a few lines of output ending with Verifying Checksum ... OK. Now it's time to actually boot into OpenWrt:
boot
This should start the familiar OpenWrt boot process.
When OpenWrt has booted, press Enter to gain command line. Also, unplug the Ethernet cable from the TFTP server and plug it into your local router.
Now let's make your AP a part of your local network. This is done by editing the network configuration file:
vi /etc/config/network
The initial file will look something like this:
config device
        option name 'br-lan'
        option type 'bridge'
        list ports 'eth0'

config interface 'lan'
        option device 'br-lan'
        option proto 'static'
        option ipaddr '192.168.1.1'
        option netmask '255.255.255.0'
Replace static with dhcp and remove the ipaddr and netmask lines. Your configuration will look like this:
config device
        option name 'br-lan'
        option type 'bridge'
        list ports 'eth0'

config interface 'lan'
        option device 'br-lan'
        option proto 'dhcp'
Save and exit (Esc, then :x), then reload the network configuration:
service network restart
See if your AP has access to the Internet:
ping -c 3 goo.gl
If it does, perform system upgrade. Remember we left a browser window open on the OpenWrt download site? Go there and find an upgrade file appropriate fot your model. It will be one of these:
sophos_ap100-squashfs-sysupgrade.binsophos_ap55-squashfs-sysupgrade.bin
Once agan, copy the URL to clipboard, then return to the command line, type sysupgrade and paste the URL. For AP 55, it will look ike this:
sysupgrade https://downloads.openwrt.org/releases/22.03.5/targets/ath79/generic/openwrt-22.03.5-ath79-generic-sophos_ap55-squashfs-sysupgrade.bin
The AP will download and install the full firmware and reboot.
Second boot
Now you have OpenWrt firmware that is installed on the AP's storage device. Note, however, that the changes to the network configuration settings you made are now lost. No problem, you can make those changes again. Open the network configuration file:
vi /etc/config/network
make the same changes you made in the previous section, save and exit, and reload the network configuration the same way you did before.
Next, set a password for your AP:
passwd
Follow the prompts to set the password.
Now see what your AP's IP address is:
ip a
Finally, point your Web browser to that IP address. The login name (root) will be pre-entered for you; use the password you just set to log in to LuCI, OpenWrt's management interface.
Hello LuCI!
Once you gain access to LuCI, you can configure the AP to your liking. One obvious outstanding task is to configure the wireless subsystem. This is done under Network >> Wireless. The process is generic; you have two radios, so you set one up to work in the 2.4 GHz range and the other, to work in the 5 GHz range. It has been covered in many places, so I will stop here...