I would go for an i2c port extender then - they are easy to use, cheap and work well (e.g. PCF8574A, MCP23018, SX1509 ...). Just keep in mind that the PCF cannot source much current, it won't work with active-high relays without additional circuitry (I had to redesign a PCB because of this and me not doing enough research).
btw, it would make matters a bit easier if you told us what you have already connected and which GPIOs are already occupied.
Surya,
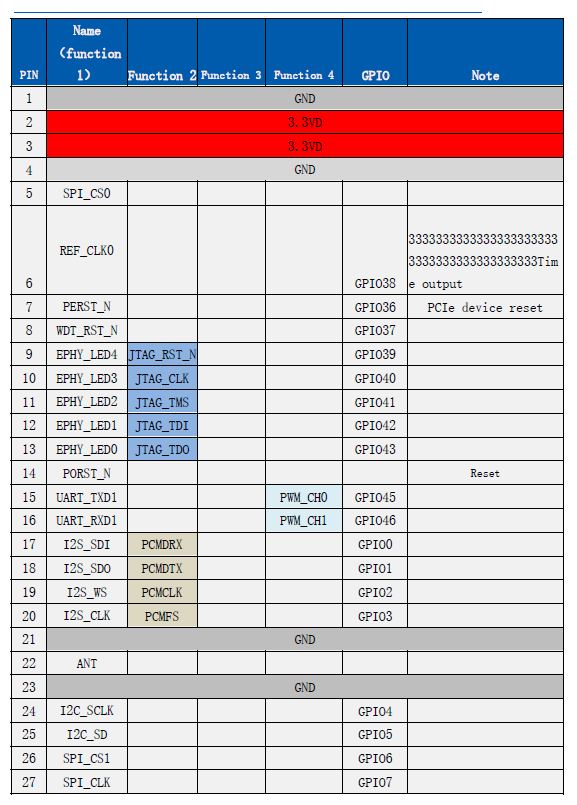
I've been trying to convert I2S pins to GPIO for a couple of buttons and leds in .dts file. But no matter what I do, the voltage at the gpio rmains a 0.5v constantly, so led won't turn on.
After lots of trials and errors. This is what I found out for this module.
I was able to free up all I2S. Got 4 GPIOs that can be manipulated as input/output from user land.
Tried EPHY_LED0-4: Use a couple of them for ETH lights, which are controlled by the kernel, work fine. But can't use them for input or output from user land as they're always high. Tried to free group ephy but got kernel panic.
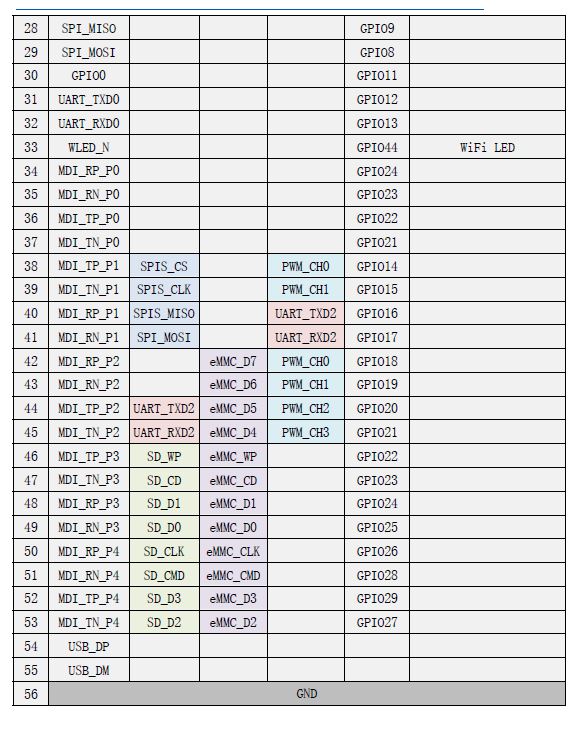
I only need 1 NIC, so tried the other 3 MDI_* pins. Not working.
I need both UART & I2C, so they're off limit.
So, it looks like the I2S and the extra GPIO0 are easily accessible. Others can possibly be hacked, but I don't want to go there yet.
Hi, I want to use GPIOs too. Could you please give me some hints to do this and also I would really appreciate it if you could provide some code examples. Many thanks
In file mt7628an_hilink_hlk-7688a.dts, I have the following block:
&state_default {
        gpio {
                groups = "wdt", "wled_an", "i2s", "p0led_an", "p1led_an", "p2led_an", "p3led_an", "p4led_an";
                function = "gpio";
        };
};
This block declares these pins as GPIOs. Where i2s means all I2S pin, p0led_an = EPHY_LED0, p1led_an = EPHY_LED1, p2led_an = EPHY_LED2, p3led_an = EPHY_LED3, p4led_an = EPHY_LED4.
Which gave me an extra 7 GPIO pins, enough for my application.
I really appreciate it. I had taken the advantage of other DTSs in ramips directory to create a dts for my device and then I used [make]. Fortunently it is like your dts so I did it right but the thing is I don't know how to use it. I tried LUCI to update my system but nothing happened! How did you install/put the dts in your device? Thank you so much