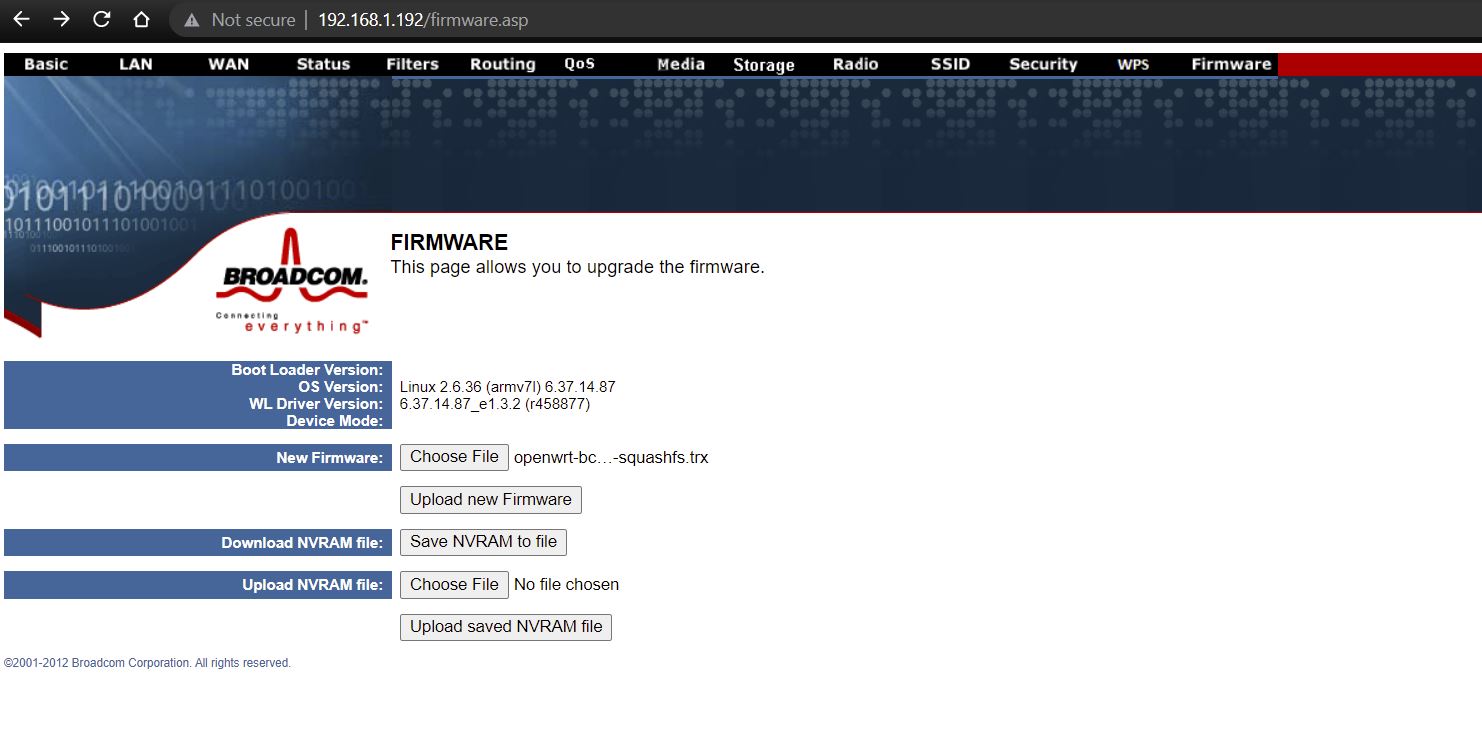
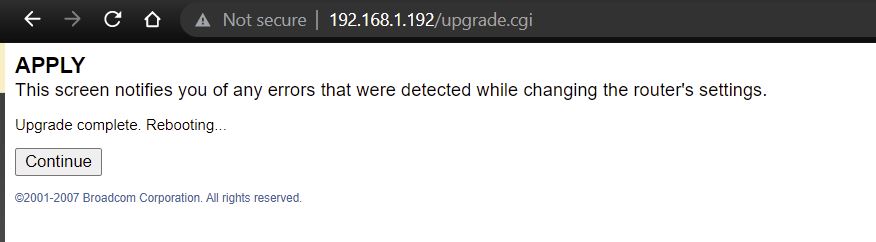
I discovered another method to flash the Meraki MR32. Following this guide https://openwrt.org/toh/meraki/mr32 it was confusing where to find mr32-initramfs.bin to flash initially.
Instead of using the upgrade meraki_mr32-squashfs.sysupgrade.bin I went with meraki_mr32-squashfs.trx and now can't boot past U-Boot.
What would have been the correct file to flash?
I'll put a guide together for this other method for others to try soon.
Here is the current U-Boot output;
U-Boot 2012.10-00075-g79231c6 (Jul 09 2014 - 13:28:22) Meraki bootkernel loader

Wait.
Done.
DEV ID= 0000cf12
SKU ID = 0
OTP status: eca00018
MEMC 0 DDR speed = 800MHz
Log: ddr40_phy_init.c: Configuring DDR Controller PLLs
Log: offset = 0x18010800
Log: VCO_FREQ is 1600 which is greater than 1Ghz.
Log: DDR Phy PLL polling for lock
Log: DDR Phy PLL locked.
Log: ddr40_phy_init::DDR PHY step size calibration complete.
Log: ddr40_phy_init:: Virtual VttSetup onm CONNECT=0x01CF7FFF, OVERRIDE=0x00077FFF
Log: ddr40_phy_init:: Virtual Vtt Enabled
Log: DDR Controller PLL Configuration Complete
PHY register dump after DDR PHY init
PHY register dump after mode register write

SHMOO VER 1.13

PKID07DC06011801080000000000001A103F01000000

S3000019F
00001030


RDLYW0 00000005

RDENW0 00000030

RDQSW0

    0000000000111111111122222222223333333333444444444455555555556666
    0123456789012345678901234567890123456789012345678901234567890123
 00 ---------+++++++++++++++++++++++X++++++++++++++++++++++---------
 01 ------------++++++++++++++++++++++X+++++++++++++++++++++--------
 02 -----------+++++++++++++++++++++++X++++++++++++++++++++++-------
 03 --------+++++++++++++++++++++++X+++++++++++++++++++++++---------
 04 --------+++++++++++++++++++++X+++++++++++++++++++++-------------
 05 -----------+++++++++++++++++++++X+++++++++++++++++++++----------
 06 ---------+++++++++++++++++++++X+++++++++++++++++++++------------
 07 ----------++++++++++++++++++++++X++++++++++++++++++++++---------
 08 --++++++++++++++++++++++X++++++++++++++++++++++-----------------
 09 -----+++++++++++++++++++++X+++++++++++++++++++++----------------
 10 --++++++++++++++++++++++X++++++++++++++++++++++-----------------
 11 -------++++++++++++++++++++++X+++++++++++++++++++++-------------
 12 ------+++++++++++++++++++++X++++++++++++++++++++----------------
 13 --------++++++++++++++++++++++X++++++++++++++++++++++-----------
 14 -----+++++++++++++++++++++X++++++++++++++++++++-----------------
 15 ------+++++++++++++++++++++X++++++++++++++++++++----------------


PW0

    0000000000111111111122222222223333333333444444444455555555556666
    0123456789012345678901234567890123456789012345678901234567890123
 00 ---------+++++++++++++++++++++++X+++++++++++++++++++++++--------
 01 ----------++++++++++++++++++++++++X+++++++++++++++++++++++------
 02 -----------+++++++++++++++++++++++X++++++++++++++++++++++-------
 03 ---------+++++++++++++++++++++++X+++++++++++++++++++++++--------
 04 -------+++++++++++++++++++++++X++++++++++++++++++++++-----------
 05 -----------++++++++++++++++++++++X++++++++++++++++++++++--------
 06 ------+++++++++++++++++++++++X+++++++++++++++++++++++-----------
 07 --------++++++++++++++++++++++++X++++++++++++++++++++++++-------
 08 +++++++++++++++++++++++X+++++++++++++++++++++++-----------------
 09 --+++++++++++++++++++++++X++++++++++++++++++++++----------------
 10 -+++++++++++++++++++++++X++++++++++++++++++++++-----------------
 11 -----+++++++++++++++++++++++X+++++++++++++++++++++++------------
 12 ---++++++++++++++++++++++X++++++++++++++++++++++----------------
 13 ------++++++++++++++++++++++++X++++++++++++++++++++++++---------
 14 ---++++++++++++++++++++++X++++++++++++++++++++++----------------
 15 --+++++++++++++++++++++++X++++++++++++++++++++++----------------


NW0

    0000000000111111111122222222223333333333444444444455555555556666
    0123456789012345678901234567890123456789012345678901234567890123
 00 ---------+++++++++++++++++++++++X++++++++++++++++++++++---------
 01 -----------++++++++++++++++++++++X+++++++++++++++++++++---------
 02 -----------+++++++++++++++++++++++X+++++++++++++++++++++++------
 03 ---------+++++++++++++++++++++++X++++++++++++++++++++++---------
 04 -------++++++++++++++++++++++X+++++++++++++++++++++-------------
 05 ---------++++++++++++++++++++++X++++++++++++++++++++++----------
 06 ---------+++++++++++++++++++++X+++++++++++++++++++++------------
 07 ---------+++++++++++++++++++++++X++++++++++++++++++++++---------
 08 --+++++++++++++++++++++++X++++++++++++++++++++++----------------
 09 ----++++++++++++++++++++++X++++++++++++++++++++++---------------
 10 --++++++++++++++++++++++X++++++++++++++++++++++-----------------
 11 -------+++++++++++++++++++++++X++++++++++++++++++++++-----------
 12 -----++++++++++++++++++++++X++++++++++++++++++++++--------------
 13 ---------++++++++++++++++++++++X+++++++++++++++++++++-----------
 14 -----+++++++++++++++++++++X++++++++++++++++++++-----------------
 15 ------++++++++++++++++++++++X+++++++++++++++++++++--------------


WRDQW0

    0000000000111111111122222222223333333333444444444455555555556666
    0123456789012345678901234567890123456789012345678901234567890123
 00 ++++++++++++++++++++X+++++++++++++++++++-------++++++++++++++++-
 01 +++++++++++++++++++++X++++++++++++++++++++-----++++++++++++++++-
 02 +++++++++++++++++++++X+++++++++++++++++++++-----+++++++++++++++-
 03 +++++++++++++++++++X+++++++++++++++++++--------++++++++++++++++-
 04 +++++++++++++++++++X+++++++++++++++++++--------++++++++++++++++-
 05 +++++++++++++++++++++X++++++++++++++++++++------+++++++++++++++-
 06 ++++++++++++++++++++X+++++++++++++++++++-------++++++++++++++++-
 07 ++++++++++++++++++++X++++++++++++++++++++-----+++++++++++++++++-
 08 +++++++++++++++++++X++++++++++++++++++----------+++++++++++++++-
 09 ++++++++++++++++++++X+++++++++++++++++++-------++++++++++++++++-
 10 ++++++++++++++++++++X+++++++++++++++++++-------++++++++++++++++-
 11 ++++++++++++++++++++X++++++++++++++++++++------++++++++++++++++-
 12 +++++++++++++++++++X+++++++++++++++++++-------+++++++++++++++++-
 13 +++++++++++++++++++++X++++++++++++++++++++-----++++++++++++++++-
 14 ++++++++++++++++++++X++++++++++++++++++++------++++++++++++++++-
 15 ++++++++++++++++++++X+++++++++++++++++++-------++++++++++++++++-


WRDMW0 00000020
WRDMW0 00000019


ADDR

    0000000000111111111122222222223333333333444444444455555555556666
    0123456789012345678901234567890123456789012345678901234567890123
 00 ++++++++++++++++S++++++++++++++X++++++++++++++++++++++++++++++++

DRAM:  15.9 MiB
WARNING: Caches not enabled
NAND:   (ONFI), iProc NAND chip could not be initialized
0 MiB
In:    serial
Out:   serial
Err:   serial
Unlocking L2 Cache ...Done
About to set TTBR0 to 00fe0000
Set TTBR0 to 00fe0000
arm_clk=1000MHz, axi_clk=500MHz, apb_clk=250MHz, arm_periph_clk=500MHz
Registering eth
Broadcom BCM IPROC Ethernet driver 0.1
Using GMAC1 (0x18025000)
ERROR: could not get env ethaddr
et0: ethHw_chipAttach: Chip ID: 0xcf12; phyaddr: 0x1e
bcm_robo_attach: devid: 0x53012

NAND read: device 0 offset 0x500000, size 0x300000
 3145728 bytes read: OK
Bad Bootkernel magic!
NAND read: device 0 offset 0x100000, size 0x300000
 3145728 bytes read: OK
Bad CRC!u-boot>