Is there a simple example how to use uhttpd-mod-ubus?
The https://openwrt.org/docs/techref/ubus lacks on a simple example? Just asking for a quick "curl" cmd, or similar.
1 Like
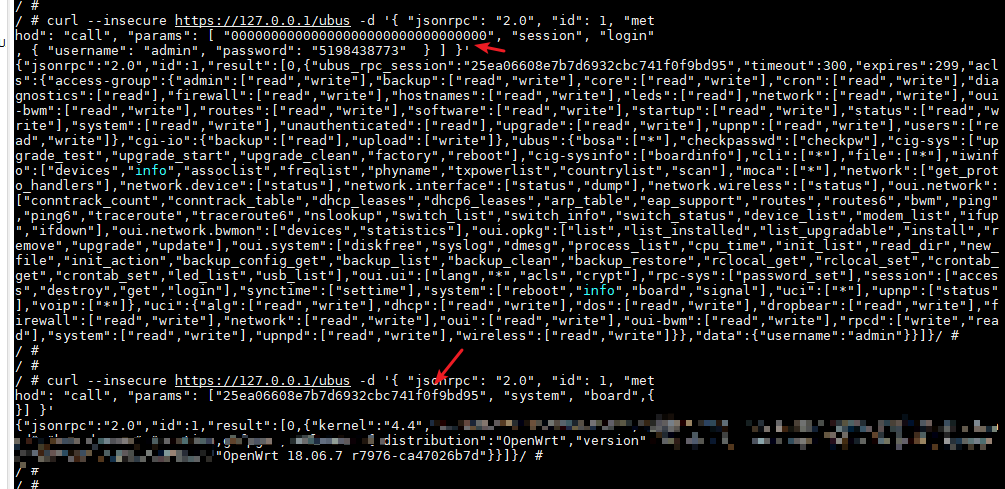
First, get ubus_rpc_session ID with your username and password
curl http://127.0.0.1/ubus -d '{ "jsonrpc": "2.0", "id": 1, "method": "call", "params": [ "00000000000000000000000000000000", "session", "login", { "username": "root", "password": "12345678" } ] }'
or https access
curl --insecure https://127.0.0.1/ubus -d '{ "jsonrpc": "2.0", "id": 1, "method": "call", "params": [ "00000000000000000000000000000000","session", "login", { "username": "admin", "password": "5198438773" } ] }'
then,do what you want, for example
curl --insecure https://127.0.0.1/ubus -d '{ "jsonrpc": "2.0", "id": 1, "met
hod": "call", "params": ["a6e961dfb6704c91d4073f8cd2b73aeb", "system", "board",{
}] }'
There is a wonderful project, OUI . OpenWrt web user interface implemented in vue.js and Ant Design of Vue, inspired by LuCI2.
2 Likes
Wow, thank u, that helps me a lot! 
Furthermore, I found a netcli, there I directly made a PR that is fixing some library issue. https://github.com/lynxis/netcli/pull/1
@serial115200
I always have the error {"jsonrpc":"2.0","id":1,"error":{"code":-32002,"message":"Access denied"}}, although I login as root?
Ah, I think it is because I'm "unauthenticated"? But why?
curl http://10.0.0.3/ubus -d '{ "jsonrpc": "2.0", "id": 1, "method": "call", "params": [ "00000000000000000000000000000000", "session", "login", { "username": "root", "password": "foo"  } ] }'
{"jsonrpc":"2.0","id":1,"result":[0,{"ubus_rpc_session":"31478346007e476a998521558a10de873","timeout":300,"expires":300,"acls":{"access-group":{"unauthenticated":["read"]},"ubus":{"session":["access","login"]}},"data":{"username":"root"}}]}
curl http://10.0.0.3/ubus -d '{ "jsonrpc": "2.0", "id": 1, "method": "call", "params": ["31478346007e476a998521558a10de87", "system", "board",{}] }'
{"jsonrpc":"2.0","id":1,"error":{"code":-32002,"message":"Access denied"}
Seems that
list read '*'
list write '*'
does not work. But creating a superuser acl and changing to
list read superuser
list write superuser
ACL deny you access request. you should add acl conf file on
/usr/share/rpcd/acl.d/
/ # cat /usr/share/rpcd/acl.d/unauthenticated.json
{
        "unauthenticated": {
                "description": "Access controls for unauthenticated requests",
                "read": {
                        "ubus": {
                                "session": [
                                        "access",
                                        "login"
                                ]
                        }
                }
        }
}
/ #
/ # cat /usr/share/rpcd/acl.d/upnp.json
{
        "upnp": {
                "description": "upnp configuration",
                "read": {
                        "uci": ["upnpd"],
                        "ubus": {
                            "upnp": ["status"]
                        }
                },
                "write": {
                        "uci": ["upnpd"]
                }
        }
}
ACL file determines which requests can be passed through rpcd daemon.when you login, you'll get a acl table on response.
/etc/config/rpcd config is for more precise controls.
config login 'user'
        option username 'user'
        list read 'upnp'
        password xxxxxxxx
now, user can read uci config file of upnpd and get status of upnp,but can't write uci config of upnp.
config login 'user1'
        option username 'user'
        list read 'upnp'
        list write 'upnp'
        password xxxxxxxx
now, user1 can write uci config of upnp.
1 Like
Why you set here testuser instead of your choosen username test?
I made an acl that defines testuser... 
I have no idea about it.can you paste rpcd config file after install package.
cat /etc/config/rpcd
or try uci-default .
Package/postinst
The actual text of the script which is to be executed after installation. Dont forget to include the #!/bin/sh. Alternatively you can also use an uci-default script which will be executed automatically on runtime installations by opkg or embedding into an image.
1 Like
Thanks I will try uci-default.
Thank you!