I can't answer all the questions but instructions how to build are available on @patient0 's PR: https://github.com/openwrt/openwrt/pull/12513
I'm on holiday until the end of month in a beautiful country with amazingly slow internet (we're talking E to H+ mobile standard). I make it short:
@wangyu: as @nscheffer correctly wrote all is happening within the PR. That version requires no changes to the bootcmd. But installation is only possible by booting into the initramfs image (serial connection needed) and then upgrade using the sysupgrade image. That method works fine for me.
I'm adding a factory image which would be installable from the stock UI. Adding the following to the RAX120v2 section in ./target/linux/qualcommax/image/ipq807x.mk creates an image which can be installed from the stock UI, bootcmd doesn't need to be changed and the kernel gets loaded but then the rootfs can't be found.
+	IMAGE/factory.img := append-kernel | pad-offset $$$$(BLOCKSIZE) 64 | \
+		append-uImage-fakehdr filesystem | pad-to $$$$(KERNEL_SIZE) | \
+		append-ubi | netgear-dni
I assume the rootfs is not written to the correct address and I would appreciate help with that part.
How to I check to which address the rootfs is written without having to install the image (binwalk?).
So i got (what i assume is) a RAX120v2 recently from craigslist, it was listed as bricked, managed to get it running again by just flashing the fw image via TFTP.
I wanted to get openwrt running on it but when i soldered the serial port i noticed it would receive data from the router but it wouldn't TX
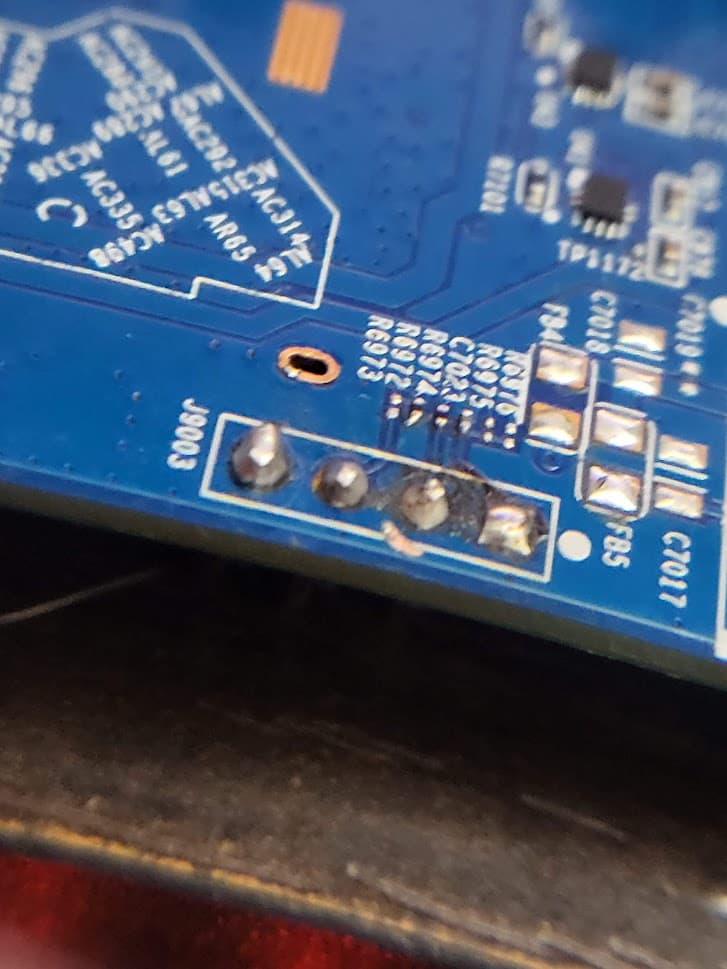
I noticed one of the resistors on the board is missing, I'm not sure if i somehow pushed it off when soldering the pins or if it's just a different mb revision, anyways, could someone confirm if there's supposed to be a resistor there at location R6972?
Hi, lan5 is both simple and has a hidden meaning under the title lan5 = 5g. So I think it might be named like that.
Morning @kat1337, on my board R6973 is not populated either, and serial is working.
You're connecting GND, RX and TX only, yes?
Thank you, I will assume you meant R6972, and yes, I'm only using GND RX and TX for the serial connection.
I can still get logs from the router via serial but it doesn't seem to register any key presses from the TTY
I'm electronically challenged (not enough for a disabled parking spot but close) and did talk about R6973.
Attached a photo of how it looked on the first RAX120v2 I got:

Ignore the horrible soldering, serial did work(ed) although it shouldn't have with my skills.
Thank you, I see there is what looks like a resistor on R6972, I'm gonna guess I nicked it off while soldering the serial port on mine, since it doesn't seem to have any markings I'm just gonna measure the other resistors and try my luck by matching it to the rest of the resistors on the serial port (since I think getting board schematics for this isn't gonna be easy)
1 Like
all is happening within the PR.
That link of PR contains only the code, NO INSTRUCTIONS.
I couldn't figure out how to build the PR. Here is where I got stuck:
After cloned your repo and switched to the rax120v2/jewwest-based-pr branch, I couldn't find the IPQ807X target as in jewwest's original PR.
can you post a short instruction of how to
build and flash 1andhow to build 2?
(again) Could you plz provide a brief instruction? (for build)
UPDATE:
renaming/moving of target 'ipq807x' to 'qualcommax', subtarget 'ipq807x'.
I found the solution by browsing through the posts here
I found the reason why the script doesn't work and the solution/workaround. We can flash your image without serial access now
Here is some background, the mtd paritions from the stock firmware:
.....
.....
0x000001480000-0x000001980000 : "dnidata"
0x000001980000-0x000007d80000 : "firmware"
0x000001980000-0x000001fa0000 : "kernel"             (let's call this range A)
0x000001fa0000-0x000007d80000 : "rootfs"              (call this range B)
0x000007d80000-0x000008100000 : "language"
0x000008100000-0x000008200000 : "cert"
0x000008200000-0x000008280000 : "mtdoops"
0x000008280000-0x000008480000 : "router_analytics"
0x000008480000-0x00000e880000 : "ntgrdata"
0x00000e880000-0x000020000000 : "reserved"            (call this range C)
why the script works on non-ubifs branch
The non-ubifs branch needs to store kernel to range A, squashfs to B, and planned to use C as a overlay (although C never worked well).
The offical upgrade pages (only?) supports write a blob to a continuous range of nand. The reason my script works is the data are continuous.
why the script doesn't work on the uifs branch
the ubifs branch still need to store kernel to A. It doesn't make use of range B at all. Instead, it requires a ubifs on top of C. The ubifs needs to have two volumes:
rootfs(as the squashfs)roofs_data(as the overlay)
The problem is the kernel and squash are no longer stored in a continous range. We can't flash to only range A and range C, without overwriting the stuffs (B, language...ntgrdata) in between.
the solution/workaround
Here is a workaround to flash your ubifs branch without serial access.
I created a web/tftp flashable image with your openwrt-qualcommax-ipq807x-netgear_rax120v2-initramfs-uImage.itb wrapped inside.
(same script, just let KERNEL_IMG point to your ramfs itb. Here is the script)
With this image, you can boot into the ramfs image without serial. SSH into the router, then you just flash the sysupgrade.bin as how you did it previously.
Here is the full step for clarity:
- on stock firmware (
V1.2.8.40), do a factory reset for safety. - connect your laptop to one of the LAN ports of router ( I use static ip
192.168.1.10in my example) - flash this image via web-upgrade or tftp. wait long enough for fully finish
- ssh into
192.168.1.1, pull thesysupgrade.bininto router.
(inside router, runscp 192.168.1.10:~/sysupgrade.bin ./) sysupgrade -n -p sysupgrade.bin, wait long enough to finsh. Done.
Note1: make sure you wait long enough for each step to finshed, if not it can fail
Note2: if you have previously touched 0x00000e880000-0x000020000000, I suggest you to erase it to zero. Otherwise the sysupgrade may refuse to create ubifs.
Here is my personal build of sysupgrade.bin for anyone doesn't won't to build by themself.
3 Likes
Thanks for the analysis, can it be done without the script using only with the official building tools?
Maybe it's easiest to create a web/tftp flashable initramfs, from there it already works (for me) with the sysupgrade image.
can it be done without the script using only with the official building tools?
I don't have the knowledge of answering this.
Maybe it's easiest to create a web/tftp flashable initramfs, from there it already works (for me) with the sysupgrade image.
Yes. And actually we don't have to build the flashable initramfs nightly. As long as the MTD mappings (where we store A B C) are not changed, a previously built initramfs works for (supports sysupgrading to) all future builds.
I wanted to get openwrt running on it but when i soldered the serial port i noticed it would receive data from the router but it wouldn't TX
Did you try 5v mode on your usb-serial. I had the same issue as you with 3.3v, but 5v works perfectly.
Here is the full step for clarity:
- on stock firmware (
V1.2.8.40), do a factory reset for safety.- connect your laptop to one of the LAN ports of router ( I use static ip
192.168.1.10in my example)- flash this image via web-upgrade or tftp. wait long enough for fully finish
- ssh into
192.168.1.1, pull thesysupgrade.bininto router.
(inside router, runscp 192.168.1.10:~/sysupgrade.bin ./)sysupgrade -n -p sysupgrade.bin, wait long enough to finsh. Done.
I just noticed there is luci available on the ramfs, so ssh is not really needed.
Here is the simpler step:
- connect your laptop to one of the LAN ports of router.
- on stock firmware (V1.2.3.28 or V1.2.8.40), do a factory reset for safety. Wait long enough to finsh
- flash this image via web-upgrade or tftp. Wait long enough for fully finish
- access luci at http://192.168.1.1/, flash sysupgrade.bin via the backup/flash firmware page. Wait long enough to finsh. Done.
1 Like
Thanks for the analysis, can it be done without the script using only with the official building tools?
I figured it out, based on your current recipe inside ipq807x.mk, here is the PR.
3 Likes
Does the 5G lan need any special procedures to enable (i.e. flash firmware to mtd25) using the above web upgrade process?
The 5G lan interface still needs the same procedure as before, that won't change (because that firmware can't be distributed with OpenWrt I assume).
Flashing to mtd25 is the only supported methods at this time since the aq-fw-download utility is not supported anymore. I'll change the PR commit message and the docu later today
@wangyu's web-gui flashable factory image is pushed to the PR, with updated PR commit log and so on.
Flashing from Netgear stock gui works well for me, if someone is up for testing you can find the compiled images boretom openwrt-fork Release 2023-08-05. All without any guaranties as always, nmrpflash can be used to flash back to stock in case something went wrong though.
Edit: The first images had 'lan5' configured as WAN, I removed them. The new images with timestamp 18:46 are configured as expected, 'lan5' being part of the LAN bridge and 'wan' being WAN. Sorry @nschimme for that!
I managed to flash using the web-gui flushable factory image and then do the sys upgrade to get the full firmware. A few quirks:
-
scp didn't seem to work from my Mac to the RAX120v2 to upload the aqr firmware where it is complaining about ash: /usr/libexec/sftp-server: not found
-
The default network topology uses lan5 as wan as opposed to wan on stock. This caused some surprise for me as I expected the stock behavior. Plus, you're stuck with no internet if the wan firmware isn't installed yet.
-
I can't seem to get my wan to work. It says link connected but no IP address is being picked up from the cable modem. I tried doing a factory reset and nothing improves.
-
No wireless devices are listed. I assume something needs to be installed to enable them?
System log: https://gist.github.com/nschimme/6634f970ffc5e394cdb4faac1856a82a
- I'll test scp, not sure what happened
I'm very sorry about that, I take down the images I uploaded. I forgot about lan5 being wan on my configuration.
-
After you move lan5 to the lan bridge and move wan out of the lan bridge and make it wan, you have to reboot OpenWrt. Of course you have then to configure wan as DHCP client. Probably best to wait for the corrected images (in about 2 hours I'd say).
-
Wireless should just work, after you enable them. Nothing has to be installed
Thanks! I managed to get WAN working by rebooting the cable modem for 30 seconds. Internet works on wired now but I still unfortunately don't have anything popping up for the Wireless in LUCI. It's simply not available in the dropdown and I my /etc/config/wireless file is empty.