Can you paste the interface configuration for wwan0?
Have you used the same SIM card on your phone to test that it works?
hi guys, im also looking for the image for MR600 .Pls share if possible
to all those who have used it,how good is it
I had to press 2 to abort the boot and was asked for tftp server IP and bin file name. The flashing started automatically as the server was ready.
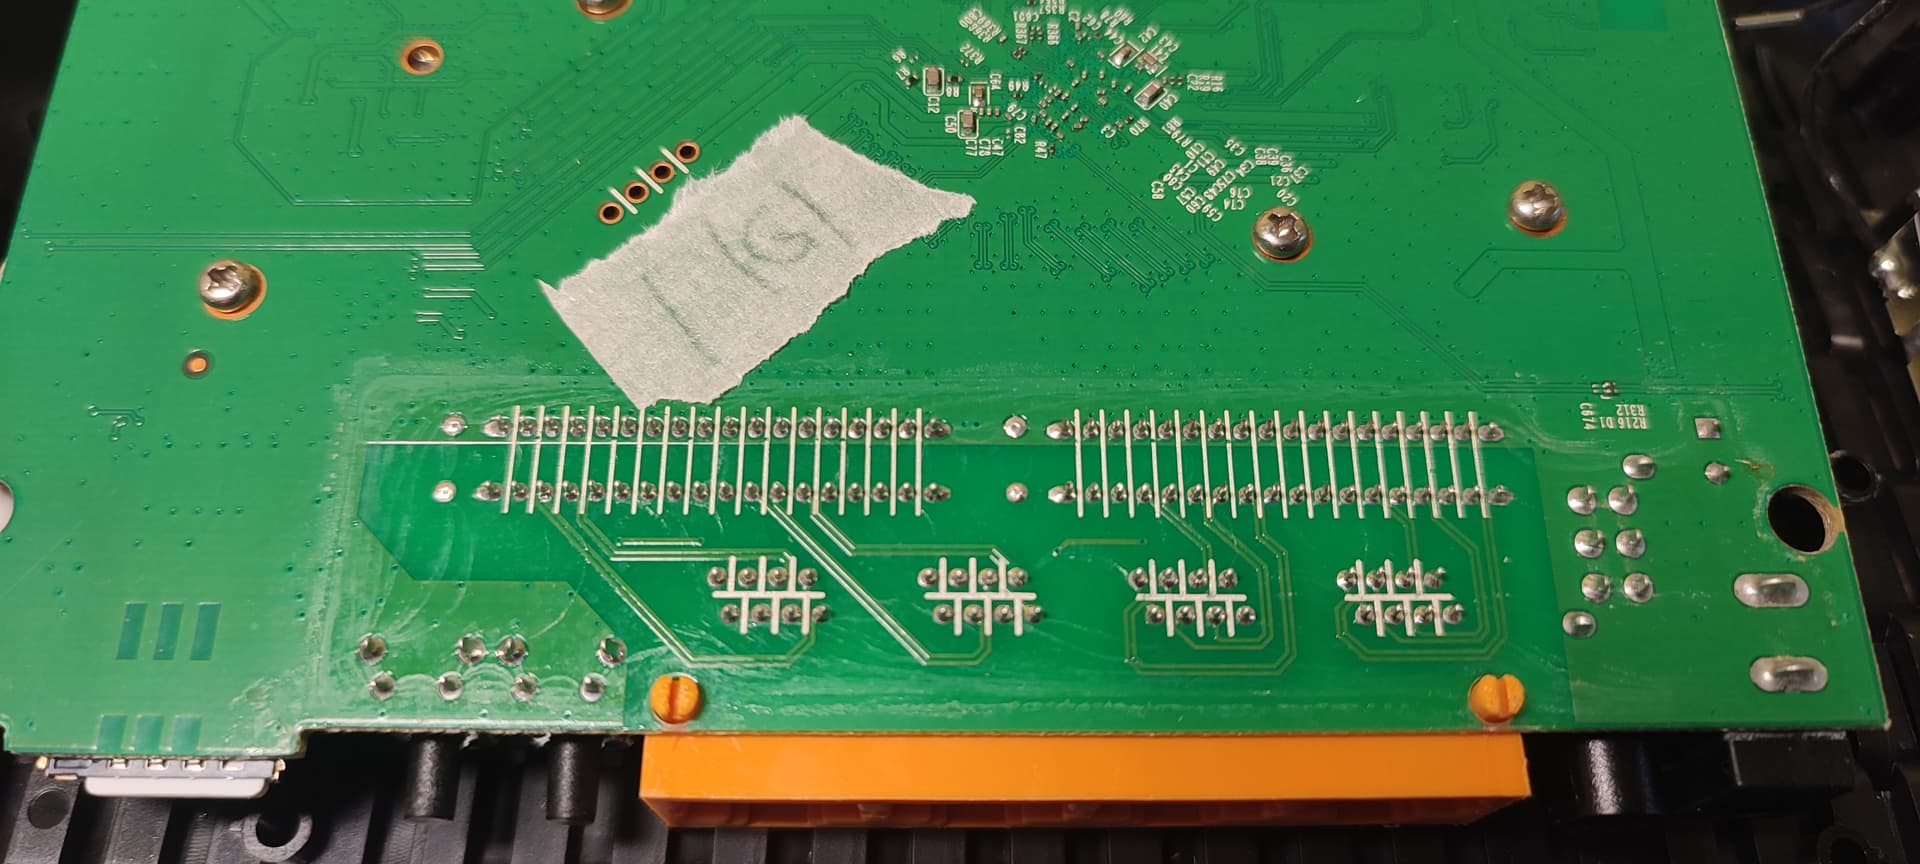
Would be neat if someone could share which pin is which on the serial on the v2, as all pictures of v2 devices vas been taken offline ![]()
Hello hypr,
this "Bad Magic Number" error was most likely caused by you using the uboot function "1" (automatic tftp boot) or calling "saveenv" manually in uboot command line (function "4").
It seems there is a misconfiguration of env-block in stock uboot. Using "saveenv" command saves the environment block to flash address 0x020000 - so the same place uboot also looks for kernel image. Unfortunately auto-tftp-boot saves variables automatically before booting the loaded tftp image:
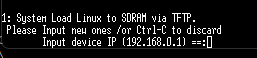
1: System Load Linux to SDRAM via TFTP.
 Please Input new ones /or Ctrl-C to discard
	Input device IP (192.168.0.1) ==:192.168.0.1
	Input server IP (192.168.0.5) ==:192.168.0.5
	Input Linux Kernel filename () ==:firmware.bin
...
Bytes transferred = 5532073 (5469a9 hex)
LoadAddr=84000000 NetBootFileXferSize= 005469a9
Erasing SPI Flash...
.
Writing to SPI Flash...

done
Automatic boot of image at addr 0x84000000 ...
## Booting image at 84000200 ...
   Image Name:   MIPS OpenWrt Linux-5.10.156
...
From what I've observed after several experiments, I'm pretty sure those "Erasing..." and "Writing SPI Flash..." indicate uboot saving environment. Afterwards even stock firmware does not boot anymore, and checking content of /dev/mtdblock1 in tftp booted openwrt afterwards cleanly shows the first 64k of the firmware image actually contain the uboot environment block.
If you use function "1" to load openwrt+initrd image you have to write firmware image again, for example using sysupgrade (or mtd tool directly, that can also be used to restore stock firmware image if you extract correct data from tp-link firmware binary).
Rebooting the device right after sysupgrade to https://downloads.openwrt.org/snapshots/targets/ramips/mt7621/openwrt-ramips-mt7621-tplink_mr600-v2-eu-squashfs-sysupgrade.bin boots the openwrt kernel just fine:
3: System Boot system code via Flash.
## Booting image at bc020200 ...
   Image Name:   MIPS OpenWrt Linux-5.10.156
   Image Type:   MIPS Linux Kernel Image (lzma compressed)
   Data Size:    2877817 Bytes =  2.7 MB
   Load Address: 80001000
   Entry Point:  80001000
   Verifying Checksum ... OK
   Uncompressing Kernel Image ... OK
No initrd
## Transferring control to Linux (at address 80001000) ...
## Giving linux memsize in MB, 128

Starting kernel ...

[    0.000000] Linux version 5.10.156 (builder@buildhost) (mipsel-openwrt-linux-musl-gcc (OpenWrt GCC 11.3.0 r21428-69f0c29b8b) 11.3.0, GNU ld (GNU Binutils) 2.37) #0 SMP Thu Dec 8 00:17:26 2022
[    0.000000] SoC Type: MediaTek MT7621 ver:1 eco:3
[    0.000000] printk: bootconsole [early0] enabled
[    0.000000] CPU0 revision is: 0001992f (MIPS 1004Kc)
[    0.000000] MIPS: machine is TP-Link MR600 v2 (EU)
[    0.000000] Initrd not found or empty - disabling initrd
...
[    0.000000] Kernel command line: console=ttyS0,115200 rootfstype=squashfs,jffs2
...
[    0.709841] Creating 5 MTD partitions on "spi0.0":
[    0.714640] 0x000000000000-0x000000020000 : "uboot"
[    0.720567] 0x000000020000-0x000000fc0000 : "firmware"
[    0.731980] 0x000000fc0000-0x000000fd0000 : "romfile"
[    0.738106] 0x000000fd0000-0x000000fe0000 : "config"
[    0.743996] 0x000000fe0000-0x000000ff0000 : "radio"
...
[    1.715157] /dev/root: Can't open blockdev
[    1.719352] VFS: Cannot open root device "(null)" or unknown-block(0,0): error -6
[    1.726838] Please append a correct "root=" boot option; here are the available partitions:
[    1.735162] 1f00             128 mtdblock0
[    1.735167]  (driver?)
[    1.741703] 1f01           16000 mtdblock1
[    1.741708]  (driver?)
[    1.748234] 1f02              64 mtdblock2
[    1.748239]  (driver?)
[    1.754743] 1f03              64 mtdblock3
[    1.754747]  (driver?)
[    1.761285] 1f04              64 mtdblock4
[    1.761289]  (driver?)
[    1.767815] Kernel panic - not syncing: VFS: Unable to mount root fs on unknown-block(0,0)
[    1.776067] Rebooting in 1 seconds..
However as you see at the end, this sysupgrade image cannot find root filesystem ![]()
I assume there is something missing in kernel or device-tree configuration that would allow auto-detection of the squashfs partition, which is hidden inside the "firmware" mtd device along with kernel itself.
I've downloaded the image-builder and will try to create a working image, though no idea yet how well that will go.
I have the same problem trying to upgrade to a newer snapshot build. The older version works fine.
Yes, it may be some recent change in openwrt build process for the tplink devices, or even some recent kernel-level change, I don't feel like digging through git logs what has been changed ![]()
Ultimate problem is in mtd_find_rootfs_from() function called from __mtdsplit_parse_uimage() ; this is responsible for finding rootfs after the kernel inside uimage partition ("firmware" in our case). Current implementation (https://git.openwrt.org/?p=openwrt/openwrt.git;a=blob;f=target/linux/generic/files/drivers/mtd/mtdsplit/mtdsplit.c) looks first right after the kernel (based on image size in uimage header), and then at the erase-block boundaries. This is normally fine, because rootfs should start right after the kernel.
However, the building script for tplink images ("Build/tplink-v2-image" block in include/image-commands.mk in the openwrt image-builder) PADS the final uimage (including 512 bytes tplink header), to the boundary of 4 (parameter "-a 0x4" for mktplinkfw2). In current snapshot this adds 3 0xFF bytes between kernel uimage and squasfs, which means the mtd_find_rootfs_from cannot find it, as it is neither right after the kernel, nor aligned to the next erase boundary (64k).
Quick fix is to download imagebuilder and change line 554 in include/image-commands.mk from:
-T $(TPLINK_HVERSION) -V "ver. 2.0" -a 0x4 -j \
to:
-T $(TPLINK_HVERSION) -V "ver. 2.0" -a 0x10000 -j \
This will put squashfs to the beginning of next erase block and kernel scan can find it again (possibly also "-a 0" might work to have no padding at all, haven't tried that).
I have flashed the rebuilt image to my router, and can confirm it works:
[    0.672080] 5 fixed-partitions partitions found on MTD device spi0.0
[    0.678508] OF: Bad cell count for /palmbus@1e000000/spi@b00/flash@0/partitions
[    0.685806] OF: Bad cell count for /palmbus@1e000000/spi@b00/flash@0/partitions
[    0.693857] OF: Bad cell count for /palmbus@1e000000/spi@b00/flash@0/partitions
[    0.701196] OF: Bad cell count for /palmbus@1e000000/spi@b00/flash@0/partitions
[    0.709577] Creating 5 MTD partitions on "spi0.0":
[    0.714379] 0x000000000000-0x000000020000 : "uboot"
[    0.720254] 0x000000020000-0x000000fc0000 : "firmware"
[    0.726658] 2 uimage-fw partitions found on MTD device firmware
[    0.732576] Creating 2 MTD partitions on "firmware":
[    0.737546] 0x000000000000-0x0000002c0000 : "kernel"
[    0.743491] 0x0000002c0000-0x000000fa0000 : "rootfs"
[    0.749320] mtd: setting mtd3 (rootfs) as root device
[    0.754459] 1 squashfs-split partitions found on MTD device rootfs
[    0.760643] 0x000000690000-0x000000fa0000 : "rootfs_data"
[    0.767010] 0x000000fc0000-0x000000fd0000 : "romfile"
[    0.773121] 0x000000fd0000-0x000000fe0000 : "config"
[    0.779060] 0x000000fe0000-0x000000ff0000 : "radio"
...
[    1.756083] VFS: Mounted root (squashfs filesystem) readonly on device 31:3.
[    1.767524] Freeing unused kernel memory: 1268K
[    1.772057] This architecture does not have kernel memory protection.
[    1.778531] Run /sbin/init as init process
1 Like
Thanks for the fix and explanation, I was able to run sysupgrade with these changes.
Would someone be as kind as to list out the steps to flash the mr600 from the snapshot
I see 3 images

I would not do that ; current build scripts in the snapshot still generate unbootable squashfs images for MR600 as far as I know (can anyone confirm this, or have it been fixed already?).
You'll have to create your own image, by downloading snapshot ImageBuilder here (see detailed instructions here), unpacking and modifying it according to my earlier post and executing build command for MR600:
make image PROFILE="tplink_mr600-v2-eu"
Flashing instructions depend on your hardware access level ; if you have serial console connected it's easy:
- keep "1" pressed in serial console client while the router boots, it should land in automatic TFTP boot
- set IPs and filename to access the snapshot initramfs-kernel.bin image (that one is fine)
- after the initramfs openwrt booting up, just press enter in serial console to enter shell, use scp or something similar to upload custom-built squashfs-sysupgrade.bin from imagebuilder into /tmp on the router and then use sysupgrade to flash it.
After reboot the openwrt should come up automatically from flash.
There's probably a way to boot initramfs-openwrt without serial console, using recovery button and setting up LAN IPs correctly, but I have not tried that so can't really give you reliable step list. Anyway, you will still need adjusted imagebuilder and custom-built sysupgrade image.
There's also a quite high chance the flashing attempt will brick your router ; uboot should still run but it may be difficult to recover without serial console.
TL;DR: in current state I would not recommend trying to flash anything without full uart access.
2 Likes
So I need to open it up and solder on a serial connection?
OK im in the tftp console of the MR600
Well that's linux console on a fully booted stock firmware - unfortunately I've never managed to log into that one (didn't try that hard either, as I was not interested in running tp-link firmware).
First good step would be getting into u-boot console; that's done by keeping key "4" pressed in the terminal while resetting the router (simply turn it off and on), if you wait a bit you should see the boot interrupted in a different console very shortly after starting up, before it even starts loading linux kernel.
In that console, you can then check with "printenv" which IPs are hardcoded for tftp boot (should be something like 192.168.0.1 for router and 192.168.0.5 for server, with "test.bin" being the firmware filename on tftp server). Then you'll have to connect netcable from your pc to one of router's LAN ports, set manually the server IP on your PC (== 192.168.0.5/24, or whatever is set in "serverip" uboot variable), start tftp server locally and put snapshot initramfs-kernel image there named as "test.bin".
Once you have all that set up correctly, you can execute "tftpboot" in uboot console; this will search for test.bin on your tftp server and download it to ram. As far as I know this is the only safe way for initial openwrt boot with no risk of ovewriting anything in flash. You should see something like this in the console if all works fine:
Trying Eth0 (10/100-M)

 Waitting for RX_DMA_BUSY status Start... done


 ETH_STATE_ACTIVE!!
TFTP from server 192.168.0.5; our IP address is 192.168.0.1
Filename 'test.bin'.

 TIMEOUT_COUNT=10,Load address: 0x84000000
Loading: checksum bad
Got ARP REPLY, set server/gtwy eth addr (b0:25:aa:3d:f9:f1)
Got it
#################################################################
	 #################################################################
	 #################################################################
	 #################################################################
	 #################################################################
	 #################################################################
	 #################################################################
	 #################################################################
	 #################################################################
	 #################################################################
	 #################################################################
	 #################################################################
	 #################################################################
	 #################################################################
	 #################################################################
	 #################################################################
	 #########################################
done
Bytes transferred = 5532073 (5469a9 hex)
LoadAddr=84000000 NetBootFileXferSize= 005469a9
When the download completes you'll end in uboot console again; now just typing "bootm" (or just "boot"? "help" should tell you, I don't recall now and my device's already packed for transfer) will boot into that downloaded image, which should result in something like this:
Automatic boot of image at addr 0x84000000 ...
## Booting image at 84000200 ...
   Image Name:   MIPS OpenWrt Linux-5.10.156
   Image Type:   MIPS Linux Kernel Image (lzma compressed)
   Data Size:    5531497 Bytes =  5.3 MB
   Load Address: 80001000
   Entry Point:  80001000
   Verifying Checksum ... OK
   Uncompressing Kernel Image ... OK
No initrd
## Transferring control to Linux (at address 80001000) ...
## Giving linux memsize in MB, 128

Starting kernel ...

[    0.000000] Linux version 5.10.156 (builder@buildhost) (mipsel-openwrt-linux-musl-gcc (OpenWrt GCC 11.3.0 r21416-f595bebc7f) 11.3.0, GNU ld (GNU Binutils) 2.37) #0 SMP Tue Dec 6 22:53:45 2022
......
Now openwrt will boot, you should get access to its shell and there you can continue by uploading your custom-built squashfs-sysupgrade image and flash it using sysupgrade command. CAREFUL: this is already a flash-level operation, if your image is not correct your router won't boot! (you'll still have access to uboot of course, so you can always tftboot into initramfs image again).
UPDATE: I see you've edited the screenshot to uboot already while I was typing... again, CAREFUL! Function "1" is faulty and you should only use it at your own risk if you know exactly what you're doing and do not want to boot into stock firmware anymore! See one of my earlier posts - successfully booting ANY image via tftp using this method results in a corrupted kernel partition in flash, and the router will not be bootable until you successfully reflash any image from running initramfs using sysupgrade!
1 Like
Im at the uboot prompt now - just trying to build the image in the backgroud also
bootargs=console=ttyS1,115200 root=/dev/mtdblock2 rootfstype=squashfs init=/sbin/init printk.time=1 flash_size=0x1000000 part_num=6 partitions=0000000000020000uboot,0002000000200000os-image,0022000000da0000file-system,00fc000000010000rom-config,00fd000000010000user-config,00ff000000010000radio,
bootcmd=tftp
bootdelay=5
baudrate=115200
ethaddr="00:xxxxxxx"
ipaddr=192.168.0.1
serverip=192.168.0.5
stdin=serial
stdout=serial
stderr=serial
BootType=3

Environment size: 458/4092 bytes
You can try setting up tftp server and booting the initramfs image in the meantime - that one is OK in the openwrt snapshot repository. It's just squashfs that has problems because of some tplink-specific alignments.
(ImageBuilder does not generate initramfs images anyway as far as I know.)
1 Like
So far so good !

ok my custom image is built

Do I just scp the sysupgrade one to the router ? like so :
# Upload firmware
scp firmware_image.bin root@openwrt.lan:/tmp

# Flash firmware
sysupgrade -v /tmp/firmware_image.bin
Success !

Right time to get luci working ![]()
Thank you @relghuar and @linosgian
Openwrt and MR600 working well with antennas on the roof
root@OpenWrt:~#  uqmi -d /dev/cdc-wdm0 --get-data-status
"connected"
root@OpenWrt:~# uqmi -d /dev/cdc-wdm0 --get-signal-info
{
        "type": "lte",
        "rssi": -77,
        "rsrq": -11,
        "rsrp": -105,
        "snr": 9.800000
}
1 Like
Great news ![]()
My usecase is also an LTE router, though I haven't had opportunity yet to actually test the modem; that will come next week. Good to see there are no obvious problems with it.
Btw. part (majority actually) of stock firmware image is some kind of modem firmware, "modem.zip" containing 3 files:
mdm9640-boot.img:  Android bootimg, kernel, page size: 2048, cmdline (noinitrd rw console=ttyHSL0,115200,n8 androidboot.hardware=qcom ehci-hcd.park=3 msm_rtb.filter=0x37)
mdm9640-sysfs.ubi: UBI image, version 1
NON-HLOS.ubi:      UBI image, version 1
MDM9640 seems to be related to Snapdragon X12, might be interesting to find out how to talk to that internally for future reference.
As we have it working reasonably well now, does anyone have any ideas how to get my build hotfix mainlined to make snapshot builds flashable? Perhaps make that "-a ???" argument as variable with default value so this specific model does not cause problems for other tp-link variants? Although honestly I can't imagine how this can work for any other devices correctly, other than accidentally being aligned just right for kernel scan to find squashfs root...
(Un)related question - does anyone have any idea how to build the actual factory image, usable directly from stock firmware UI? Trying to use squashfs-factory.bin image for stock upgrade fails currently. As far as I can tell, stock firmware binary seems to begin with u-boot partition, although also prefixed by 512byte header; this one not actually included in flash, unlike the kernel header.
PS: after unpacking stock firmware image, there seems to be this line in passwd file:
admin:$1$$iC.dUsGpxNNJGeOm1dFio/:0:0:root:/:/bin/sh
which according to this should translate to admin/1234 default login ; this may work to get stock shell, which might again help to find out what goes wrong when we try to upgrade using openwrt squashfs-factory image...