Support MA5671A SFP GPON

I booted uboot from xmodem... maybe that's why, I'll try again later and will report back

Huh, I somehow managed to brick it... not even xmodem transfer works.. for some reason my compiled uboot just RESET itself while it's trying to load and I can't load my stock uboot mtd0

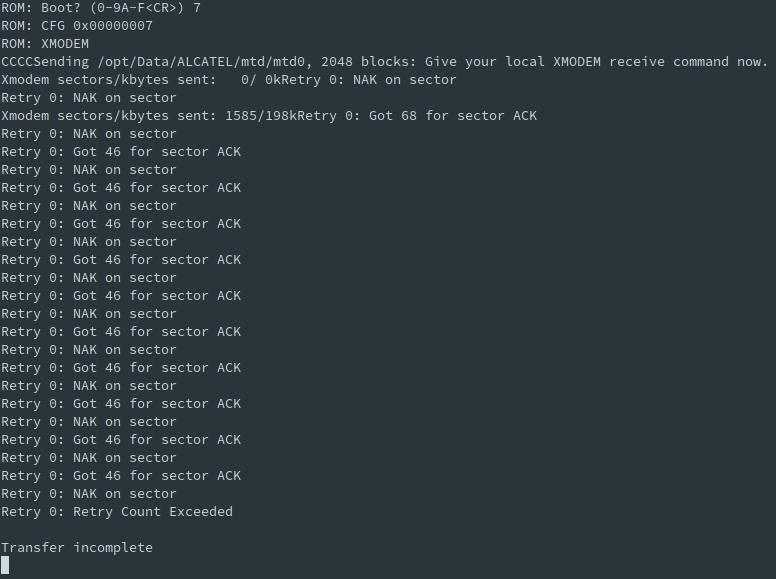
very weird.... worst case i'll just pull out the flash and reflash it... but it worked yesterday, why now it doesn't??

anyway, here's the ROM modes... kinda interesting

ROM: Boot? (0-9A-F<CR>) 0
ROM: CFG 

ROM: Boot? (0-9A-F<CR>) 1
ROM: CFG 0x00000001
ROM: NOR

ROM: Boot? (0-9A-F<CR>) 2
ROM: CFG 0x00000002
ROM: NAND8, no ECC

ROM: Boot? (0-9A-F<CR>) 3
ROM: CFG 0x00000003
ROM: NAND8, with ECC

ROM: Boot? (0-9A-F<CR>) 4
ROM: CFG 0x00000004
ROM: SFLASH

ROM: Boot? (0-9A-F<CR>) 5
ROM: CFG 0x00000005
ROM: SFLASH-2

ROM: Boot? (0-9A-F<CR>) 6
ROM: CFG 0x00000006
ROM: SFLASH-4

ROM: Boot? (0-9A-F<CR>) 7
ROM: CFG 0x00000007
ROM: XMODEM

ROM: Boot? (0-9A-F<CR>) 8
ROM: CFG 0x00000008
ROM������O��

ROM: Boot? (0-9A-F<CR>) 9
ROM: CFG 0x00000009
ROM: RGMII_A0

ROM: Boot? (0-9A-F<CR>) A
ROM: CFG 0x0000000A
ROM: RGMII_A1

ROM: Boot? (0-9A-F<CR>) B
ROM: CFG 0x0000000B
ROM: RGMII_A2

ROM: Boot? (0-9A-F<CR>) C
ROM: CFG 0x0000000C
ROM: RGMII_A3

ROM: Boot? (0-9A-F<CR>) D
ROM: CFG 0x0000000D
ROM: RGMII_B0
ROM: ** RETRY, 0x00000001

ROM: Boot? (0-9A-F<CR>) E
ROM: CFG 0x0000000E
ROM: RGMII_B1

ROM: Boot? (0-9A-F<CR>) F
ROM: CFG 0x0000000F
ROM: RGMII_B2

I wonder what's the mode 0 does... CFG? is this for configuring default boot flag? don't want to mess with it in case these are OTP memory...

EDIT:

Ha! I know why my uboot has skipped and RESET itself, apparently I've also corrupted the uenv and it tried to do whatever is inside the uenv of the flash which is garbage, I just short the flash while uboot is booting and it fallback to its original env

EDIT: yes! the custom uboot has booted successfully, idk why but it always get corrupted when i write it via xmodem in stock uboot and render the stick unbootable, i have to use mtd command in openwrt and it's worked fine, there's still need to work on the code because of the gpio command not found

Bootmode: 0x06
Reset cause: Power-On Reset
CPU Clock: 400 MHz
DRAM:  64 MiB
Now running in RAM - U-Boot at: 83fc4000
SF: Detected S25FL129P_64K with page size 64 KiB, total 16 MiB
Net:   GPHY0, SGMII
Unknown command 'gpio' - try 'help'
Hit any key to stop autoboot:  0 
SF: Detected S25FL129P_64K with page size 64 KiB, total 16 MiB
## Booting kernel from Legacy Image at 80f00000 ...
   Image Name:   MIPS OpenWrt Linux-3.10.12
   Created:      2015-06-12   7:26:12 UTC
   Image Type:   MIPS Linux Kernel Image (lzma compressed)
   Data Size:    1183972 Bytes = 1.1 MiB
   Load Address: 80002000
   Entry Point:  80002000
   Verifying Checksum ... OK
   Uncompressing Kernel Image ... 

After reading this post (credit @centaur)
https://forum.openwrt.org/t/support-for-gpon-sfp-fgs202/42641/53

I decided to stop the clutter of cables and constructed a simple cable that takes up little space while allowing me access to the MA5671A
I didn't have to use an external power supply because the USB TTL adapter provides 3.3V DC

Connection diagram
USB TTL(UART) Adapter ---------- SFP 20pins Molex connector

3.3V -------red ----------------------------pin #15 and #16
TX --------orange ------------------------pin #2
RX ---------yellow ------------------------pin #7
GND ------green ------------------------ pin #10

IMPORTANT! Use GND wire as ON/OFF switch, otherwise there will be a slight delay before data is displayed on the console (putty/TeraTerm)

1 Like

Dear friends. Thanks for the topic.
The module is good. It has a lot of possibilities and keeps the temperature low. I've struggled a lot to run it with my internet provider. The password, GPON serial number and MAC are encoded using base64 and stored into sfp_a2_info variable. "@" is used as a new line delimiter "\n"

PART 1. BACKUP
Before you start, save your crucial data to backup files.
root@SFP:~# fw_printenv

Save mtd1 partition
user@ubuntu:~$ nc -l -p 1234 > mtd1.bin (listen on the linux PC, port 1234@ 192.168.1.11)
root@SFP:~# cat /dev/mtd1 | nc 192.168.1.11 1234 (execute on MA5671A)

PART 2. PREPARATIONS
Existing data of my module.
Serial Number = HWTC11223344
gpon Password = 0x00 0x00 0x00 0x00 0x00 0x00 0x00 0x00 0x00 0x00
MAC = 48:57:02:da:be:ef

I will be changing to:
Serial Number = ZTEG87654321
gpon Password = 0xde 0xad 0x11 0x22 0x33 0x44 0x55 0x66 0xbe 0xef
MAC = 49:f2:02:33:7f:11
root@SFP:~# fw_printenv sfp_a2_info

sfp_a2_info=begin-base64 644 sfp_a2_info @XwDOAFoA0wCMoHUwiLh5GK/IAACIuAAAm4Ii0HuGK9QJzwANB8sAEAAAAAAA@AAAAAAAAAAAAAAAAAAAAAAAAAAAAAAA/gAAAAAAAAAEAAAABAAAAAQAAAAEA@AAAAAABMIzZ9gwxeAAEAAf////8CAAFA//8BQAAAcAAAAAAAEGD/////////@////////////MDMwMzJDVVcAAAAAAAD+GP//////////////////////////@//////////8AAhQAAAAAAAAAAAAAAAAAAAAAAAAAAAAAAAAAAAAAAAAAAAAA@AAAAAAAAAAJIV1RDESIzRP///////////////////wAAAAAAAAAAAAAAAAAA@AAAAAAAAAAAAAAAAAAAAAAAAhCXp6S3bWnEE46bzNVgwCzEoIM19H2ZIJqDn@C97inzKY4ssTj9LUDzY4tOppNIJ4I1ZuuUWBOqfOL6dRnac7HCvCAAAAAAAA@AAAAAAAAAAAAAAAAAAAAAAAAAAAAAAAASFcC2r7vAAAAAAAAAAAAAAAAAAAA@AAAAAAAAAAAAAAAAAAAAAAAAAAAAAAAAAAAAAAAAAAAAAAAAAAAAAAAAAAAA@AAAAAAAAAAAAAAAAAAAAAAAAAAAAAAAAAAAAAAAAAAAAAAAAAAAAAAAAAAAA@AAAAAAAAAAAAAAAAAAAAAAAAD/0P/gAAAAAAAAAAAAAAAAAAAAAAAAAAAAAA@AAAAAAAAAAAAAAAAAAAAAAAAAAAAAAAAAAAAAAAAAAAAAAAAAAAAAAAAAAAA@AAAAAAAAAAAAAAAAAAAAAAAAAAAAAAAAAAAAAAAAAAAAAAAAAAAAAAAAAAAA@AAAAAAAAAAAAAA==@====@

To display sfp_a2_info in friendly format

root@SFP:/tmp# fw_printenv sfp_a2_info | sed "s/^sfp_a2_info=//" | tr '@' '\n'

begin-base64 644 sfp_a2_info 
XwDOAFoA0wCMoHUwiLh5GK/IAACIuAAAm4Ii0HuGK9QJzwANB8sAEAAAAAAA
AAAAAAAAAAAAAAAAAAAAAAAAAAAAAAA/gAAAAAAAAAEAAAABAAAAAQAAAAEA
AAAAAABMIzZ9gwxeAAEAAf////8CAAFA//8BQAAAcAAAAAAAEGD/////////
////////////MDMwMzJDVVcAAAAAAAD+GP//////////////////////////
//////////8AAhQAAAAAAAAAAAAAAAAAAAAAAAAAAAAAAAAAAAAAAAAAAAAA
AAAAAAAAAAJIV1RDESIzRP///////////////////wAAAAAAAAAAAAAAAAAA
AAAAAAAAAAAAAAAAAAAAAAAAhCXp6S3bWnEE46bzNVgwCzEoIM19H2ZIJqDn
C97inzKY4ssTj9LUDzY4tOppNIJ4I1ZuuUWBOqfOL6dRnac7HCvCAAAAAAAA
AAAAAAAAAAAAAAAAAAAAAAAAAAAAAAAASFcC2r7vAAAAAAAAAAAAAAAAAAAA
AAAAAAAAAAAAAAAAAAAAAAAAAAAAAAAAAAAAAAAAAAAAAAAAAAAAAAAAAAAA
AAAAAAAAAAAAAAAAAAAAAAAAD/0P/gAAAAAAAAAAAAAAAAAAAAAAAAAAAAAA
AAAAAAAAAAAAAAAAAAAAAAAAAAAAAAAAAAAAAAAAAAAAAAAAAAAAAAAAAAAA
AAAAAAAAAAAAAA==
====

PART 3. MODIFICATIONS

Transfer sfp_a2_info into temporary file
root@SFP:~# fw_printenv sfp_a2_info | sed "s/^sfp_a2_info=//" > /tmp/sfp_a2.txt

Example of changing serial number (6th line) using online decoder
AAAAAAAAAAJIV1RDESIzRP///////////////////wAAAAAAAAAAAAAAAAAA
https://base64.guru/converter/decode/hex
00000000000000024857544311223344ffffffffffffffffffffffffffffff0000000000000000000000000000

change SN to ZTEG87654321 5a54454787654321
00000000000000025a54454787654321ffffffffffffffffffffffffffffff0000000000000000000000000000
https://base64.guru/converter/encode/hex
AAAAAAAAAAJaVEVHh2VDIf///////////////////wAAAAAAAAAAAAAAAAAA

replace the modified line number 6 using vi editor
root@SFP:~# vi /tmp/sfp_a2.txt

repeat these steps for password(line 5)
//////////8AAhQAAAAAAAAAAAAAAAAAAAAAAAAAAAAAAAAAAAAAAAAAAAAA
ffffffffffffffff0002140000000000000000000000000000000000000000000000000000000000000000000
ffffffffffffffff000214dead112233445566beef000000000000000000000000000000000000000000000000
//////////8AAhTerREiM0RVZr7vAAAAAAAAAAAAAAAAAAAAAAAAAAAAAAAA

and MAC address(line 9)
AAAAAAAAAAAAAAAAAAAAAAAAAAAAAAAASFcC2r7vAAAAAAAAAAAAAAAAAAAA
000000000000000000000000000000000000000000000000485702dabeef000000000000000000000000000000
00000000000000000000000000000000000000000000000049F202337F11000000000000000000000000000000
AAAAAAAAAAAAAAAAAAAAAAAAAAAAAAAASfICM38RAAAAAAAAAAAAAAAAAAAA

Transfer modified sfp_a2.txt file back into variable sfp_a2_info
root@SFP:~# fw_setenv sfp_a2_info `cat /tmp/sfp_a2.txt`

PART 4. REVIEW AND TESTING
After reboot I check for new variables
root@SFP:~# fw_printenv sfp_a2_info

sfp_a2_info=begin-base64 644 sfp_a2_info @XwDOAFoA0wCMoHUwiLh5GK/IAACIuAAAm4Ii0HuGK9QJzwANB8sAEAAAAAAA@AAAAAAAAAAAAAAAAAAAAAAAAAAAAAAA/gAAAAAAAAAEAAAABAAAAAQAAAAEA@AAAAAABMIzZ9gwxeAAEAAf////8CAAFA//8BQAAAcAAAAAAAEGD/////////@////////////MDMwMzJDVVcAAAAAAAD+GP//////////////////////////@//////////8AAhTerREiM0RVZr7vAAAAAAAAAAAAAAAAAAAAAAAAAAAAAAAA@AAAAAAAAAAJaVEVHh2VDIf///////////////////wAAAAAAAAAAAAAAAAAA@AAAAAAAAAAAAAAAAAAAAAAAAhCXp6S3bWnEE46bzNVgwCzEoIM19H2ZIJqDn@C97inzKY4ssTj9LUDzY4tOppNIJ4I1ZuuUWBOqfOL6dRnac7HCvCAAAAAAAA@AAAAAAAAAAAAAAAAAAAAAAAAAAAAAAAASfICM38RAAAAAAAAAAAAAAAAAAAA@AAAAAAAAAAAAAAAAAAAAAAAAAAAAAAAAAAAAAAAAAAAAAAAAAAAAAAAAAAAA@AAAAAAAAAAAAAAAAAAAAAAAAAAAAAAAAAAAAAAAAAAAAAAAAAAAAAAAAAAAA@AAAAAAAAAAAAAAAAAAAAAAAAD/0P/gAAAAAAAAAAAAAAAAAAAAAAAAAAAAAA@AAAAAAAAAAAAAAAAAAAAAAAAAAAAAAAAAAAAAAAAAAAAAAAAAAAAAAAAAAAA@AAAAAAAAAAAAAAAAAAAAAAAAAAAAAAAAAAAAAAAAAAAAAAAAAAAAAAAAAAAA@AAAAAAAAAAAAAA==@====@

root@SFP:~# fw_printenv nPassword
nPassword=0xde 0xad 0x11 0x22 0x33 0x44 0x55 0x66 0xbe 0xef
root@SFP:~# fw_printenv gSerial
gSerial=ZTEG87654321
root@SFP:~# fw_printenv ethaddr
ethaddr=49:f2:02:33:7f:11

check registration status for O5 (successful)
root@SFP:~# onu ploamsg
errorcode=0 curr_state=5 previous_state=4 elapsed_msec=243880
root@SFP:~#

5 Likes

This is my SFP breakout, it takes so long to make... worked great though

1 Like

@anon23891239
Thank you for your contribution.

@minhng99
Nice setup you have, more future proof. It's also good for taking measurements.

Welcome again. In this thread I found a lot of interesting information that I shared on the Russian forum. I also described how to unlock the bootloader in a more friendly way, step by step. I wanted to share my description with you.

Connect the USB adapter with SFP connector to the module. Start the TeraTerm program and set the serial port parameters: drivers, speed, COM port, (115200 8N1).

This is what a locked bootloader looks like.

ROM: V1.1.4
ROM: CFG 0x00000006
ROM: SFLASH-4
hw fuse format 1
 
U-Boot 2011.12-lantiq-gpon-1.2.24 (Nov 03 2014 - 22:46:28), Build: falcon_sfp_linux
 
Board: SFP
DRAM:  64 MiB
Now running in RAM - U-Boot at: 83fc8000
SF: Detected S25FL129P_64K with page size 64 KiB, total 16 MiB

Create a temporary connection between contacts 4 and 5 of the flash memory and switch the module back on.

Type 7 at the prompt and send 1224ABORT.bin file to the flash. (Modified file u-boot.bin is located a couple of posts above)
TeraTerm File->Transfer->XMODEM->Send 1224ABORT.bin

ROM: V1.1.4
ROM: CFG 0x00000006
ROM: SFLASH-4
ROM: CFG 0x00000006
ROM: SFLASH-4
ROM: CFG 0x00000006
ROM: SFLASH-4
ROM: Boot? (0-9A-F<CR>) 7
ROM: CFG 0x00000007
ROM: XMODEM
CCCCCCCCCCCCCC

When the 1224BORT.BIN file transfer is complete, press Ctrl-C to get this prompt.

FALCON =>

Enter these variables to keep the bootloader unlocked permanently.

FALCON => setenv bootdelay 5
FALCON => setenv asc 0
FALCON => setenv preboot "gpio input 105;gpio input 106;gpio input 107;gpio input 108;gpio set 3;gpio set 109;gpio set 110;gpio clear 423;gpio clear 422;gpio clear 325;gpio clear 402;gpio clear 424"
FALCON => saveenv 

Restart the module.

This is what a unlocked bootloader looks like.

ROM: V1.1.4
ROM: CFG 0x00000006
ROM: SFLASH-4
hw fuse format 1
 
U-Boot 2011.12-lantiq-gpon-1.2.24 (Nov 03 2014 - 22:46:28), Build: falcon_sfp_linux
 
Board: SFP
DRAM:  64 MiB
Now running in RAM - U-Boot at: 83fc8000
SF: Detected W25Q128 with page size 4 KiB, total 16 MiB
Chip:  FALCON-S (A22)
Bootmode: 0x06
Reset cause: Power-On Reset
CPU Clock: 400 MHz
Net:   SGMII, SERDES [PRIME]
gpio: pin 105 (gpio 105) value is 0
gpio: pin 106 (gpio 106) value is 0
gpio: pin 107 (gpio 107) value is 0
gpio: pin 108 (gpio 108) value is 1
gpio: pin 3 (gpio 3) value is 1
gpio: pin 109 (gpio 109) value is 1
gpio: pin 110 (gpio 110) value is 1
gpio: pin 423 (gpio 423) value is 0
gpio: pin 422 (gpio 422) value is 0
gpio: pin 325 (gpio 325) value is 0
gpio: pin 402 (gpio 402) value is 0
gpio: pin 424 (gpio 424) value is 0
Press SPACE to delay and Ctrl-C to abort autoboot in 5 seconds 

Now you can upload mtd2 image0 with full shell (The file is located a couple of posts above)

FALCON => loadb 0x80800000
## Ready for binary (kermit) download to 0x80800000 at 115200 bps... 

TeraTerm File->Transfer->Kermit->Send MA5671Amod.bin
File transfer will take about 25 minutes.

Last step. Move the file from memory to flash.

FALCON => sf probe 0
FALCON => sf erase C0000 740000
FALCON => sf write 80800000 C0000 740000

The module should have two images on the flash: active(0) at 0xC0000 and standby(1) at 0x800000
If standby is also present, image1_is_valid=1

FALCON => printenv image1_is_valid
image1_is_valid=1
FALCON => 

Make sure the active one is 0

FALCON => printenv committed_image
committed_image=0
FALCON => 

When finished, insert the module into the router and log in at 192.168.1.10

5 Likes

My Alcatel-Lucent SFP doesn't do GEM multicast forwarding :frowning: Couldn't use it because I need IPTV from my ISP which goes through GEM multicast

I think it have something to do with the file /etc/mibs/sfp_alu.ini because it looks like the file containing OMCI code

i try firmware MA5671Amod-mtd2.bin
root@SFP:~# onu gtcsng
errorcode=0 serial_number=HWTC12345678

but i dont know how to change SN.

Dear friends,
After surfing the Mikrotik forum I thought about trying the firmware from Chinese modules popular in Spain on the MA5671A insert. Speaking of CarlitoProxx(CPGOS03-0490) aka Hilnk(HL23446). The software is more open and has Luci web interface and many advantages compared to highly customized solutions from telecom vendors.
First of all, the optical calibration is preserved.
Furthermore, it is possible to change these OMCI parameters used during authentication with the OLT.

  • GPON SN, GPON password, Vendor id, ONT Version, ONT model, Equipment id, LOID, LOID password(checkcode), firmware version, MAC address

It is also possible to change the EEPROM parameters of the SFP module that are displayed on the router screen.

  • Vendor name, Part number, Part number revision, Serial number, Date

The entire procedure is covered here in considerable detail:
https://forum.mikrotik.com/viewtopic.php?f=3&t=116364#p751330

Image files
http://s000.tinyupload.com/index.php?file_id=39744640834338451129
CPGOS03-0490 HL23446 Image0
http://s000.tinyupload.com/index.php?file_id=51194170383576121597
CPGOS03-0490 HL23446 Image1

PROCEDURE FOR UNLOCKED MA5671A MODULE with ROOT SHELL

For a module with shell access, uploading a new firmware will not take long. To do this, login as usual to the SFP module at 192.168.1.10. Then simply move the image files from your PC to the SFP module's /tmp folder using the scp protocol. After image transfer:

root@SFP:/# cd /tmp/
root@SFP:/# cat /proc/mtd

root@SFP:/tmp# mtd -e linux write mtd2.bin linux
Unlocking linux ...
Erasing linux ...
Writing from mtd2.bin to linux ...
root@SFP:/tmp#

root@SFP:/tmp# mtd -e image1 write mtd5.bin image1

The module with the CPGOS03-0490 HL23446 firmware needs two new variables to work properly
root@SFP:/# fw_setenv ont_serial HWTC11223344
root@SFP:/# fw_setenv target oem-generic

root@SFP:/# fw_setenv committed_image 0
Restart the module for the changes to take effect.

PROCEDURE FOR NEW MA5671A MODULE WITH UNLOCKED BOOTLOADER

In case of the factory module, it must first be unlocked using the procedures described above and a small amount of soldering. After unblocking the bootloader it is enough to upload image files using kermit protocol.

FALCON => loadb 0x80800000
Ready for binary (kermit) download to 0x80800000 at 115200 bps...

TeraTerm File->Transfer->Kermit->Send mtd2.bin
File transfer will take about 13-17 minutes.

FALCON => sf probe 0
FALCON => sf erase C0000 740000
FALCON => sf write 80800000 C0000 740000

A similar approach will apply to the image1
TeraTerm File->Transfer->Kermit->Send mtd5.bin
File transfer will take about 13-17 minutes

FALCON => sf probe 0
FALCON => sf erase 800000 800000
FALCON => sf write 80800000 800000 800000

The module with CPGOS03-0490 HL23446 firmware needs two new variables to work properly
FALCON => setenv ont_serial HWTC11223344
FALCON => setenv target oem-generic

FALCON => setenv committed_image 0
FALCON => saveenv

Disconnect, insert the module into the router and log into 192.168.1.10 to complete the customization.

EXAMPLE OF CONFIGURATION

Login to the SFP module with new firmware at 192.168.1.10. Apply the desirable GPON serial number and password.

root@SFP:/# fw_setenv ont_serial ELTX11223344
root@SFP:/# uci set gpon.ploam.nPassword="0xde 0xad 0x31 0x32 0x33 0x34 0x35 0x36 0xbe 0xef"
root@SFP:/# uci commit
root@SFP:/# reboot

A selection of optional parameters
root@SFP:/# fw_setenv image0_version 9.0.0
root@SFP:/# fw_setenv image1_version 9.0.0
root@SFP:/# fw_setenv omci_loid someLOIDnumber
root@SFP:/# fw_setenv omci_lpwd LOIDpassword

root@SFP:/# uci set network.lct.macaddr="ac:9a:96:de:be:ef"
root@SFP:/# uci set network.host.macaddr="ac:9a:96:de:be:ef"
root@SFP:/# uci commit

root@SFP:/# reboot

I decided that I should also test the eprom values. Everything works well. Values like these:Vendor Name(HUWAWEI), Vendor Part Number(MA5671A), Vendor Revision(0001),Vendor Serial(ELTX11223344), Manufacturing Date(191029),MAC OUI(AC9A96) are visible on the router

Reset all eprom values(optional)
root@SFP:/# sfp_i2c -d yes

root@SFP:/# sfp_i2c -i 0 -s "HUWAWEI"
root@SFP:/# sfp_i2c -i 1 -s "MA5671A"
root@SFP:/# sfp_i2c -i 2 -s "0001"
root@SFP:/# sfp_i2c -i 3 -s "ELTX11223344"
root@SFP:/# sfp_i2c -i 4 -s "191029"
root@SFP:/# sfp_i2c -i 36 -w 0xac9a96 -4 -m 0x00FFFFFF

VERIFY GPON SN and GPON Password in real time

By using the onu command we are able to view in real time the Serial Number and Password that is sent to the OLT
onu gtcpg - onu gtc password get
onu gtcsng - onu gtc serial number get
For some reason the version of onu included in this firmware displays these values in decimal format. This is still good enough for verification.
ELTX 11223344 - 69 76 84 88 17 34 51 68
0xde 0xad 0x31 0x32 0x33 0x34 0x35 0x36 0xbe 0xef - "222 173 49 50 51 52 53 54 190 239"

root@SFP:/# onu gtcsng
errorcode=0 serial_number="69 76 84 88 17 34 51 68"
root@SFP:/# onu gtcpg
errorcode=0 password="222 173 49 50 51 52 53 54 190 239"

So to remind you that the ONU successfully connected should be in the state O5
root@SFP:/# onu ploamsg
errorcode=0 curr_state=5

7 Likes

Hello,

First of all, thank you all for the awesome work.

Trying to flash OpenWRT on MA5671A using the last images posted.

For me, the problem is that it seems in enters in a bootloop, after starting S60optic.sh (this is the last part logged before it reboots).

uboot printenv log:

https://pastebin.com/4JpGqhma

openwrt booting messages with debug=4:

https://pastebin.com/xiUMpShf

Any ideas?

Regards

If you are using a USB powered adapter, check your SFP module in the router. The power from the computer's USB port may not be sufficient when the optics are turned on.

Thank you for the reply.

Yes, I'm using a USB powered CP2102 adapter.

But I tried on the router too and I cannot reach 192.168.1.10.

Regards

Yes, It seems this was exactly the problem.

For some reason SFP adapter has ip 192.168.1.57.

Thank you very much :smiley:

Best Regards

Hello,

I changed S/N, MACs and eeprom i2c variables to suit original equipment.

For some reason PLOAM state is always 1. Exceptionally I see 2 here but it last one or two seconds.

Receive state machine status and Receive superframe state machine status are syncing, but nothing else.

I tried rebooting with the fiber cable inserted but it has the same behaviour.

Regards

Hello morishe

A few questions
Is the printenv output given above complete? If not, what values have been deleted? In this form it appears as if the boot environment is default or without optical calibration.

Have you confirmed that the ont_serial and password changes have been saved?
Do all the variables look good?
root@SFP:/# fw_printenv ont_serial
root@SFP:/# uci show gpon.ploam.nPassword

root@SFP:/# onu gtcsng
root@SFP:/# onu gtcpg

Yes, the printenv output in pastebin above is complete.

The commands ont_serial and gpon.ploam.nPassword looks good.

ONU commands are the same but in dec form.

My ISP only checks s/n. How should I indicate that the password is blank?

The optical calibration is something exclusive from every SFP unit or it could have default values?

Regards

I haven't analyzed the optical calibration closely because there is not much documentation available for this chip. Anyway, I noticed that due to the lack of variable goi_config or default values, the laser will not turn on. See if you can extract mtd1 partition from the full image(post number 7) or from github. Save your old mtd1(uboot_env) just in case.

https://forum.openwrt.org/t/support-ma5671a-sfp-gpon/48042/7
https://github.com/minhng99/alcatel_lucent-lantiq_falcon/blob/master/mtd/mtd1

Then move the mtd1 image file from your PC to the SFP module's /tmp folder using the scp protocol. After image transfer:

root@SFP:/# cd /tmp/
root@SFP:/# cat /proc/mtd
root@SFP:/tmp# mtd -e uboot_env write mtd1 uboot_env

After restarting, verify that fw_printenv has changed and rewrite target, password, SN values again

root@SFP:/# fw_setenv target oem-generic
root@SFP:/# fw_setenv ont_serial ELTX11223344
root@SFP:/# uci set gpon.ploam.nPassword="0xde 0xad 0x31 0x32 0x33 0x34 0x35 0x36 0xbe 0xef"
root@SFP:/# uci commit
root@SFP:/# reboot

Thank you very much for the detailed instructions. I will try them now.

Keep you informed

@anon23891239

I tried with bmx29 and minhng99 mtd1's but It doesn't solve the problem :frowning:

In gtop I see PLOAM state = 1.

One thing that surprises me: If I connect the fiber cable with the module started it doesn't change anything (same values gtop with cable disconnected). If I restart the module with the cable inserted I see sync in Receive state machine status and Receive superframe state machine status and Downstream FEC= YES. In both cases same Ploam state.

Any other ideas?

i have same problem firmware HL23446 is not work
change to other firmware now working