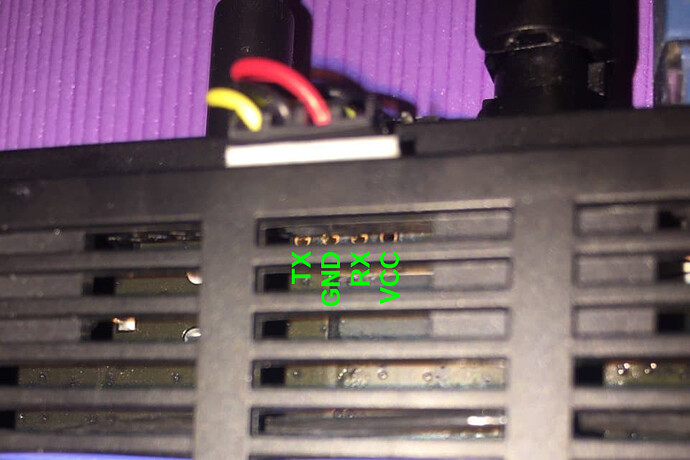
Important notes:
- If you do not follow the instructions described here correctly, you can damage your device!
- Capture everything you do in the UART console (for example, in minicom, this is enabled by pressing Ctrl+Z, L). The resulting text files will help me figure out what went wrong and how to restore the device.
- If something went wrong, then stop and describe what happened here on the forum, so as not to worsen the situation, but to sort it out together.
Currently, I have found 2 ways to open ssh access.
1 ) Via UART on the board.
This method is easier for those who know how to use a soldering iron. You will need a USB to TTL adapter.
UART pinouts:
4  3  2  1
-  -  -  -
t  g  r  v
x  n  x  c
   d     c
I connected to UART without opening the case through the vents.
Connecting the adapter:
RX <---> TX
TX <---> RX
GND <-> GND
Attention! Do not connect the VCC!
I use minicom on Linux and macOS. On Windows you can use Putty. The connection speed is 115200. If you have connected everything correctly, then a log will be displayed in the terminal program on the computer after restarting the router.
Now we need to make the router think that we are in emergency mode and let us go to the u-boot console. Connect the power to the router and turn it off after 5-10 seconds. After the next power connection, the startup will be stopped for 2 seconds. At this time, you should see the inscription Hit any key to stop autoboot: and a countdown (2..1..0). At this time, you need to press any key and you will be taken to the u-boot console. If everything is done correctly, you will see the prompt: ath>.
Next, we will need a TFTP server on the computer. To do this on Linux, you can use dnsmasq for example. Copy the following files to the root folder of the TFTP server:
- rootfs.squashfs.mod (rootfs modified by me)
- 310000.squashfs (original rootfs from 3.0.36)
In the u-boot console, run:
tftpboot 0x80060000 rootfs.squashfs.mod
Waiting for a message about a successful download (! size must be equal to cbdd5c !).
Erasing the old rootfs in flash:
erase 0x9f310000 +0xcbdd5c
Flashing a new rootfs:
cp.b 0x80060000 0x9f310000 0xcbdd5c
After copying is complete, restart the router:
reset
To roll back to the original rootfs, do the same, but replace the file name with 310000.squashfs:
tftpboot 0x80060000 310000.squashfs
erase 0x9f310000 +0xcbdd5c
cp.b 0x80060000 0x9f310000 0xcbdd5c
reset
When you first start the ssh server on the router, an RSA key is generated, so the launch will take longer. After about 2 minutes, SSH access should be opened.
2 ) Using a vulnerability exploited through the web interface
This method does not require soldering skills, but requires an additional access point on a controlled firmware (OpenWRT or similar).
Based on Adding OpenWrt support for Xiaomi AX3600
You will need an WiFi AP where you can respond to HTTP POST requests. Almost any access point or wireless router on an alternative firmware will work.
On a POST request to /cgi-bin/luci/api/xqsystem/token it should answer:
{"code":0,"token":"; nvram set ssh_en=1; nvram commit; sed -i 's/channel=.*/channel=\"debug\"/g' /etc/init.d/dropbear; /etc/init.d/dropbear start;"}
Also, this access point must have the DHCP server disabled, the wired network disconnected, and the IP address set to 169.254.31.1.
Now we need to log in to the web interface on the hacked router. After that, you need to copy the token to the url (after stok= and before the next slash). Next, insert the following url in the address bar:
http://<router IP>/cgi-bin/luci/;stok=<STOK>/api/xqsystem/extendwifi_connect_inited_router?ssid=ssidname&password=PaSsW0rd&encryption=WPA2PSK&enctype=AES&channel=11&band=2g&admin_username=user&admin_password=pwd&admin_nonce=xxx
<STOK> - token copied from the previous url
ssid, password, encryption, enctype, channel, band - connection parameters to the second WiFi access point
admin_username, admin_password, admin_nonce - ignored, can contain any values
After successful loading of this url, SSH access will be opened. However, without flashing modified rootfs, you will have to go through the described procedure again after each reboot of the router.
You can flash rootfs in the system console of the router with the following commands:
tftp -g -r rootfs.squashfs.mod -l /tmp/rootfs.squashfs.mod <IP address of TFTP server>
Waiting for a successful download.
mtd write /tmp/rootfs.squashfs.mod rootfs
After successful firmware, restart the router:
reboot
PS Changes to the modified rootfs:
- the firmware distribution channel is ignored when the SSH server is started
- removed overwrite of
nvramparameters frombdata - the overlay in tmpfs has been replaced with an overlay in the mtd section
rootfs_data
UPD Sorry, I forgot to attach the rootfs change diff yesterday. https://gist.github.com/eisaev/bfcabf299a18c9302236afe7c4f69667

