Script to update DNSmasq config and edit firewall rules

So I am very very new to OpenWRT, and have been looking through many posts trying to work out how to achieve the following.

Lockdown Script - I want one script to:

  • Ensure the OpenDNS server IPs (208.67.222.222,208.67.220.220) get given to any of my daughter's devices via DHCP as her DNS server IPs (her devices will be in the range 10.0.0.90 - 10.0.0.99). For everyone else, the default DNS config I have in place is fine.
  • Force a DHCP renewal of all her devices to allow changes to take place
  • Create a firewall rule to ensure any traffic from that IP range is blocked from the internet between 21:00 and 06:00

Freedom Script - The other script should

  • Remove the special OpenDNS server configuration, so my daughter's devices receive the default DNS config
  • Force a DHCP renewal of all her devices to allow changes to take place
  • Remove the firewall rule that blocks internet

And then I want to be able to trigger those scripts remotely somehow!

I haven't got far. I have worked out how to force the OpenDNS server IPs on her specific devices by editing the dnsmasq.conf:

dhcp-range=set:IsabelleDevices,10.0.0.90,10.0.0.99
dhcp-option=tag:IsabelleDevices,option:dns-server,208.67.222.222,208.67.220.220

But that is just a hard coded hack. I actually want to put it into a script, along with the firewall related commands.

Anybody got any advice on how I could achieve all this, or at least point me in the right direction?

Thanks so much!

DHCP is not the right tool for forceful time-based configuration management.
There's a combination of other methods to achieve that goal.

A possible solution is using multiple Dnsmasq instances with different upstream resolvers.
You can run those instances on different ports of the same interface.

DNS traffic matching specific source address can be intercepted with time-based firewall redirects.
Redirect it to a port matching specific Dnsmasq instance.

Note that DNS-based content filtering is just one of possible ways to implement parental controls.

1 Like

Thanks so much - I will definitely check those links out.

I probably wasn't being clear enough about my objective I think.

Most of the time the parental controls would be in place (i.e. internet only between 7am-9pm, and DNS goes through OpenDNS) but I would manually trigger the freedom script on special occasions (I have given her permission to use internet after 9, or she needs to use YouTube for her homework).

Still trying to figure out the best approach...

OpenWrt firewall rules/redirects can be time-based as well as can be enabled/disabled on demand.

So I have been on a steep learning curve for the last few days, understanding dnsmasq and uci. I have taken your advice @vgaetera and looked at avoiding using DHCP for time based config management (since I now get that the client itself needs to reconnect to refresh DNS info).

I still cannot get everything to work, but here is what I have so far.

Here is my code snippet to create an additional instance of dnsmasq, which has the opendns server as one of its upstream resolvers

uci -q delete dhcp.dns_controlled
uci set dhcp.dns_controlled=dnsmasq 
uci set dhcp.dns_controlled.domainneeded='1' 
uci set dhcp.dns_controlled.boguspriv='1' 
uci set dhcp.dns_controlled.filterwin2k='0' 
uci set dhcp.dns_controlled.localise_queries='1' 
uci set dhcp.dns_controlled.rebind_protection='1' 
uci set dhcp.dns_controlled.rebind_localhost='1' 
uci set dhcp.dns_controlled.local='/lan/' 
uci set dhcp.dns_controlled.domain='lan' 
uci set dhcp.dns_controlled.expandhosts='1' 
uci set dhcp.dns_controlled.nonegcache='0' 
uci set dhcp.dns_controlled.authoritative='0' 
uci set dhcp.dns_controlled.readethers='1' 
uci set dhcp.dns_controlled.leasefile='/tmp/dhcp.leases.controlled' 
uci set dhcp.dns_controlled.resolvfile='/tmp/resolv.conf.d/resolv.conf.auto.controlled' 
uci set dhcp.dns_controlled.nonwildcard='1' 
uci set dhcp.dns_controlled.localservice='1'
uci set dhcp.dns_controlled.server='/#/208.67.222.222'

When I restart dnsmasq I can see from the output that it is starting 2 instances not 1. I'm not sure if that syntax for setting the upstream resolver at 208.67.222.222 is correct, because I have also seen a post where the config is applied as follows:

uci uci add_list dns_controlled.server='208.67.222.222'
uci uci add_list dns_controlled.server='208.67.220.220'

Not sure which one is correct.

Anyway, my understanding (which may be flawed) is that if I can be guaranteed my second dnsmasq instance is working as expected, I can then create a host entry which will use this specific instance to resolve dns queries, rather than the default instance. I have tried to do this as follows

uci add dhcp host
uci set dhcp.@host[-1].name='(my computer name)'
uci set dhcp.@host[-1].dns='1'
uci add_list dhcp.@host[-1].mac='(my MAC address)'
uci set dhcp.@host[-1].ip='10.0.0.93'
uci set dhcp.@host[-1].leasetime='12h'
uci set dhcp.@host[-1].instance='1' 

I have no idea if this is the correct value I should be using for the "instance" option.

When I commit the uci for the host entry and restart dnsmasq, no devices on my lan can connect to the internet, so something has gone wrong.

Ultimately if I can get this to work, I plan to use a scheduled task or ad hoc script to change the instance of dnsmasq that this host points to, so immediately it uses the default upstream resolvers, rather than openDNS.

Not sure if all that makes sense, but if you have any comments on my approach, or can spot any errors in the above, I would appreciate it. Thank you very much for your help so far.
1 Like

You are close enough, there're some fixes:

uci -q delete dhcp.dns_controlled.server
uci add_list dhcp.dns_controlled.server="208.67.222.222"
uci add_list dhcp.dns_controlled.server="208.67.220.220"
uci set dhcp.dns_controlled.noresolv="1"
uci set dhcp.dns_controlled.port="5253"
uci commit dhcp
/etc/init.d/dnsmasq restart

No, it doesn't work like that.

Proceed with a firewall redirect.
Use the general DNS hijacking article mentioned above.
Then add the destination port from the second Dnsmasq instance.
Also limit the scope of the source IPs or MACs.

1 Like

Thanks for the incredibly quick reply. It will take me a little while to work this out, but I am understanding your recommended approach now. Thank you!

1 Like

Hmmm. So I have been hacking away for a few hours and it still doesn't work.

I have set up the instance of dnsmasq as you suggest on port 5253.

I have also set up a firewall rule now as follows:

# Intercept DNS traffic
uci -q delete firewall.dns_int
uci set firewall.dns_int=redirect 
uci set firewall.dns_int.name="Intercept-DNS"
uci set firewall.dns_int.src="lan"
uci set firewall.dns_int.src_dport="53" 
uci set firewall.dns_int.proto="tcp udp"
uci set firewall.dns_int.target="DNAT"
uci set firewall.dns_int.dest='lan' 
uci set firewall.dns_int.dest_ip='10.0.0.1' 
uci set firewall.dns_int.dest_port='5253' 
uci set firewall.dns_int.enabled='1'
uci commit firewall

So in theory, all clients on my network should now have their DNS requests intercepted and redirected to port 5253 on my router, which is the second instance of DNSmasq.

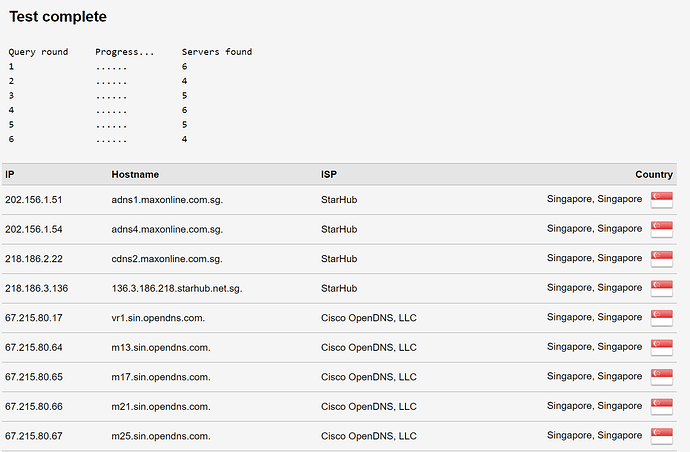
The good news is that when I go to DNSleak to see where my DNS queries are going, I can see the openDNS servers have been queried in some of the tests, but there is leakage because still I am getting my local ISPs default DNS servers being used for some DNS queries too. Which is strange, because I don't know where it is getting those ISP IPs from. Snippet of results below.

Not sure if it is relevant, but the output when I restart the firewall has a few errors in it as well, after I followed the DNS hijack tutorial:

 * Populating IPv6 nat table
Warning: fw3_ipt_rule_append(): Can't find target 'prerouting_lan_rule'
Warning: fw3_ipt_rule_append(): Can't find target 'postrouting_lan_rule'
Warning: fw3_ipt_rule_append(): Can't find target 'prerouting_wan_rule'
Warning: fw3_ipt_rule_append(): Can't find target 'postrouting_wan_rule'
Warning: fw3_ipt_rule_append(): Can't find target 'prerouting_rule'
Warning: fw3_ipt_rule_append(): Can't find target 'postrouting_rule'

So, bit of a brick wall :frowning:

1 Like

A couple of fixes:

uci set dhcp.dns_controlled.noresolv="1"
uci commit dhcp
/etc/init.d/dnsmasq restart
uci -q delete firewall.dns_int.dest
uci -q delete firewall.dns_int.dest_ip
uci commit firewall
/etc/init.d/firewall restart

Those firewall warnings are safe to ignore, it's a known issue.

1 Like

In case, you are willing to dive deep into openwrt:
I am about to publish first version of a more sophisticated solution, also to solve your problem. However, will need to build a custom image for your device.

Feel free to monitor this thread:

1 Like

I cannot thank you enough! That sorted it out perfectly.

I have now restricted the rule by source MAC address and it works great. I have also added a rule for restricting internet by MAC address at certain times.

Quite a learning curve, but you really helped @vgaetera - Спасибо and have a great weekend.

1 Like

If anyone is interested, here is the full code I used.

Setting up instance of DNSmasq

# Create new instance of dnsmasq on port 5253

uci add dhcp dnsmasq 
uci set dhcp.@dnsmasq[-1].domainneeded='1' 
uci set dhcp.@dnsmasq[-1].boguspriv='1' 
uci set dhcp.@dnsmasq[-1].filterwin2k='0' 
uci set dhcp.@dnsmasq[-1].localise_queries='1' 
uci set dhcp.@dnsmasq[-1].rebind_protection='1' 
uci set dhcp.@dnsmasq[-1].rebind_localhost='1' 
uci set dhcp.@dnsmasq[-1].local='/lan/' 
uci set dhcp.@dnsmasq[-1].domain='lan' 
uci set dhcp.@dnsmasq[-1].expandhosts='1' 
uci set dhcp.@dnsmasq[-1].nonegcache='0' 
uci set dhcp.@dnsmasq[-1].authoritative='0' 
uci set dhcp.@dnsmasq[-1].readethers='1' 
uci set dhcp.@dnsmasq[-1].leasefile='/tmp/dhcp.leases.controlled'
uci set dhcp.@dnsmasq[-1].noresolv='1'
uci set dhcp.@dnsmasq[-1].nonwildcard='1' 
uci set dhcp.@dnsmasq[-1].localservice='1'
# OpenDNS IP addresses
uci add_list dhcp.@dnsmasq[-1].server='208.67.222.222'
uci add_list dhcp.@dnsmasq[-1].server='208.67.220.220'
uci set dhcp.@dnsmasq[-1].port='5253'
uci commit dhcp 
/etc/init.d/dnsmasq restart

Then set up the firewall

# Enable NAT6  
opkg update  
opkg install kmod-ipt-nat6  
cat << "EOF" > /etc/firewall.nat6  
iptables-save -t nat \  
| sed -e "/\s[DS]NAT\s/d;/\sMASQUERADE$/d;/\s--match-set\s\S*/s//\06/" \  
| ip6tables-restore -T nat  
EOF  
uci -q delete firewall.nat6  
uci set firewall.nat6="include"  
uci set firewall.nat6.path="/etc/firewall.nat6"  
uci set firewall.nat6.reload="1"  

# Intercept DNS traffic with this rule  
uci -q delete firewall.dns_int  
uci set firewall.dns_int=redirect  
uci set firewall.dns_int.name="Intercept-DNS"  
uci set firewall.dns_int.src="lan"  
uci set firewall.dns_int.src_dport="53"  
uci set firewall.dns_int.proto="tcp udp"  
uci set firewall.dns_int.target="DNAT"  
uci set firewall.dns_int.dest_port='5253'  
uci set firewall.dns_int.enabled='1' 
uci add_list firewall.dns_int.src_mac='(MAC address of kid's device 1)'
uci add_list firewall.dns_int.src_mac='(MAC address of kid's device 2)'

#Set timed access with this rule
uci -q delete firewall.internet_lock
uci set firewall.internet_lock=rule 
uci set firewall.internet_lock.name="Isabelle Internet Lock" 
uci set firewall.internet_lock.src="lan" 
uci add_list firewall.internet_lock.src_mac='(MAC address of kid's device 1)'
uci add_list firewall.internet_lock.src_mac='(MAC address of kid's device 2)'
uci set firewall.internet_lock.dest="wan" 
uci set firewall.internet_lock.start_time="21:00:00" 
uci set firewall.internet_lock.stop_time="07:00:00" 
uci set firewall.internet_lock.target="REJECT" 
uci set firewall.internet_lock.enabled='1'
uci commit firewall 
/etc/init.d/firewall restart 

Once this is all in place, you can use the following to enable and disable the firewall rules, so parental controls can be switched on and off.

Disable rules (freedom mode):

uci firewall.dns_int.enabled='0'
uci firewall.internet_lock.enabled='0'
uci commit firewall
/etc/init.d/firewall restart

Enable rules (lockdown mode):

uci firewall.dns_int.enabled='0'
uci firewall.internet_lock.enabled='0'
uci commit firewall
/etc/init.d/firewall restart
1 Like

There's a typo in the second line.

Fixed. Thanks for spotting!

1 Like

This topic was automatically closed 10 days after the last reply. New replies are no longer allowed.