Hello everyone,
If you have landed here, then most likely, like me, you scoured the forum and found a lot of useful information but not always in the same place or put succinctly. I make no claim I will manage to do so, but I will surely try to describe exactly how I got my TP-LINK RE450 v1 unbricked.
After trying out OpenWrt, I was very happy with the custom firmware, but unfortunately, could not get my 5Ghz antenna to repeat my router's signal. Another poor soul mentions the same issue in this reply (albeit for RE450 v2). I tried everything from snapshots, to custom package installation to no avail. So, I decided to revert back to the stock firmware and, without having read the warnings, I bricked my device.
For the majority of this, I will be referencing (and giving massive credit to) @Heinz, who managed to come up with a "back-to-stock" firmware. His original answer can be found here. From the console output in his reply, one can see that he is working with the version of RE450 v1 that has 128MB of RAM. Mine only had 64, but the commands are the same and they worked. This claim, I backup further with this reply from @sammo.
Alright, here is the step-by-step:
- Install and configure a TFTP server on your computer.
- I used the Linux guide from the OpenWrt website found here and, more precisely, the atftpd package. The Troubleshooting section at the bottom was most useful to guide me to fixing my issues (more on those, below).
- My first issue was even starting the server. That was because I had other programs running and using port 69, which is TFTP's default. In a terminal and as root, I ran:
netstat -panul | grep ":69"
and then usedpkill <process name>to kill any process occupying port 69. - Then I made a folder (for example,
/home/ubuntu/srv/tftp/) and changed directories to it. In it, I, following Heinz's instructions, copied the "back-to-stock" firmware into the folder. The link to the firmware can be found in his post (linked above) or from here. I also renamed the firmware file tore450bs.binfor simplicity, as suggested. Importantly, then I changed the ownership of the foldertftpand all contents inside it with:
chown nobody:nogroup -R /home/ubuntu/srv/tftp/ - Next we need to allow our firewall outbound traffic on port 69 so that our bricked RE450 can receive the firmware from the TFTP server on our computer. While connected to the RE450, I could not retrieve the firmware from the TFTP server. That useful Troubleshooting section helped with * drumroll * troubleshooting this issue. I did not do this at first, so I had to backtrack and repeat all the above steps, so avoid my mistake and open your firewall with the following commands that I ran not as root:
sudo iptables -A OUTPUT -p tcp --dport 69 -j ACCEPT
sudo iptables -A OUTPUT -p udp --dport 69 -j ACCEPT - From within the same folder, I executed
atftpd --daemon --no-fork --logfile - .
to run atftpd as a daemon (note the period in the end of the line above, do not omit that). - To verify that you have setup the TFTP server correctly (except the firewall issue), from the same computer, but another folder, run
tftp 0.0.0.0
and then
tftp> get re450bs.bin
If you get something likeReceived 8152633 bytes in 0.8 seconds, your server is running properly. To attempt to ALSO verify the firewall rules, you could connect to your TFTP server from another device on your network and substite0.0.0.0with the server's IP.
- Next, we will setup the serial connection. If you are also doing this with the help of your trusty Arduino Uno, keep reading, else, find another guide that details the exact way to connect your USB to TTL (serial) converter.
- To be as clear and short (unlike the mess above), I will refer you to this YouTube video posted by the channel "
ElectronFun.com".
Now, I know what you're thinking. Yes, our RE450 v1 does not have pins like the device in the video, nor does it have those holes you can put wires in or use the "paperclip trick", as the RE450 v2 does. Nevertheless, the Arduino configuration is what matters. Furthermore, the pads on the motherboard are still there and are referenced both by Heinz here and in his original reply, but also by OpenWrt's own wiki page, which is abhorrently desolate when it comes to information on how to do any of this, with few exceptions such as the last link. I will try and fill out as much info in it as I can, if I can. - If you can solder AND have the equipment (which I did not) - great for you! Solder some pins on those pads and connect your Arduino Uno's cables to them and you're good to go. Skip to the next bullet point. However, if you do not have the equipment or just plain cannot solder and are stubborn as a mule, as am I, you will find out that:
What I did next, can only be called monstrous, hideous and perhaps cruel...but it worked.
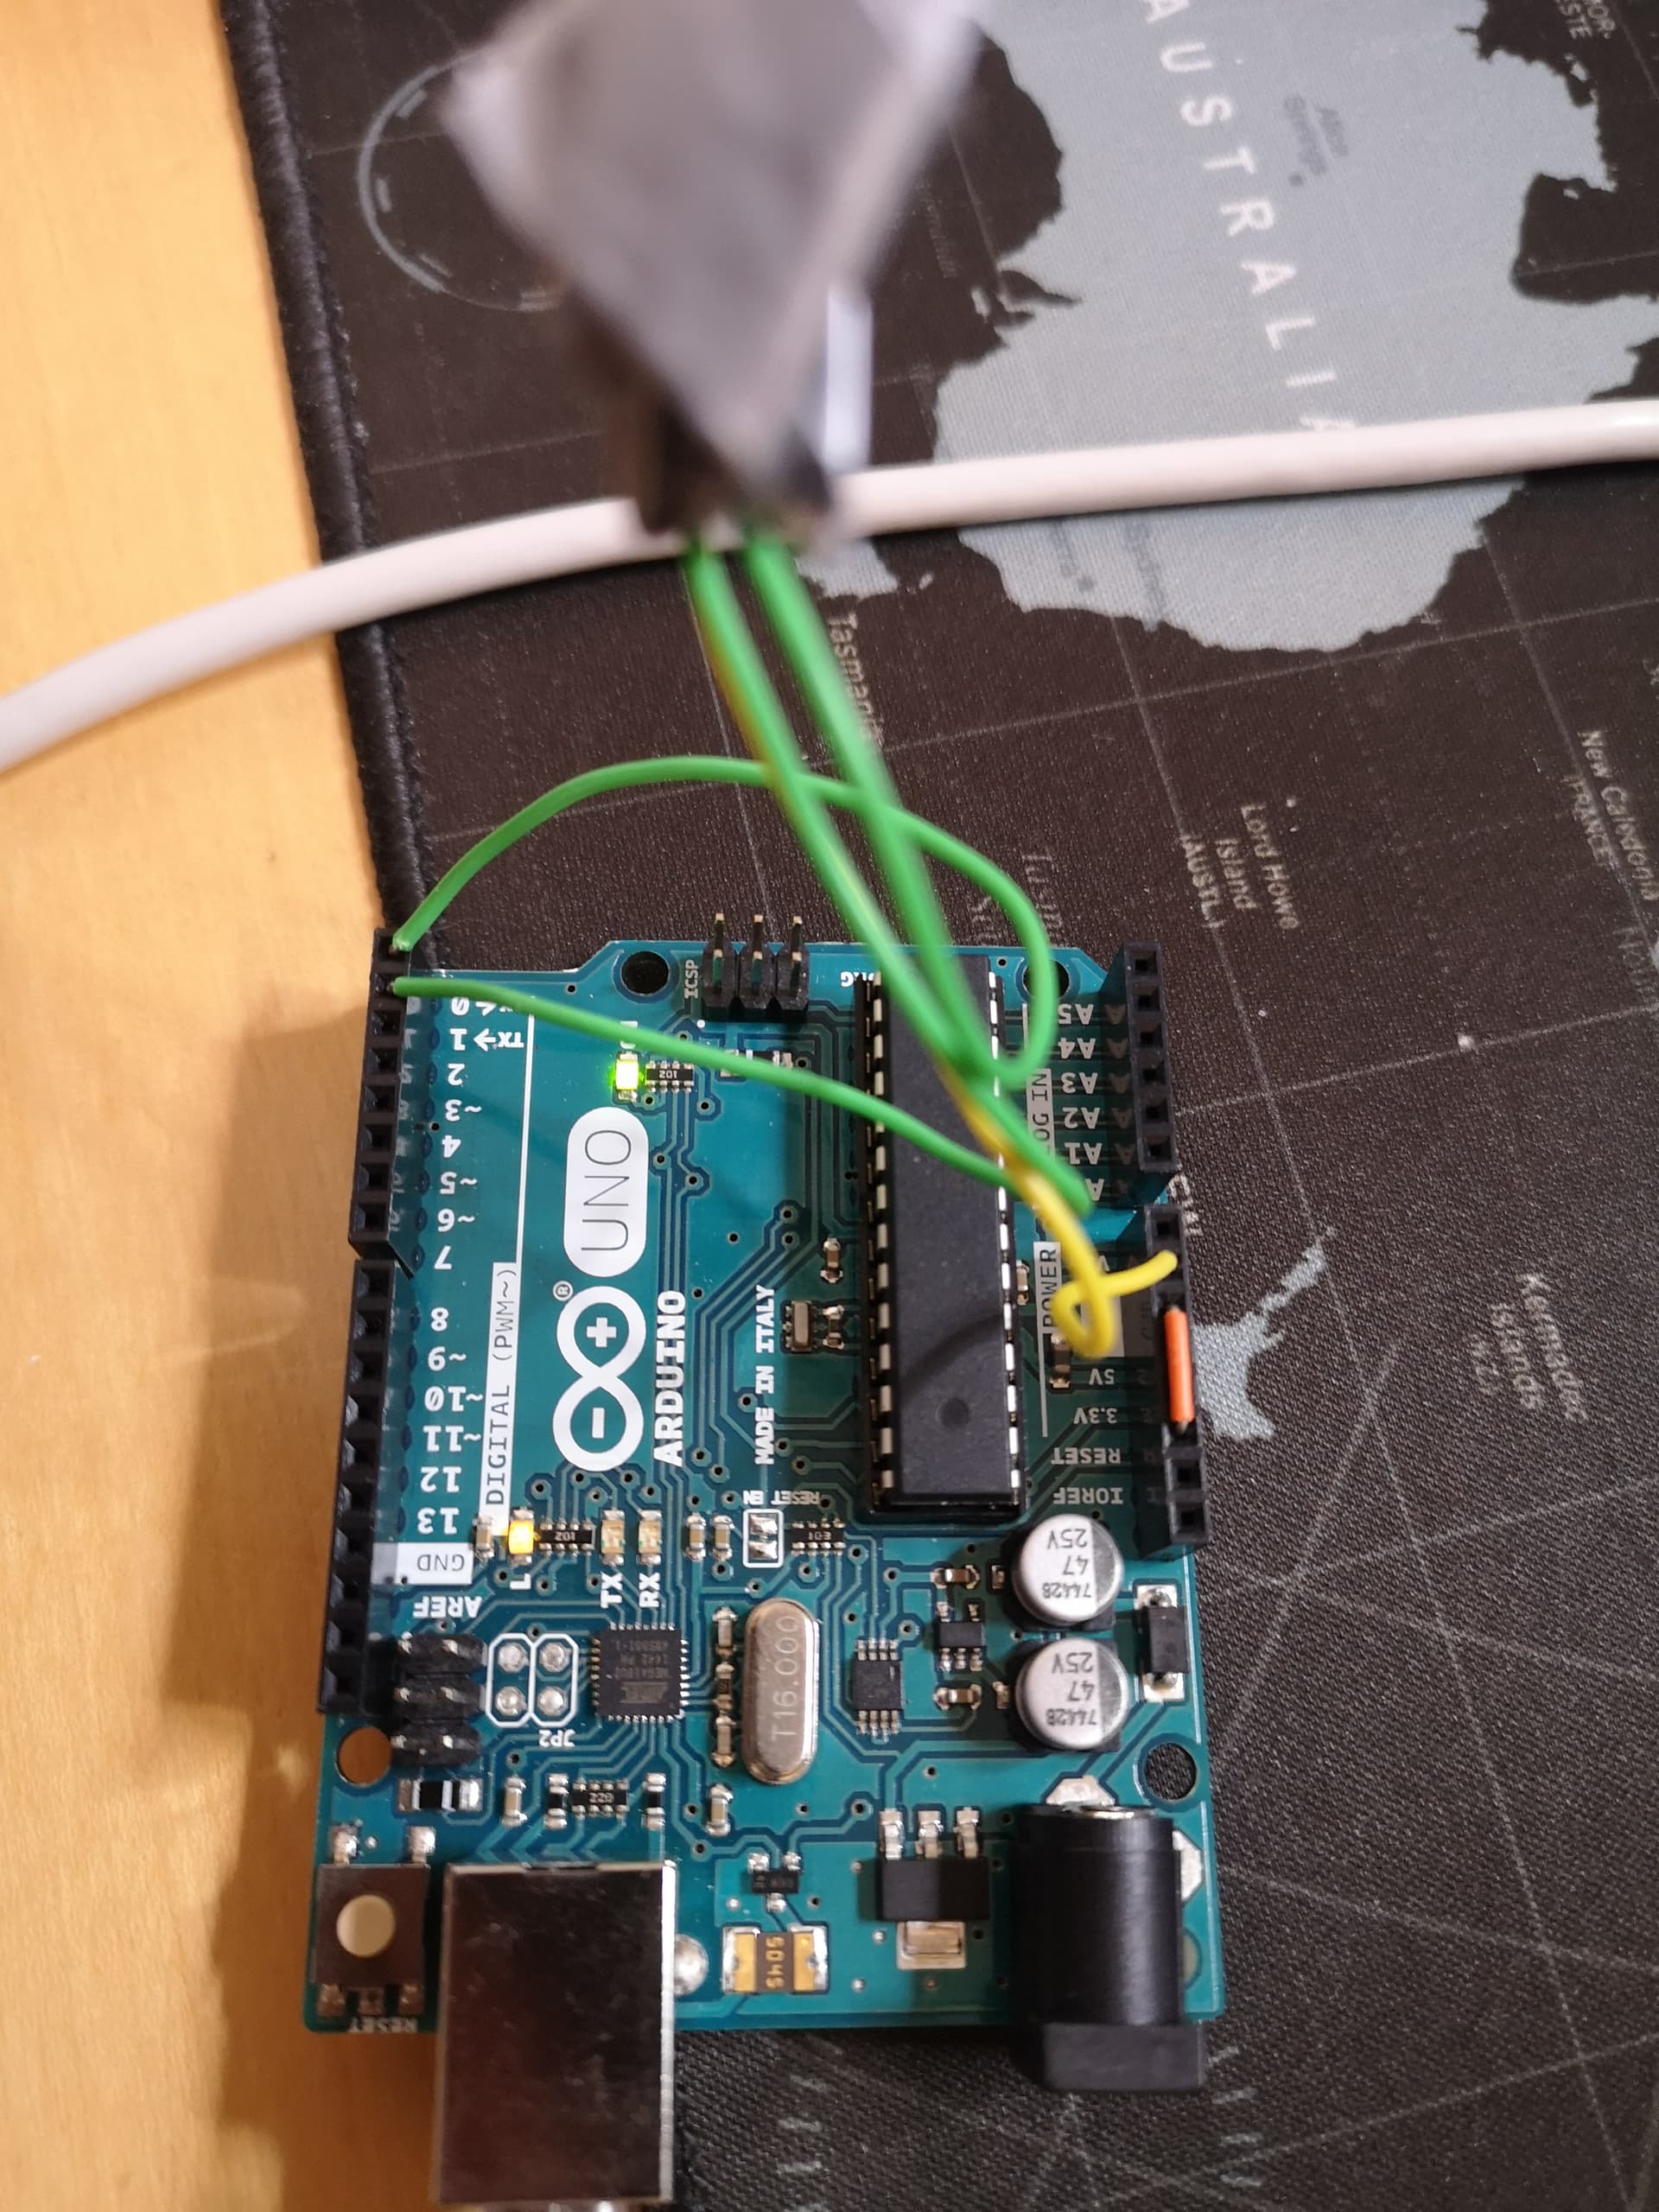
Following the guide from the video and with EXTREMELY limited resource (yes, I hated having to use green for both Tx and Rx, I know) I Frankenstein'ed this:
Alternative view:
So that the pins on the end can correspond to the 3 pads on the RE450 motherboard. Pictured above, from top to bottom, the pins on my "cable" are as follows Tx - Rx - Ground. And they are in this order because when I flip it, you get this:
Ground cable to TP3, RX to TP2 and TX to TP1.
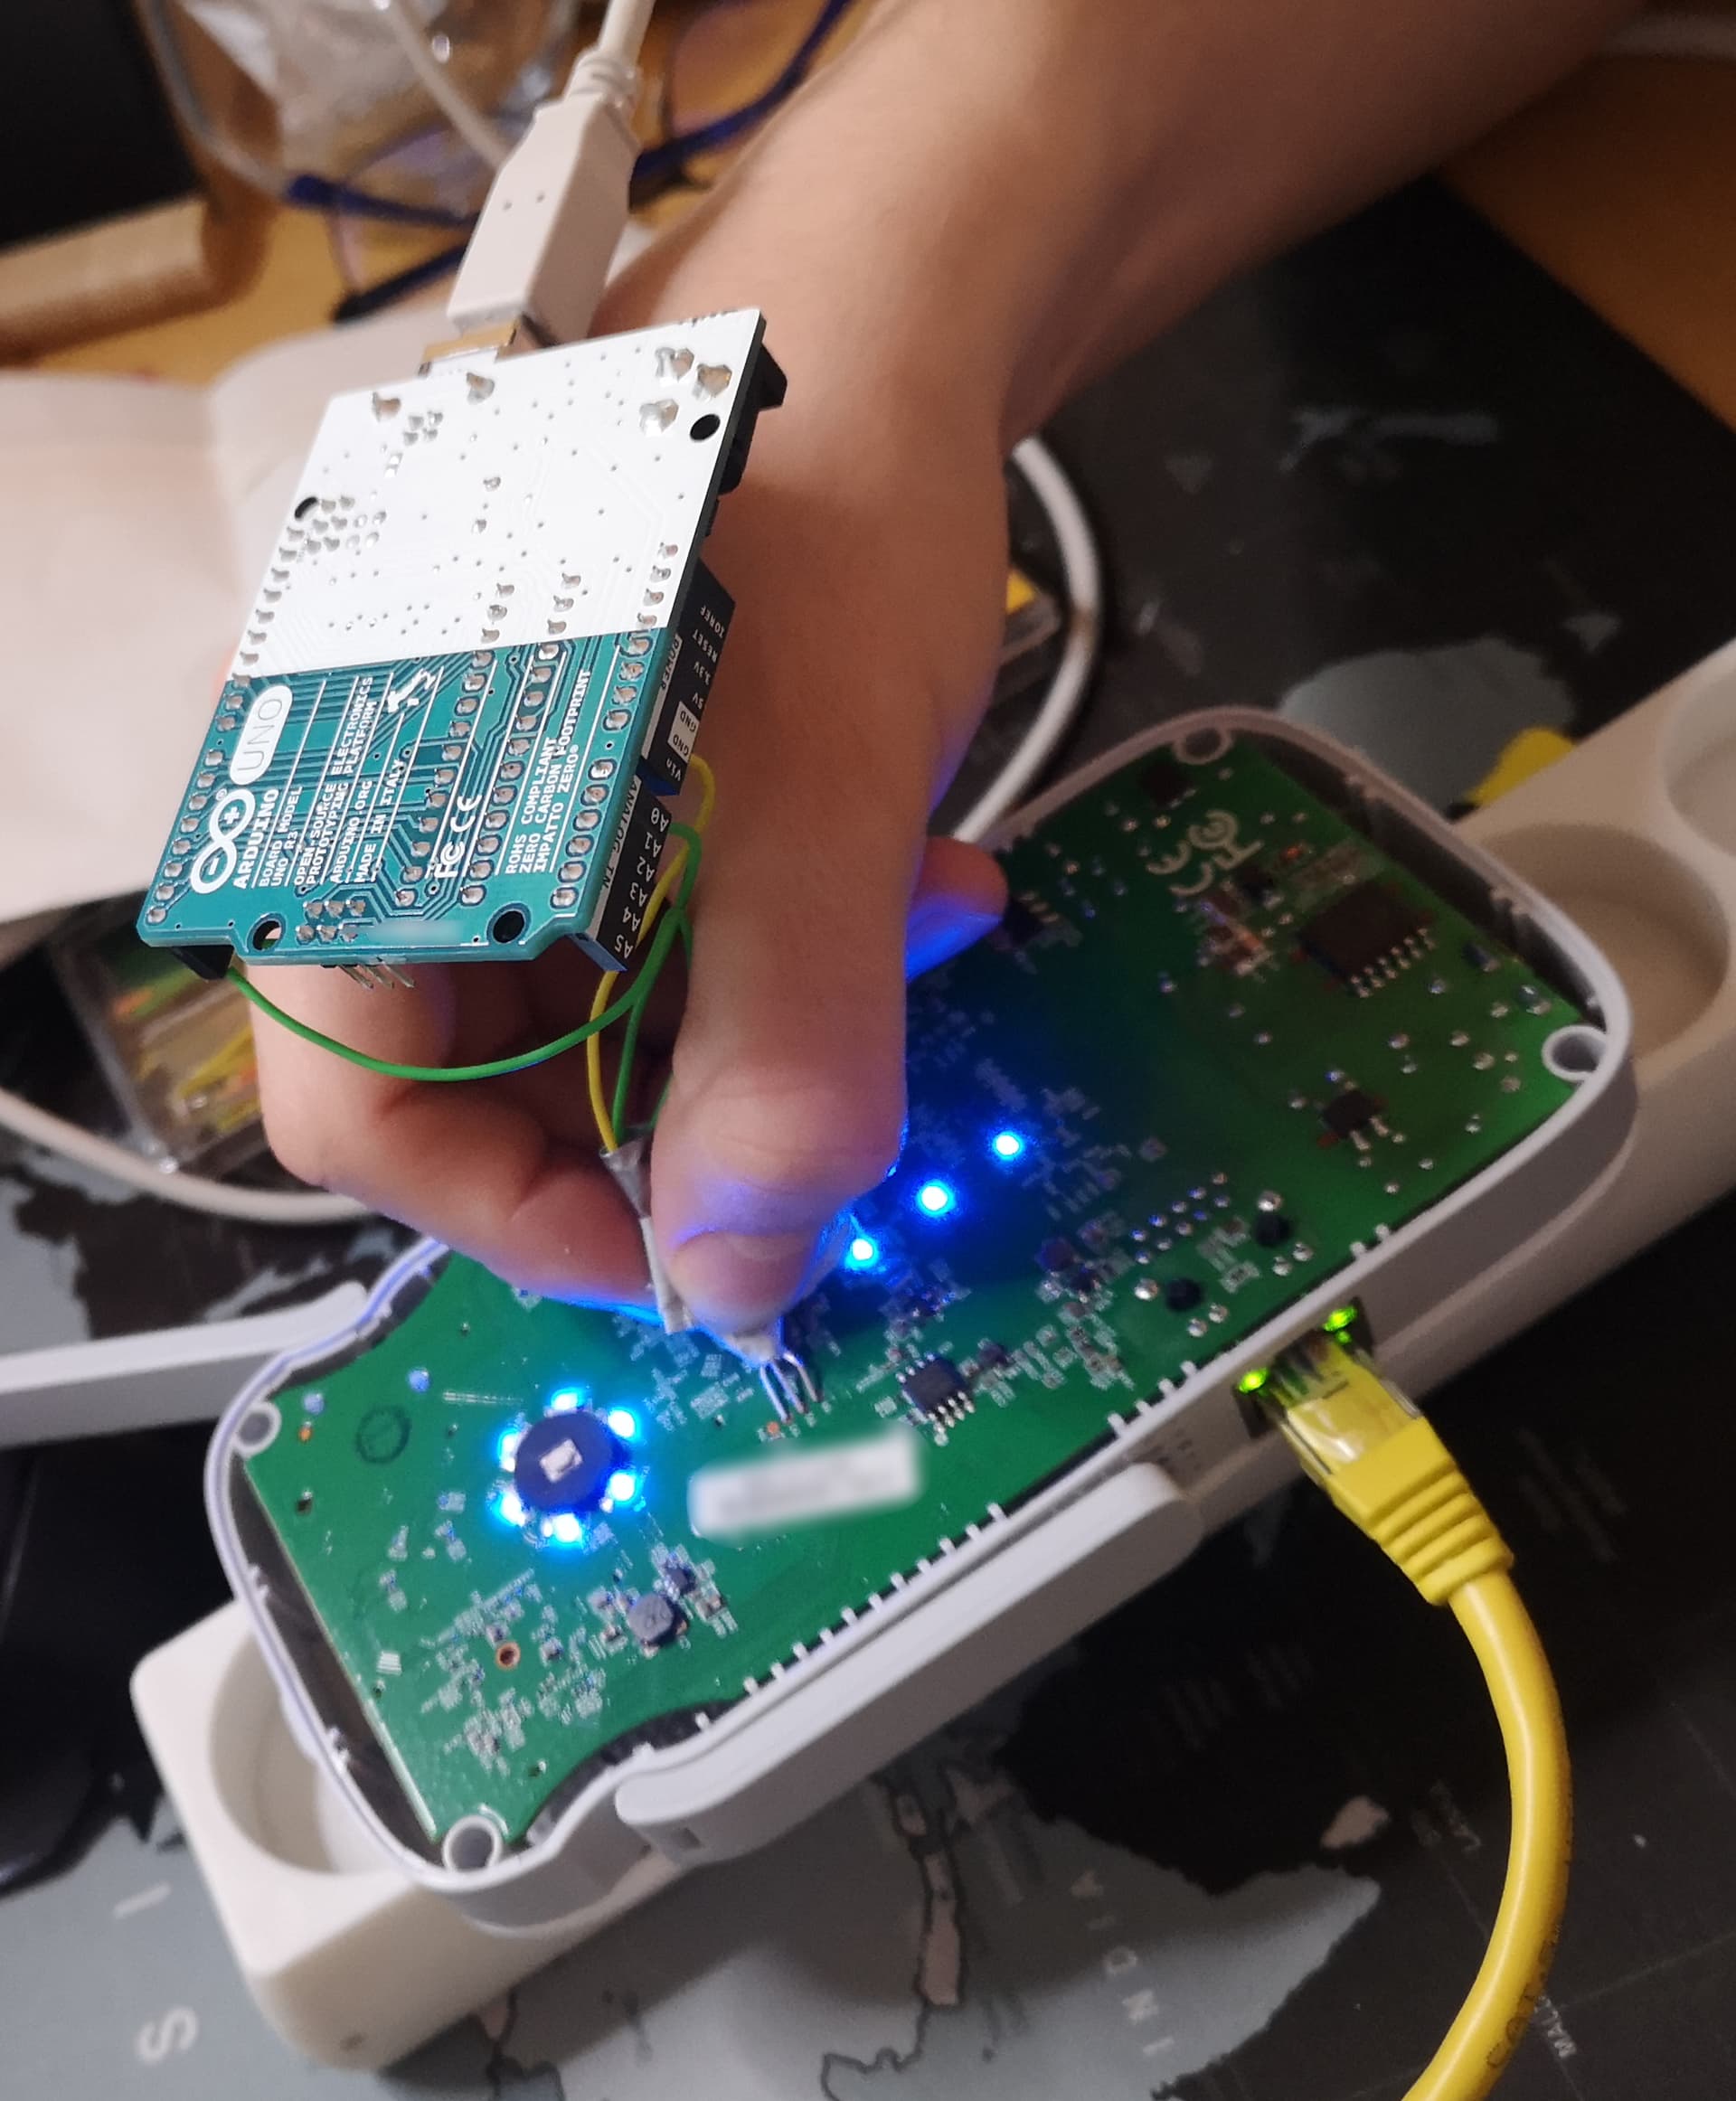
Yes, I am holding the pins on my "Frankencable" directly on the contact pads. Yes, I lost connection very often, but the good thing about serial is that you can just reajust and continue typing commands and it resumes where it left off, so that was at most a minor inconvenience. Yes, if you can solder, for the love of God, do it! But, in a pinch, hey, it worked.
- Next up, we need to establish the serial connection to the device. If you have a friend who can type things for you or hold the cable, from here on out, it would be a lot easier. For me, my left hand had to do.
 . You can use PuTTY, as it's widely known and cross-platform or other linux applications like screen (here are some more). I used PuTTY with the following settings:
- Serial line:
/dev/ttyACM0(this is the COM ports, in Windows) - Speed
115200 - Connection type
Serial- writing it out for explicitness's sake.
In PuTTY's sidebar, go to Connection -> Serial and change: - Flow control from
XON/XOFFtoNone - Leave the data bits, stop bits and parity as is (This was, perhaps, the one of the few useful pieces of information present in the wiki page about the RE450)
- Serial line:
- After you open the session, if you do not see a rapidly printing console output from your turned on RE450 bootlooping, then you better check all your cable connections, including the contacts on the contact pads (unless, you were not a masochist, and actually soldered pins, of course). Make doubly sure that you connecting the Tx pin on the Arduino board to the Tx pad, Rx to Rx and Ground to Ground - pictures found here. If you do all of the points in Step 2 right, you should get a little something like the code block a little below looping:
- Now comes the fun part. With that one hand, when it reaches
Autobooting in 1 seconds, you gotta spam typingtpland hit Enter as fast as possible, until you get the following prompt:
Autobooting in 1 seconds
scorpion> - Now we're in business. From here, if you have opted to adopt the "Frankencable" methodology, I would suggest that you are EXTRA careful with not moving. I did say with serial if you reconnect it all should resume as it was, but... just in case, we are flashing firmware, after all.
- To be as clear and short (unlike the mess above), I will refer you to this YouTube video posted by the channel "


U-Boot 1.1.4 (Jan 11 2017 - 18:09:36)

ap135 - Scorpion 1.0

DRAM:  64 MB
Top of RAM usable for U-Boot at: 84000000
Reserving 133k for U-Boot at: 83fdc000
Reserving 192k for malloc() at: 83fac000
Reserving 44 Bytes for Board Info at: 83fabfd4
Reserving 36 Bytes for Global Data at: 83fabfb0
Reserving 128k for boot params() at: 83f8bfb0
Stack Pointer at: 83f8bf98
Now running in RAM - U-Boot at: 83fdc000
Flash Manuf Id 0xc8, DeviceId0 0x40, DeviceId1 0x17
flash size 16MB, sector count = 256
Flash: 16 MB
Using default environment

In:    serial
Out:   serial
Err:   serial
Net:   ath_gmac_enet_initialize...
athrs_sgmii_res_cal: cal value = 0xe
No valid address in Flash. Using fixed address
Scorpion  ----> AR8033 PHY *
AR8033 PHY init
eth0: 00:03:7f:09:0b:ad
eth0 up
eth0
Setting 0x18116290 to 0x58b0214f
Autobooting in 1 seconds
## Booting image at 9f020000 ...
   Uncompressing Kernel Image ... Stream with EOS marker is not supportedLZMA                                                                                                                                                                                                      ROR 1 - must RESET board to recover

<<<<HERE IT REBOOTS AND LOOPS>>>>

U-Boot 1.1.4 (Jan 11 2017 - 18:09:36)

ap135 - Scorpion 1.0

DRAM:  64 MB
Top of RAM usable for U-Boot at: 84000000
Reserving 133k for U-Boot at: 83fdc000
Reserving 192k for malloc() at: 83fac000
- Flashing the firmware onto the bricked RE450 v1
- Firstly, connect the Ethernet port on the RE450 to that of your computer that will act as the TFTP server.
- On your PC, in your network's settings, set your PC's IP manually to any IP (for example,
192.168.0.100) - On the RE450, we need to manually set the device's IP with this command:
setenv ipaddr 192.168.0.249 - Now, we need to set the variable that holds the IP of our TFTP server that we setup in step one and connected to in the first bullet point of this step:
setenv serverip 192.168.0.100 - Test to see that the RE450 can see and communicate with your computer:
ping ${serverip} - If you see a
ping failed; host 192.168.0.100 is not alive, go back to the trusty Troubleshooting section I linked above and try again. This is how I figured out I had firewall issues. If there are no (more) problems, you should see:host 192.168.0.100 is alive - Now, Heinz preferred to type in all the commands on one line with the chaining operator
&&so that all of them execute one after another. Given my setup, I did not have faith in my hand being that steady so I executed them one by one like so:
tftp 0x80060000 re450bs.bin
erase 0x9f020000 +$filesize
cp.b $fileaddr 0x9f020000 $filesize
and finally
boot
The whole thing looked like:
scorpion> tftp 0x80060000 re450bs.bin
Trying eth0
Checking Link: Up
Checking Duplex: Full
Checking Speed 1000BaseT
Using eth0 device
TFTP from server 192.168.0.100; our IP address is 192.168.0.249
Filename 're450bs.bin'.
Load address: 0x80060000
Loading: #################################################################
         #################################################################
         #################################################################
         #################################################################
         #################################################################
         #################################################################
         #################################################################
         #################################################################
         #################################################################
         #################################################################
         #################################################################
         #################################################################
         #################################################################
         #################################################################
         #################################################################
         #################################################################
         #################################################################
         #################################################################
         ##################################
done
Bytes transferred = 6160384 (5e0000 hex)
scorpion> erase 0x9f020000 +$filesize
Erase Flash from 0x9f020000 to 0x9f5fffff in Bank # 1
First 0x2 last 0x5f sector size 0x10000                                       95
Erased 94 sectors
scorpion> cp.b $fileaddr 0x9f020000 $filesize
Copy to Flash... write addr: 9f020000
done
scorpion> boot
## Booting image at 9f020000 ...
   Uncompressing Kernel Image ... OK
No initrd
## Transferring control to Linux (at address 801930c0) ...
## Giving linux memsize in bytes, 67108864

Starting kernel ...

Booting QCA955x
Linux version 2.6.31--LSDK-9.2.0_U5.508 (root@localhost.localdomain)
...
~here be dragons~
~FIN~
You are done!
After this, my device booted properly and I was able to set it up and operate it as usual.
One side note, given that Heinz's firmware is not official, the firmware's on the device's configuration page was set to 0.0.0. but I had no problem flashing the latest official firmware from TP-LINK to set it back to 1.0.0.
I most likely missed some detail, but I will be happy to help, if I can so leave a reply if you notice something. I am tagging @abhijith58 and @ldq19900209 as they had similar questions and may find this helpful, provided they still have the device.