OpenWrt support for Zyxel WSQ50

Hi
I have a Zyxel WSQ50 (AC3000 multy x) Router and I gotta say: the firmware sucks. So I'm looking for an alternative and I wanna try OpenWrt.
Problem is: my device has unknown status for OpenWrt support as far as I found. I also didn't find any ways to install custom firmware on it.
Now I'm wondering if anybody found a way to do so and could give me a rundown for the process or nows whether or not this is even possible.

Cheers

1 Like

Hardware specs for reference: https://wikidevi.wi-cat.ru/ZyXEL_WSQ50

Based on that information, the hardware should be supportable - but someone (e.g. you) needs to do the developing work.

Have a spare one of these I'd be willing to lend out to someone with the expertise to get it working.

Will try to keep an eye on the forum, but just in case:
openwrt :a:T aioue.net

Hi folks, did anyone get any further with this?

I've got 3x WSQ50's and I'm now utterly sick of their stock firmware's inability to change their WiFi channels.

Unless another access point is sat right next to them on the same channel when the WSQ50 boots up, they all default to channel 4 on 2.4 GHz and channel 42 on 5 GHz.

Zyxel themselves have said they will intentionally not allow manually setting the WiFI channels unless you buy a different (even more expensive) product. Disgusting.

2 Likes

Right. My WSQ50's decided to stop working requiring a full factory wipe in both the Zyxel Android app and the access points. Enough was enough.

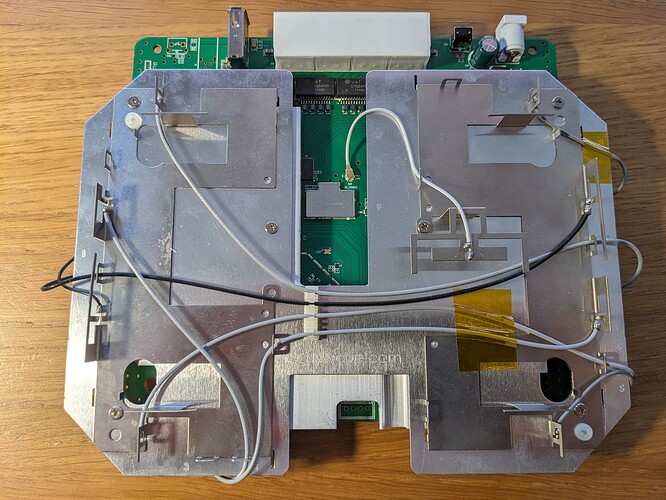
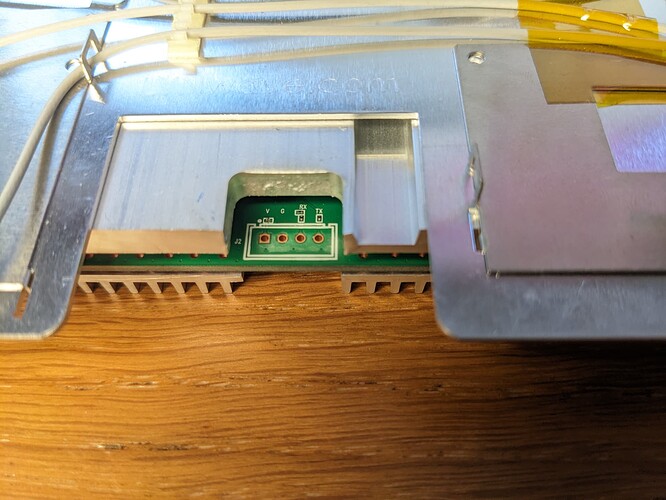
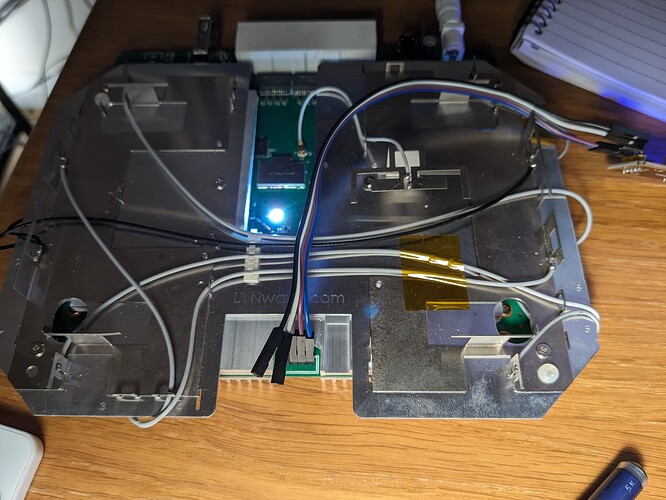
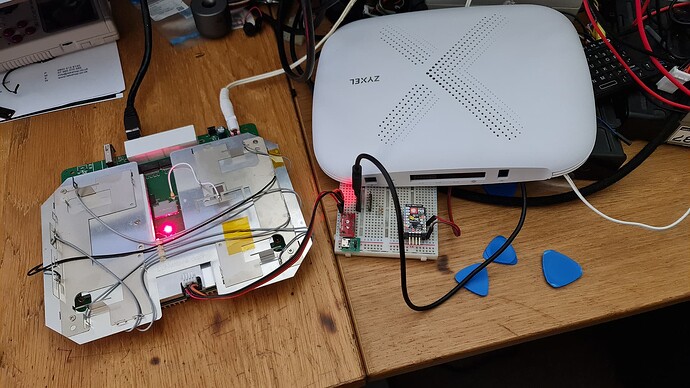
I stripped one down, found a 3.3v serial UART, managed to get into it (love the lack of security, the root password was 1234) and discovered there's already a bastardized Attitude Adjustment release on there (12.09-rc1) already loosely based off IPQ4019. Zyxel have just removed any UI and config / updates is done via a custom binary that phones home.

Here's a dump of some crucial info;

root@WSQ50:~# cat /etc/openwrt_version
12.09-rc1

root@WSQ50:~# cat /etc/openwrt_release
DISTRIB_ID="OpenWrt"
DISTRIB_RELEASE="Attitude Adjustment"
DISTRIB_REVISION="unknown"
DISTRIB_CODENAME="attitude_adjustment"
DISTRIB_TARGET="ipq806x/wsq50"
DISTRIB_DESCRIPTION="OpenWrt Attitude Adjustment 12.09-rc1"

Happy to try and help get this device official OpenWRT support but not quite sure where to start.

Some more useful info for the factory firmware (mainly documenting it for my own sanity):

Security
To be able to get into this thing, you've gotta factory reset it. Once it's up, you can get in with root / 1234 via the serial UART.

An alternative password seems to be the last 6 characters of the serial number + the last 4 digits of the MAC Address on the sticker on the bottom minus 2..

So with the Serial number S180A123456789 and the MAC Address B8ECA3AABB22 the root password would be 456789BB20.

Although this may be moot, once it's booted up and configured, it locks the root user using the typical Linux mechanism of sticking a ! in front of the password in /etc/shadow.

SSH access
This has to be activated on boot every time for now, with a freshly wiped unit, connect up with the UART, log in with root / 1234, plug in an Ethernet cable to the WAN port and then run udhcpc to get an IP.

Next, enable dropbear by running the following;

uci set dropbear.setting.enable=1
uci commit
/etc/init.d/dropbear start

Unlocking u-boot
Interrupt the boot process and then run ATSE WSQ50 (note the caps, WSQ50 should be the hostname as it appears in the command line prompt).

Take the token, pass it through this small bash script and paste the results into the UART terminal:

#!/usr/bin/env bash

ror32() {
  echo $(( ($1 >> $2) | (($1 << (32 - $2) & (2**32-1)) ) ))
}

while (true); do
        sleep 1
        read -p "Enter result of ATSE <HOSTNAME>: " ATSE
        v="0x$ATSE"
        a="0x${v:2:6}"
        b=$(( $a + 0x10F0A563))
        c=$(( 0x${v:12:14} & 7 ))
        p=$(( $(ror32 $b $c) ^ $a ))
        printf "ATEN 1,%X\nATGU\n" $p
done

(I put that in a while loop as I had to do it repeatedly, press ctrl+c once you're done).

Sample boot log

Update
Seems the WSQ50 was happy to tftpboot from a similar devices image (ie. Live / running from RAM); openwrt-23.05.0-ipq40xx-generic-zyxel_nbg6617-initramfs-uImage.itb

I thought I'd just try it based on the fact it's the same SoC and sure enough, it booted up fine and I could get into the Web GUI after faffing with DHCP to get an IP address.

The only thing that didn't immediately work was the wireless adapters, but at least we're one step closer to having a dedicated WSQ50 image :slight_smile:

Hi @bagjason.

Got 2 of these and willing to help. Removed the rubber bottom panel exposes 4 screws. Unscrewing these allows the panel to unclip starting at the ethernet and working clockwise. A plastic pill blister pack allowed me to open the case without harming it.

I reset it using the button and I have managed to get UART connected. Here's my kernel boot log, autoboot interruption options and failsafe output.

Failsafe gives me a root@none. Do I still need to do the password calculation? What does that give us over failsafe shell? (I'm a newbie).

Zyxel do a WSQ60 ("Multy Plus") which, as far as I can tell is the exact same hardware as the Multy X. But give you a web admin interface and pro features like channel selection. Maybe that firmware could be forcefully written?


@aio Hah um... snap?

I've been working on this with support from the people in IRC, so far I've managed to get the following working:

  • 2x2 2.4 GHz radio
  • 2x2 5 GHz radio
  • 4x4 5 GHz Wave2 radio
  • Bluetooth LE and Classic
  • USB 2.0 port
  • Internal 3.7 GB eMMC
  • Internal SPI based EEPROM (contains wireless calibration data)
  • RGB LED

Remaining things left:

  • Figure out how to permanently write the image instead of booting from tftp
  • Submit a patch to OpenWrt
  • Document it on the wiki

The WSQ50 and WSQ60's are reportedly both identical hardware, it was just software that differed.

Yep the security is still required, you can run passwd in the single-user mode (the second prompt to interrupt boot) to set the root password but only after you've typed mount_root first.

Watch this space, hopefully official support coming soon :+1:

1 Like

Actually @aio there is something you could help with. Please can you run the following commands in the failsafe mode (where you see root@none) and paste the output here?

blkid

cat /sys/block/mmcblk0/mmcblk0p9/uevent

cat /sys/block/mmcblk0/mmcblk0p10/uevent

I'm almost there now, but without wiping the internal eMMC there's an internal 4 MB partition (mmcblk0p1) with the label rootfs_data that OpenWrt uses by default as the writeable area of the install.

Although everything now works perfectly on this device, we only really get 2.4~ MB remaining for "activities" after install, for things like additional package installs.

Luckily, there's 2 other larger partitions on the eMMC we can use:

  • mmcblk0p9 with the label bu1 - 256 MB and is a firmware update scratch space
  • mmcblk0p10 with the label bu2 - 3.0 GB and is a dumping ground for misc crap

My plan is to use the 256 MB partition as a new extroot partition (it should be plenty of space, barely has any files inside and won't need formatting), but to do that I need to be sure my partition UUIDs and labels match yours exactly. I'm banking on Zyxel keeping the same UUIDs as they manufactured them.

(The 3.0 GB partition will then be free for people to use as they see fit)

Thank you in advance :slight_smile:

How large is the rootfs partition on that device?

Best practise is to set up a loop device on top of the rootfs partition as rootfs_data overlay on the emmc device. You don't have to touch the emmc partitions in that case.

You need a padded rootfs image to get this working:

OpenWrt should then use that rootfs_data loop device instead of the small rootfs_data emmc partition as overlay.

You can just re-use that emmc.sh script and handover the right kernel and rootfs partition names like that:

The loop device is then set up during sysupgrade.

Hi @kirdes - thank you for taking the time to reply. It is sincerely appreciated (all the help I can get is positive).

I feel I may not have been verbose enough in my previous post, I'm aware of everything you have posted (and it's useful information), but the key thing here is this statement;

The WSQ50 has a rootfs_data partition in its internal eMMC from the factory, OpenWrt's codebase uses this blindly if it exists and is formatted with a supported filesystem. That's what's happening here. I cannot override this behaviour without reformatting the internal eMMC or changing labels. In the spirit of maintaining the ability to return to the factory firmware, I won't do this.

I then have 2 choices, either...

  1. Use extroot instead - easiest solution for one device but the stars need to align with UUIDs
  2. Create and raise a patch for fstools to allow overriding the rootfs_data partition for /overlay with a Kernel cmdline switch

The latter option feels like the best way moving forward but that code change would potentially affect millions of devices and I'm not comfortable bearing that responsibility :smiley: :smiley: :smiley:

Yes fstools are mounting a rootfs_data partition, but per default there is no partition scan performed (see https://github.com/openwrt/fstools/commit/1ea5855e980cd88766dd9f615e78e7dd6edfbb74)

We have also emmc devices with a rootfs_data partition in the ipq807x target and they work fine with a loop device as overlay.

That is the actual cmdline of the device?

Failsafe Mode Output

Block Devices

root@(none):/# blkid
/dev/mmcblk0p1: UUID="05f19e55-f453-4bd1-acb7-954d5d8cf49e" TYPE="ext4"
/dev/mmcblk0p5: TYPE="squashfs"
/dev/mmcblk0p8: TYPE="squashfs"
/dev/mmcblk0p9: UUID="2733b831-b2e6-4e88-839d-af2182dcce82" TYPE="ext4"
/dev/mmcblk0p10: UUID="0a5f4591-7806-485f-8721-0c49dac1fc39" TYPE="ext4"
root@(none):/# df -h
Filesystem                Size      Used Available Use% Mounted on
rootfs                   23.0M     23.0M         0 100% /
/dev/root                23.0M     23.0M         0 100% /
tmpfs                   242.0M      8.0K    242.0M   0% /tmp
tmpfs                   512.0K         0    512.0K   0% /dev

Block Details

root@(none):/# cat /sys/block/mmcblk0/mmcblk0p9/uevent
MAJOR=179
MINOR=9
DEVNAME=mmcblk0p9
DEVTYPE=partition
PARTN=9
PARTNAME=bu1
root@(none):/# cat /sys/block/mmcblk0/mmcblk0p10/uevent
MAJOR=179
MINOR=10
DEVNAME=mmcblk0p10
DEVTYPE=partition
PARTN=10
PARTNAME=bu2

Happy to test the install method once you've nailed it down. Do you anticipate USB, or TFPT etc?

Will the 3.0 GB partition be mounted automatically? Would be great to keep logs etc on a separate partition so they don't interfere with normal operation.

@kirdes I tried setting fstools_partname_fallback_scan=1 in the Linux cmdline but it didn't change any behaviour. Still mounting the 4 MB rootfs_data partition.

It's also worth noting that I simply cannot just "rename" that partition, I tried with mkfs.ext4 -L old_rootfs_data /dev/mmcblk0p1 but as soon as it rebooted it had reverted to rootfs_data - thinking is the Zyxel u-boot shim is being awkward.

@aio Thank you buddy! Although the PARTNAME fields match, unfortunately the UUID's do not, meaning I can't hard-code those and have to do something a little more difficult. I'll keep you updated.

I anticipate USB will be the best install method (or even just wget), and the 3.0 GB partition currently isn't mounted by default but I can happily add it, how would you like to see it mounted? Somewhere like /mnt/bu2 ?

1 Like

By setting fstools_partname_fallback_scan=1 in the cmdline you explicitly activating the partname scanning and fstools is finding the rootfs_data partition for sure.

Do you even have set up a loop-device with the name "rootfs_data"? If so, I'm pretty sure fstools will mount this as overlay instead the rootfs_data partition, this is exactly how it works on ipq807x.

Happy to help @bagjason :+1:

bu2 sounds good. Having all that space available from boot makes the device even better.

Edit: do you have github branch for this work? It's beyond my skill level but am interested in what adding support looks like.

Update here; it's all good! Everything now works! Edit: Apart from sysupgrade config persists.

@kirdes that switch was what was required, PaulFertser on IRC told me to try it and now we have 45 MB of lovely loopdev storage space. Although neither bu1 (256 MB) nor bu2 (3.0 GB) are currently mounted / being used for anything.

I'm thinking of just leaving them permanently mounted by default in /mnt/bu1/ and /mnt/bu2 respectively. That way users can do what they like with them.

@aio yes I do, you can find it here, and this is the diff before and after, however I still need to...

  • Fix sysupgrades, configs don't persist
  • Clean up the code and rebase it against main / master, I based it off 23.05 and apparently that was wrong
  • Split some LED subsystem changes out into a separate patch - I added multiple LED support - until that gets approved the status LED will be green rather than white
  • Mount bu1 and bu2 as above
  • Properly document the install process
  • I need to create a wiki page for the device once its accepted

I should be able to do the first 4 on that list tomorrow :slight_smile:

1 Like

Just ignore them (apart from documenting their presence in commit message and the device's wiki page), any smarter handling only makes it harder for the user to mount them where they want (using blockd).

Aside, according to the FHS, /mnt/ is off limits for system side automounts (exclusively reserved for the admin to choose).

1 Like

Where is a right place to automount?

As a device owner, I just want the space that exists to be available permanently without fussing with the device. I wouldn't even know where to start without them available.