Are you seeing CPU contention? Do you use irqbalance?
If you're running iperf on the device itself, that's the problem. iperf itself needs considerable juice for packet generation and in that case you aren't measuring routing performance, just processor performance. You need the router and two (different) endpoints to do a proper iperf test.
1 Like
I have the R5S which also has eMMC. I was able to install and boot OpenWrt from eMMC. I know it is a different device, but it may be likely the same with R4SE.
I also have an R4S running vanilla OpenWrt 22.03, and I do not have boot issues.
1 Like
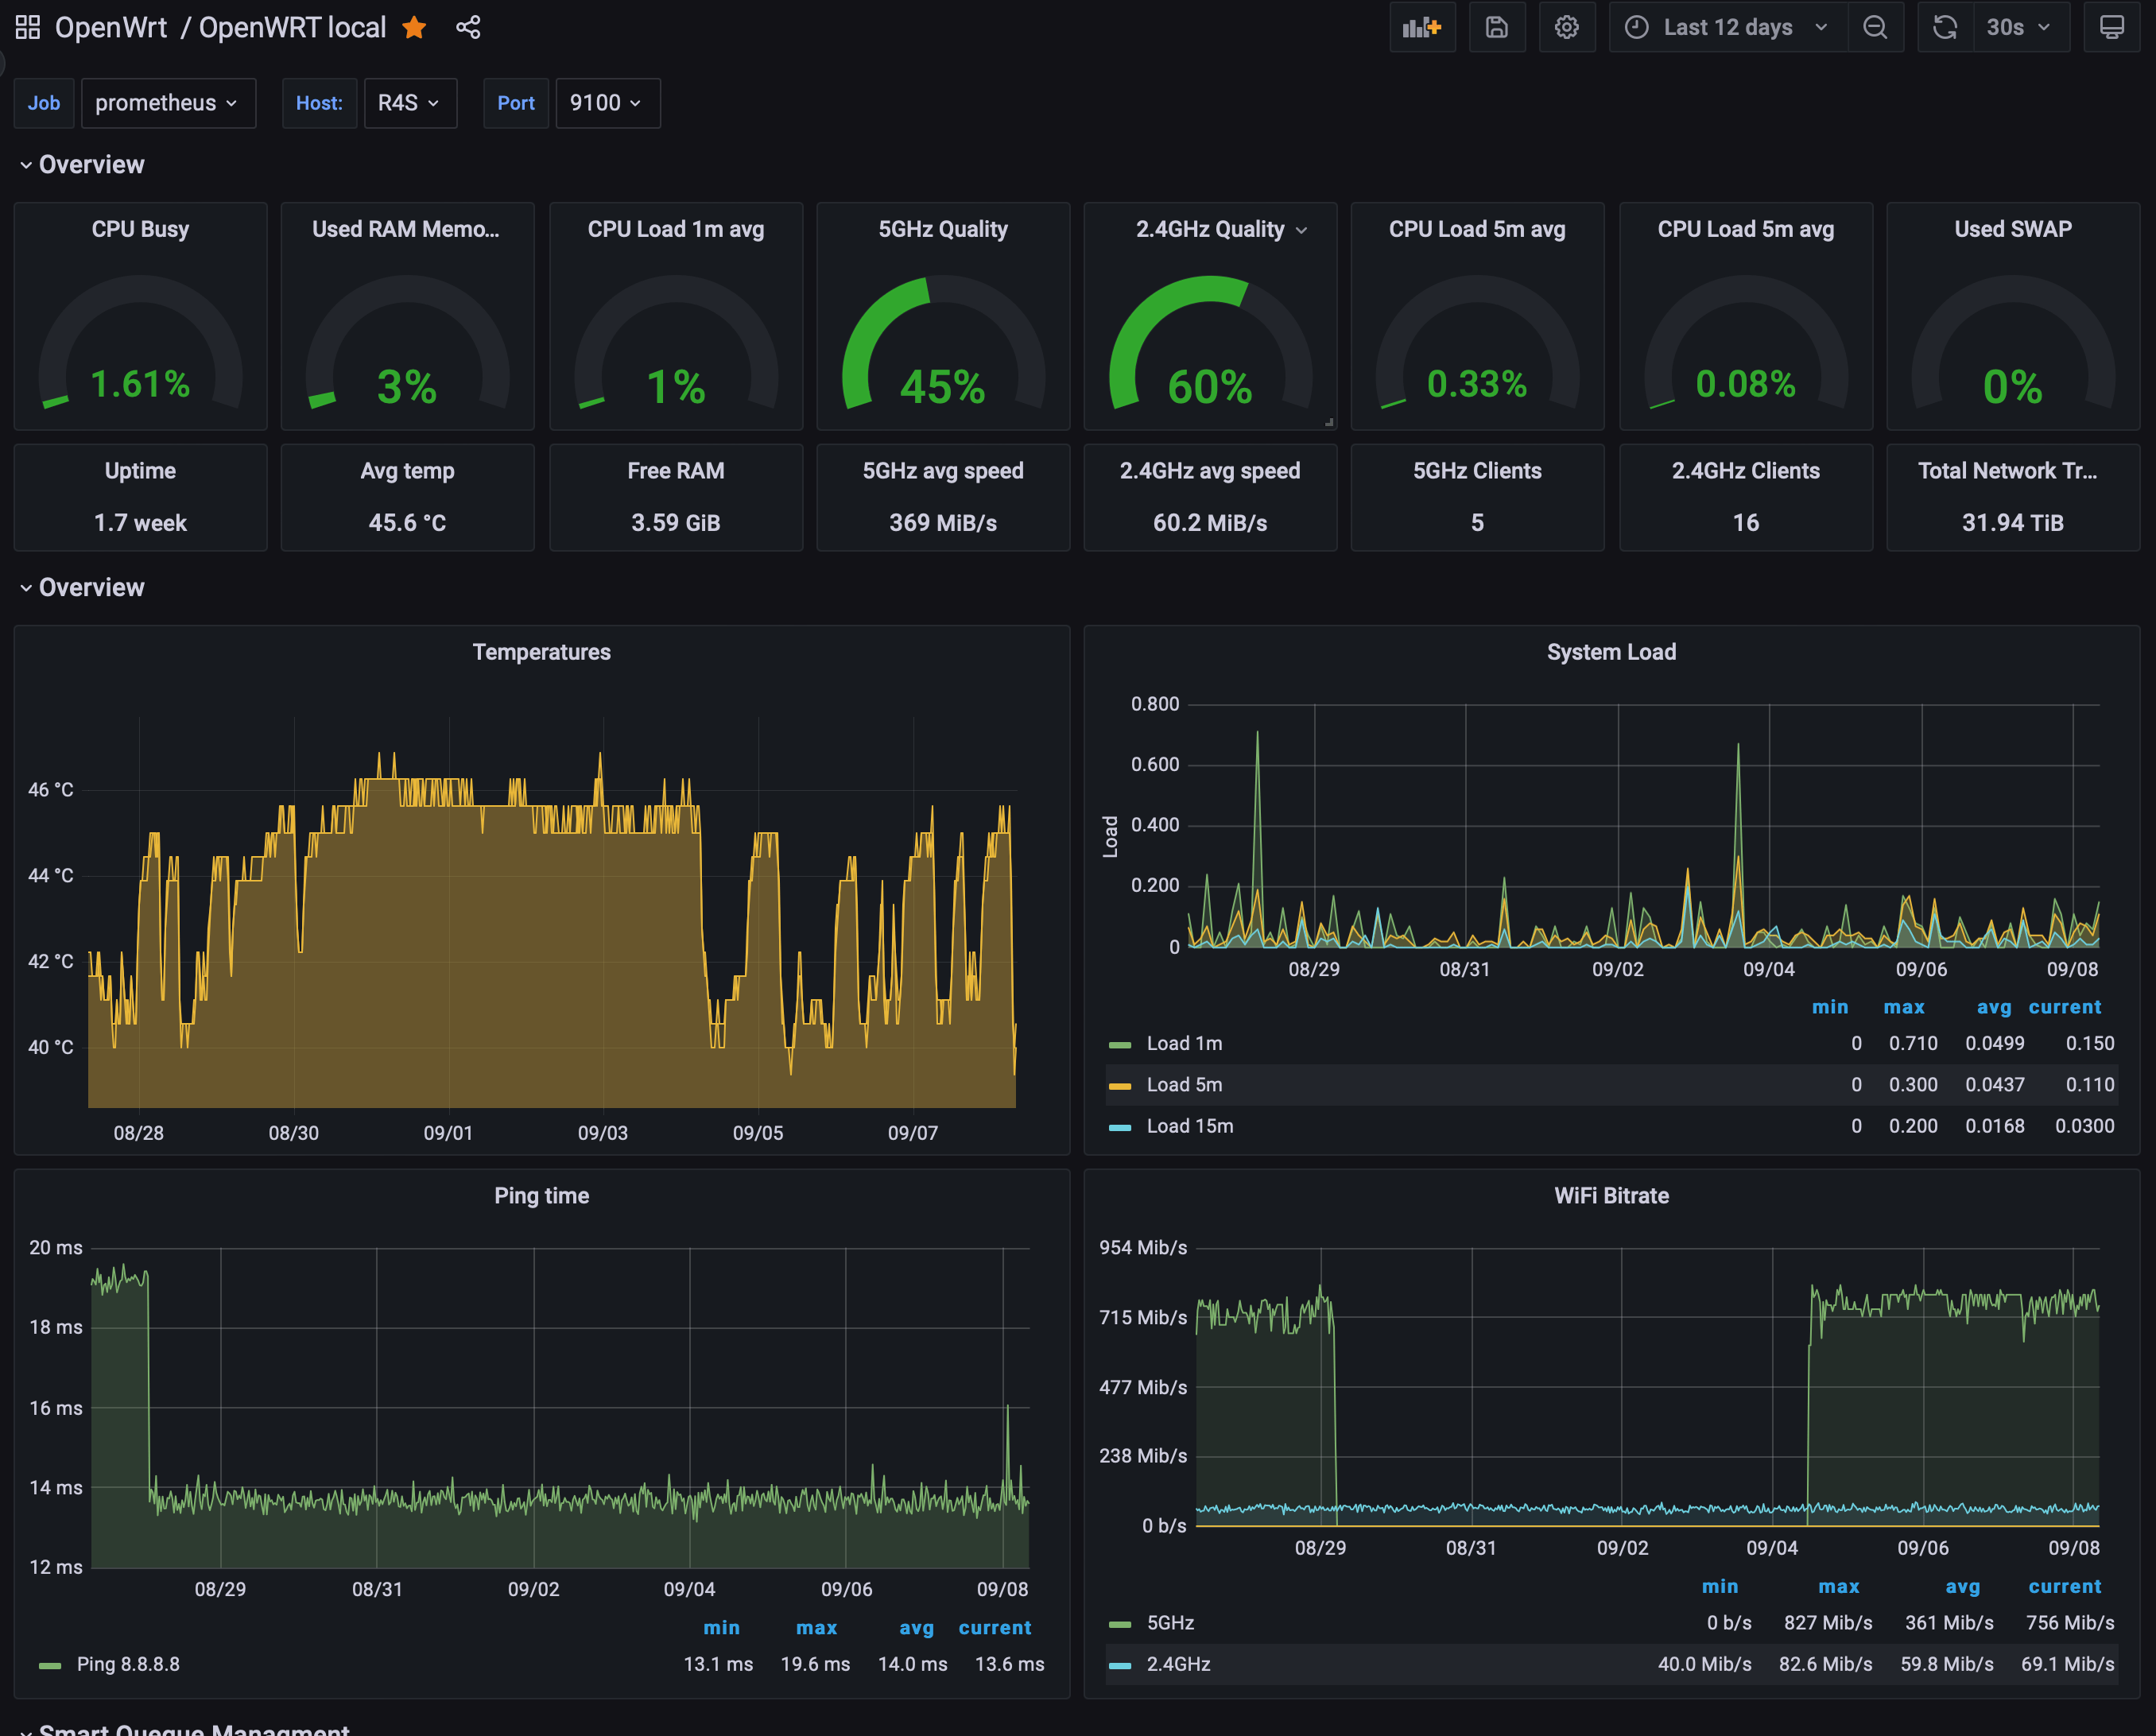
The R4S reached 12 days of uptime, because I was away to make a reportage in Kosovo and during that time I was always connected with WireGuard (on the R4S) with 3 or 4 devices on a snapshot r20386, all the IoT things were working at my home, and all was perfect, no reboot, no lag, no high ram usage, no heat (I left all the a/c off for 10 days but it never went above 50 °C), nothing. Even with 4 devices connected to WireGuard I have never have a single issue. Only lots of push notifications for the load and SQM that were working, so I rised the alert threshold from away ![]()
i'm very happy with it, I think I'll keep the kernel 5.10, since for me it works...


6 Likes
that's some nice dashboards. Are they from templates or custom?
I'm running an older anaelorlinski build but my uptime is solid.
Uptime:44d 1h 3m 37s
Local Time:2022-09-08 19:45:40
Kernel Version:5.10.108
Model:FriendlyElec NanoPi R4S
Architecture:ARMv8 Processor rev 4
Firmware Version:AO Build@2022.03.29
Hey folks, now that v22.03.0 has been released I want to configure my R4S 4GB from the scratch but I want to use an external SSD to store sensor/collectd/stats, logs, adblock lists and everything that usually shorten the MicroSD card's life. Can you help me on this? Is there any guide? I don't need detailed and extensive steps, just a quick list of adjustments will suffice. Thanks in advance!
There are probably multiple ways to approach this but here is one way that worked for me. This is mostly typed from memory so it might be off a bit.
Choose a supported filesystem for the storage. Options are limited if you also want it readable by Windows or a Mac. I chose vfat. I think f2fs would be good if it will only live on a linux system like OpenWrt. Other people often use ext4.
Install any needed kernel drivers and user space tools for the chosen filesystem. The usb-storage kernel driver may be a part of this.
Partition and format storage as needed either on OpenWrt or a computer.
Connect storage to router.
Use a program like block to get the UUID of the partition you want to mount.
mkdir a directory for the mount point like /mnt/usb-drive/.
Set permissions on that directory if needed.
Use Luci or uci to setup the mount and make sure hotplug mounts it on insertion. Use umount to unmount the usb drive before unplugging it to avoid corruption etc.
Make any subdirectories on the storage you want and set access permissions as needed.
Set collectd and/or any other app to point to the correct directory/path for the files it uses.
There are guides for storage and others for setting up data collection.
As an example here are some of my settings:
Output of block:
/dev/sda1: UUID="811E-1A0A" LABEL="RDATA" VERSION="FAT32" TYPE="vfat"
Output of lsblk:
sda
├─sda1 vfat RDATA 811E-1A0A
uci config:
fstab.@mount[0]=mount
fstab.@mount[0].enabled='1'
fstab.@mount[0].target='/mnt/usb-flsh-p1'
fstab.@mount[0].uuid='811E-1A0A'
Luci / uci creates entries in /etc/config/fstab:
config global
	option anon_swap '0'
	option anon_mount '0'
	option auto_swap '1'
	option auto_mount '1'
	option delay_root '5'
	option check_fs '1'

config mount
	option enabled '1'
	option target '/mnt/usb-flsh-p1'
	option uuid '811E-1A0A'
In luci, you can set the output directory for collectd under the "Output Plugins"
tab.
Enjoy!
1 Like
Thanks, it's Grafana with Prometheus exporter, I created a post blog with my setup: https://giuliomagnifico.blog/networking/2022/08/14/home-network_v3.html (don't forget to read the first post linked, there's the Grafana setup).
44 days of Uptime sounds cool but with old and stable release, I achieved it with a snapshot build, this is why I was surprised ![]()
3 Likes
You don't need an SSD to store few kilobytes of logs and files ![]() I'm doing the same for all the network data, collectd, etc... but on a USB3 drive, is more than sufficent.
I'm doing the same for all the network data, collectd, etc... but on a USB3 drive, is more than sufficent.
Just use the OpenWrt USB drive tutorial, then check the auto mount of your drive, and configure the collectd, nlbwmon, etc... few clicks from LuCi
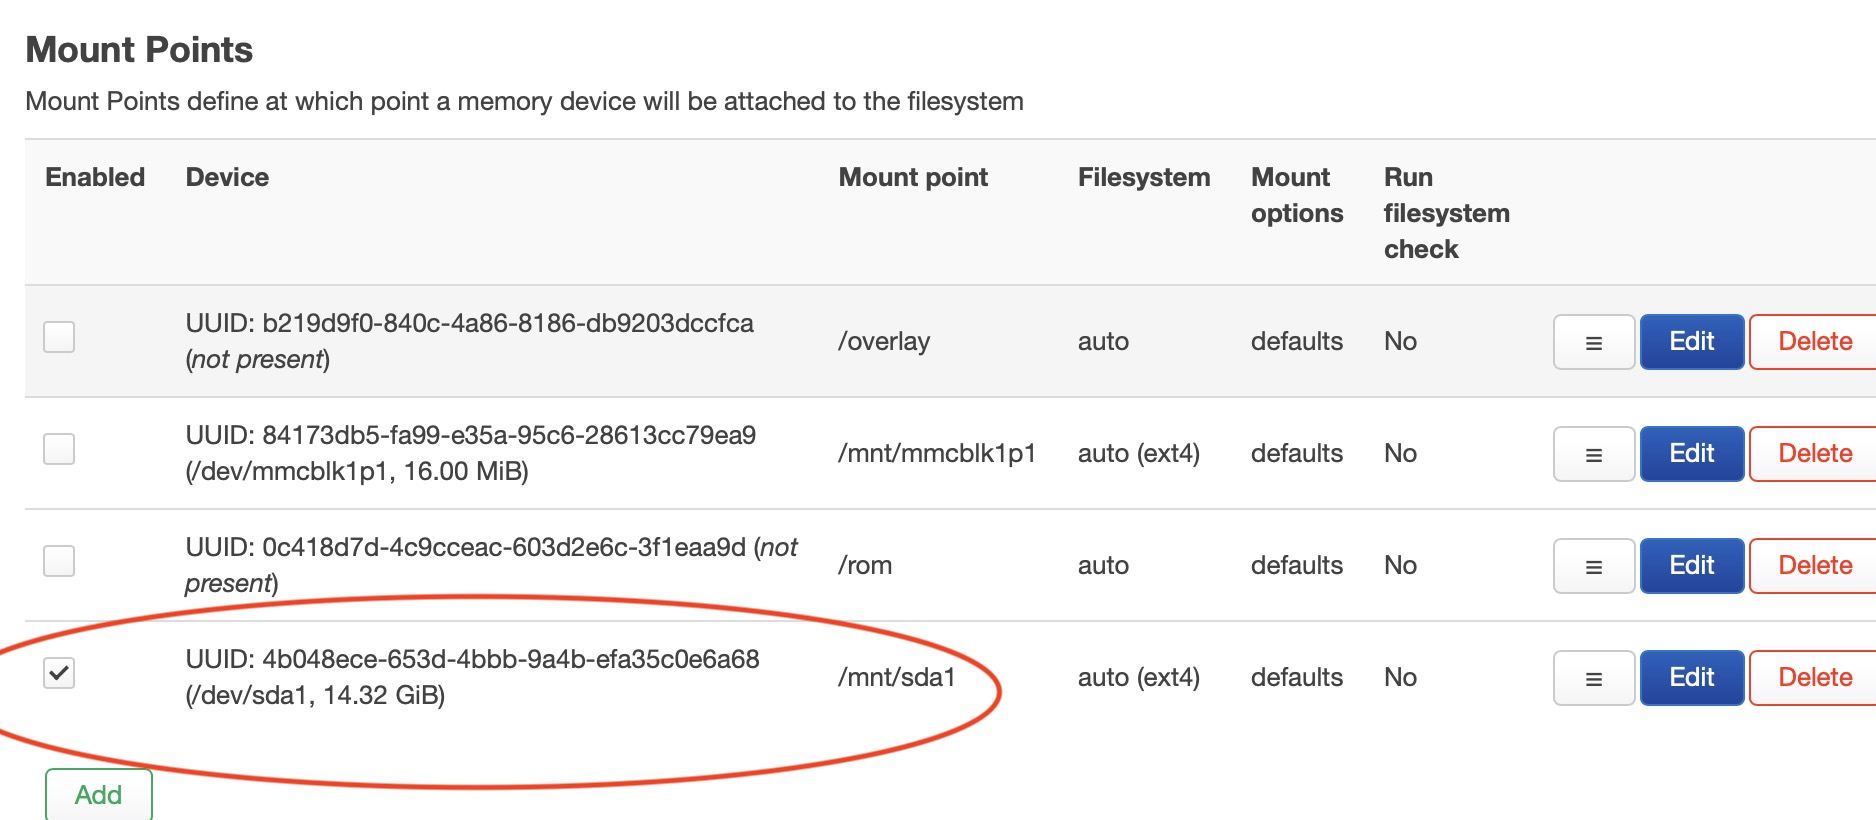

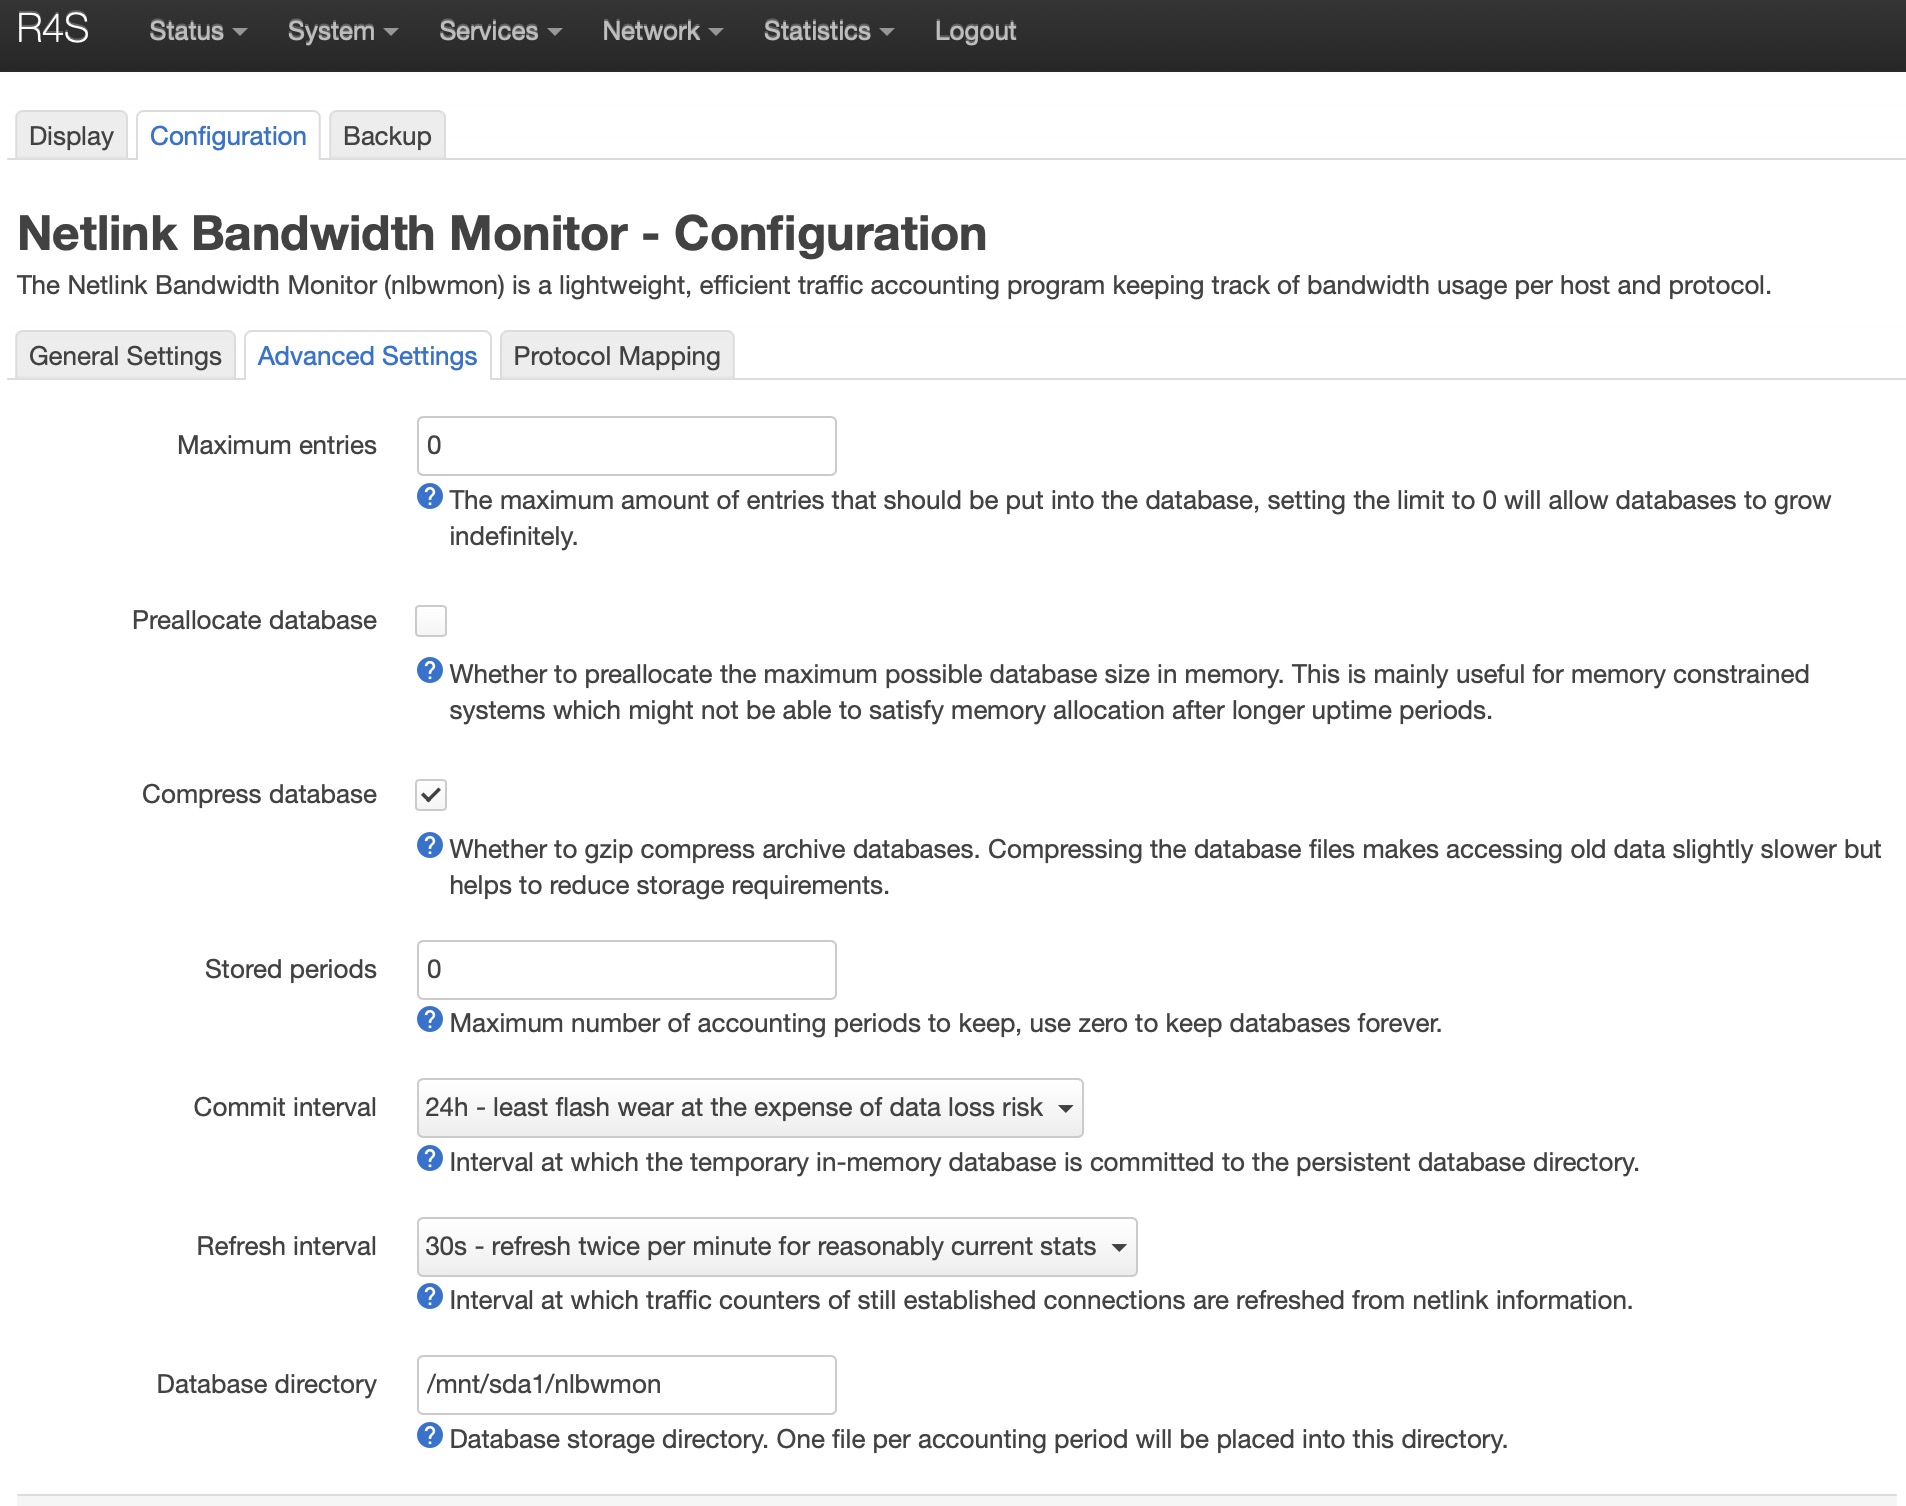
Just remember to change the default data period of nlbwmon that reset itself too often, I don't remember which parameter (you know, you make this change one time and then you forgot it, god save the backups)

3 Likes
Thank YOU! This will help me a lot. I have an idea on how to do that but with a quick how to it's much easier to remember the steps...
2 Likes
Yeah, an SSD isn't needed but I have an spare one with 120GB and I'm planning to experiment some heavier things later like docker. And SSDs have wear leveling so it probably will be more reliable than a microSD or USB thumb drive...
Generally speaking is absolutely correct but these logs are really few kb.. (probably 5-10 megabytes per years). these are absolutely not impacting on the wear of the X drive. If you have a spare SSD use it, otherwise any USB drive will be fine ![]()
1 Like
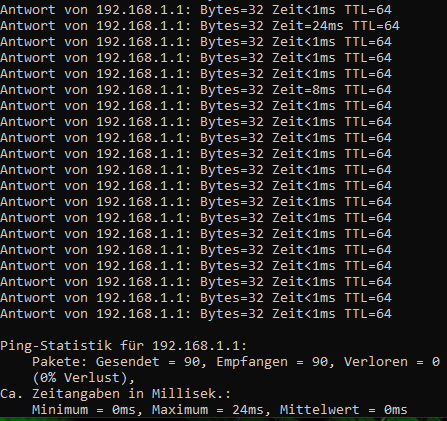
are these ping spikes normal while pinging the r4s ?
Lately i have lags in games maybe thats the problem. Im using OpenWrt 22.03.0 with only qosify installed and my pc is the only device on the internet. I saw THIS POST but i dont know how to set the r4s into high performance mode (with ssh ?).
To set performance mode, go into LuCI, System menu, Startup menu entry, Local Startup tab, and add the following by copy/paste:
find /sys/devices/system/cpu/cpufreq/ -name scaling_governor | while read GOVERNOR; do
  echo performance > $GOVERNOR
done
Save and reboot.
If for any reason you want to go back to the default behavior, reverse the steps (just delete those three lines, save and reboot).
3 Likes
Hello,
I'm trying to install openspeedtest via docker on the nanopi r4s, however it seems that there is an incompatibility with fw4 nftables, So is anyone using docker on this device with fw4?
A lot of packages are still not compatible with fw4, dockerd is one of them as you can see below:
Also in the comments of the "issue" above, there are some ppl talking about docker and about some ways to make it work with fw4.
1 Like
Answer: No
Once you update the squashfs firmware, you are back to 100MB space... that's a shame that the firmware, targeted for the 4GB ,doesn't use that space...
1 Like
I have, in the past, tried to follow this thread and reading that a nanopi r4s 4GB machine is a reasonably good choice for a router I bought 2 (1 for use and a backup).
Now I come to setting up the first one.
I followed
https://openwrt.org/toh/hwdata/friendlyarm/friendlyarm_nanopi_r4s
on that page was an 'installation method' (well sorta)
linked to
https://openwrt.org/docs/guide-user/installation/installation_methods/sd_card
so I get to the 'squashfs-image' - - - that is under 'Expanding the filesystem'
and now I grind to a halt.
Ask questions
Nanopi R4S (4GB) install problems
where I get told that I'm supposed to have a running nanopi system and then do this and that
-
-
- so my questions
I have
- so my questions
-
Nanopi R4S (4GB) install problems
I have the oenwrt-rockchip-armv8-. . . installed on the sd card
How do I get this card so that I can slip it into the sd card slot on the box and then set up my system?
I have a router at 192.168.1.1 already - - - is there an easy way to place this nanopi on something like 192.168.2.1 so there is no conflict?
(I do hope someone out there can help - - - the instructions I have found I followed but I am in limbo and really don't know how to get to home base (a working router).)
TIA
Download 22.03.0 squashfs image. Then use something like balena etcher to flash the image to your sd card. Put the sd card into your NanoPi R4S and power it up.
Sure. Disconnect from your router network on 192.168.1.1, then connect the NanoPi Lan port to your computer's ethernet port instead. You should now be able to reach the NanoPi on 192.168.1.1.
Next, change the static IP address of the NanoPi R4S to something on the same subnet (192.168.1.x). For example: 192.168.1.5, but not 192.168.2.x - that is a different subnet. Define your router at 192.168.1.1 as your gateway, and identify a DNS server so your NanoPi can reach the internet. You can do this configuring the network lan interface from a web browser using LuCI, or you can log into your NanoPi via a terminal session (e.g., ssh root@192.168.1.1) and edit the file /etc/config/network on your NanoPi with vi to have the following lines in the lan interface:
option ipaddr '192.168.1.5'
option gateway '192.168.1.1'
list dns '1.1.1.1'
Next power off your Nano Pi. Reconnect to the 192.168.1.1 network on your router. Power on your NanoPi and connect its lan port to a lan port on your router (or computer). Your router will still be 192.168.1.1, and your NanoPi will now be reachable at 192.168.1.5 so it does not conflict with your router at 192.168.1.1. Your NanoPi will also have internet access through your router (the gateway) and via DNS translation provided by Cloudflare (1.1.1.1).
There are other ways to do this, but this should get you started. None of this is NanoPi specific - it's just a matter of learning how to flash OpenWrt to any device that boots from an SD card, and then learning how to configure any OpenWrt device to be reachable through a unique static IP address on your network's lan subnet.
1 Like
That's quite limiting if you want to download software like docker that take some space...
I am really surprise that no PR exist about it