Also, the forum has something that the wiki lacks by design: reader feedback. For example, the opening post in this thread has a Diagnostics section that came to be entirely due to a suggestion made by @efahl, for which I am very grateful.
Again, this is not to diminish the importance of the wiki. The wiki and the forum are highly complementary. Each has its uses.
My biggest issue with wikis is their horrible editing facilities. The wiki devs put all sorts of effort into the presentation of the final pages, but seemingly forget that someone has to type all that garbage. I've been using dokuwiki (same as what OpenWrt uses?) for a couple years, and my modus operandi is to ssh to the server, cd to the wiki's data directory and vi dhcp-notes.txt directly, so I can use a real editor and do greps, seds, awks and so on to my heart's content.
It was about 18 years ago (wow time flies) I set up our company website (all hand-edited html at the time) using iirc Filezilla. It had a cool feature where you could ftp-connect to the site, surf to the directory of interest, click "edit" (which was configured to your editor of choice) and it would download the file, launch the editor on the copy, then auto-upload any changes you made. I would love to see that sort of thing on a modern wiki so even if I can't do grep -r something or sed s/some/stuff/ on a bunch of files, at least I could use a real editor.
Will there ever be a time that openwrt comes with an installer for x86, in the same way that pfsense or opnsense has one? I am aware of openwrt's origin, still an installer would make life so much easier.
I installed OpenWrt on my N5105 from a USB stick using Ventoy. I got it to boot the OpenWrt img using their instructions (https://www.ventoy.net/en/doc_openwrt.html), then somehow (4 months ago and I didn't document it properly) mounted the proper partition on the source USB and simply did
$ mount something something /usb
$ dd if=/usb/openwrt.img of=nvme0n1
$ reboot
# Pull the USB stick out while it reboots...
Seems like it could be a starting point for a simple installer.
That sounds like something very usefull and could safe a lot of users a lot of time. As you said, a kind of bootable imager that copy and resizes the image to a systems hdd/sdd.
What about downloading and creating a bootable gparted system Gparted home Live then boot it and run gparted? It should find your partition which, since it is not mounted, can be extended or shrunk. And it's graphical instead of command line.
As always, backup your disk first (ala Clonezilla).
I strongly suggest you download Ventoy and create a bootable USB with it. Then you can copy multiple ISOs as files to the jump drive - anything from Win11 to Clonezilla Live. You boot the Ventoy, select the ISO and it loads and boots. Easy as all those ISOs are in one place and can be removed and replace by newer versions at will.
It should work if you have an ext4 image. Not sure about SquashFS; I could never figure out how to manage SquashFS overlays with gparted. Truth be told though, I haven't tried very hard...
Could you elaborate more on the last section? What do those command do exactly, on what environment should I perform those commands? I'm using squashfs file system, where should I execute those commands? External boot environment or directly under the same openwrt OS? I performed this using finnix USB stick, not working for me, it's an old laptop with SATA 2.5 drive.
I managed to expand the sda2 partition, I can't thank you enough for such a thorough guide.
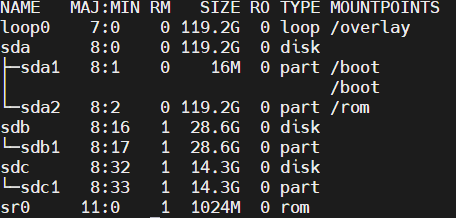
Sorry to start at the end, but it appears that you already figured out that this procedure as described should be performed on the working system itself. Great job!
Now for the big question:
Hmm... Where do I start to avoid starting at the Big Bang?
Background. In Linux, storage devices can be block or loop (if you remember the old DOS, there was a similar dichotomy there, "physical drives" and "logical drives"). Block devices are actual physical devices (hard drives, SSDs, eMMC modules, USB sticks, etc.). A loop device is definable on the system. You can set one up to match a physical device, or to refer to a file system stored in a file (or some other unit of storage) on an existing device. The latter is called overlay.
Base reality. OpenWrt installs on a block device (in your case, sda). That block device includes a boot partition and a root partition; the latter also holds a user-writable overlay (the root partition proper, at least in a SquashFS image, is read-only; this is good for security, disaster recovery, resets, etc.). So the task of properly resizing the root partition includes the resizing of the overlay. The first few commands (those starting with words written IN CAPS) collect information about how all of this is set up and store it in environment variables. After enough information is collected (and formatted in a way that the worker utilities can understand), the losetup utility defines the overlay as a loop device residing on the root partition; then, the resize2fs utility does the actual resizing of that loop device.
Disclaimer. For the sake of brevity, I filtered out a lot of technical details, so my explanation came out a bit hand-wavy. If anyone knows a better (succinct, yet sufficiently technical) way of explaining it, please post it here.
thanks again for explaining, I have successfully resized the filesystem too, I did it while openwrt is running, it works without third party boot media
I have another method that worked for me. I pulled the hard drive out of the Openwrt machine and connected it to a usb to sata adpater. I then plugged that into a Debian 11 machine and edited the partitions with G-parted.
This works, too. If you have the right adapter. I've done this on ext4 drives, but not on SquashFS drives. On my Mint machine, gparted recognizes SquashFS partitions, but doesn't want to do anything that involves writing with them. It's entirely possible that this can be overcome with the right software, but I have not researched this.
Also, on some x86 units (for example, Sophos XG 85[w] and 86[w]), the boot drive is an eMMC module soldered onto the motherboard. In those cases, the removal of the boot drive is simply not an option...