Free Space: 0% Turris Omnia

All partitions are missing.
There is no filesystem on flash...
just the RAMdisk tmpfs data.

Have you read the Turris flashing instructions from the commit introducing the support?

https://git.openwrt.org/?p=openwrt/openwrt.git;a=commit;h=9f3f61a0d968fbe7b93899f948f3c34612683ba6

The same advice is in wiki:
https://openwrt.org/toh/turris_cz.nic/turris_cz.nic_omnia#installation

Based on that, I think that you may have missed the final mount step & actual sysupgrade step in the initramfs approach.

(But without practical Turris experience, that is a pure guess)

@jeff I needed to add the aacraid driver for my Adaptec RAID card I want to integrate and could not seem to run make kernel_menuconfig with the TurrisOS build.

@hnyman I did not read that information. I'm on the high end of the novice spectrum where I know what I'm doing kindof but not really :stuck_out_tongue: Still learning.

Method 1 - USB 'medkit' image w/o serial

  • Copy openwrt-mvebu-turris-omnia-sysupgrade.img.gz and
    omnia-medkit-openwrt-mvebu-turris-omnia-initramfs.tar.gz to the root of a
    USB flash drive formatted with FAT32 / ext2/3/4 / btrfs / XFS.
    Note that the medkit MUST be named omnia-medkit*.tar.gz
  • Disconnect other USB devices from the Omnia and connect the flash drive
    to either USB port.
  • Power on the Omnia and hold down the rear reset button until 4 LEDs are
    illuminated, then release.
  • Wait approximately 2 minutes for the Turris Omnia to flash itself with
    the temporary image, during which LEDs will change multiple times.
  • Connect a computer to a LAN port of the Turris Omnia with a DHCP client
  • (if necessary) ssh-keygen -R 192.168.1.1
  • ssh root@192.168.1.1
    $ mount /dev/sda1 /mnt
    $ sysupgrade /mnt/openwrt-mvebu-turris-omnia-sysupgrade.img.gz
  • Wait another minute for the final OpenWrt image to be flashed. The Turris
    Omnia will reboot itself and you can remove the flash drive.

:dizzy_face: I'll try that. I was wondering why there were two files and assumed sysupgrade was not what I wanted since I was flashing the full thing. TurrisOS comes as 1 'medkit' file.

Ran the sysupgrade and it killed the ethernet ports lol. I'll make sure the right drivers are loaded. :frowning:

I'm not seeing the switch driver specified anywhere so I'm going to assume there is another issue. I'll try enabling the WIFI and then run the sysupgrade to see what may have happened.

edit looks like it soft bricked. Had to drag out a serial com.
Wrong Image Format for bootm command
ERROR: can't get kernel image!
There's a thread somewhere that supposedly fixes this.

edit looks like I can't use a nano so I had to overwrite my project mega board -_-
ran the commands:
env default -a
saveenv
and now the recovery is working normally again.
Recompiled OpenWRT and will give it another go.

Success! However I only have 256MB of storage but I'm pretty sure I know where to fix that.

Thank you again for your help pointing me in the right direction :slight_smile:

I have 18.06.5 installed and I only have 256MB of storage, how did you get it back?

the eMMC partition size set for the mvebu target is not tailored to the 7.3GB available on the TO.

You could look up the source code but if I am not mistaken it creates only a 512 MB or 1014 MB partition initially. Depending on the filesystem deployed on the mmcblk0 partition you could probably resize (expand) both - the partition and the filesystem - with userland tools.

Thanks for the info, the partition layout is

root@Turris:~# ls /dev/ | grep mmc*
mmcblk0
mmcblk0boot0
mmcblk0boot1
mmcblk0p1
mmcblk0p2
mmcblk0rpmb

And

root@Turris:~# df -h
Filesystem                Size      Used Available Use% Mounted on
/dev/root                 3.0M      3.0M         0 100% /rom
tmpfs                  1011.8M      1.3M   1010.5M   0% /tmp
/dev/loop0              251.4M     41.6M    139.7M  23% /overlay
overlayfs:/overlay      251.4M     41.6M    139.7M  23% /
tmpfs                   512.0K         0    512.0K   0% /dev

How do i figure out what these partitions are used for, boot0 and boot1 I think are obvious p1 p2 and rpmb partitions are the ones I should be looking at, can you point me in the right direction?

logread | grep partition might provide a hint, else there are

  • lsblk
  • block info
  • blkid
  • mount

mmcblk0 would be the block device with the 7.3GB capacity

logread | grep partition doesnt return any info,

root@Turris:~# lsblk
NAME         MAJ:MIN RM   SIZE RO TYPE MOUNTPOINT
loop0          7:0    0 253.4M  0 loop /overlay
sda            8:0    1  57.6G  0 disk 
└─sda1         8:1    1  57.6G  0 part 
mtdblock0     31:0    0     1M  0 disk 
mtdblock1     31:1    0     7M  0 disk 
mmcblk0      179:0    0   7.3G  0 disk 
├─mmcblk0p1  179:1    0  16.3M  0 part 
└─mmcblk0p2  179:2    0 256.3M  0 part /rom
mmcblk0boot0 179:8    0     4M  1 disk 
mmcblk0boot1 179:16   0     4M  1 disk 
mmcblk0rpmb  179:24   0     4M  0 disk 
root@Turris:~# /sbin/block info
/dev/loop0: UUID="7acebbaf-355b-4d19-b41b-208bdd6b7f6b" VERSION="1.10" MOUNT="/overlay" TYPE="f2fs"
/dev/mmcblk0p1: UUID="0A9C-AE5E" LABEL="NO NAME" VERSION="FAT16" TYPE="vfat"
/dev/mmcblk0p2: UUID="5193d8b0-64a4e088-a92a51e7-60814ed2" VERSION="4.0" MOUNT="/rom" TYPE="squashfs"
/dev/sda1: UUID="faed2be9-a4b1-4453-b91a-538a875dd657" LABEL="Turris" VERSION="1.0" TYPE="ext4"
root@Turris:~# mount
/dev/mmcblk0p2 on /rom type squashfs (ro,relatime)
proc on /proc type proc (rw,nosuid,nodev,noexec,noatime)
sysfs on /sys type sysfs (rw,nosuid,nodev,noexec,noatime)
tmpfs on /tmp type tmpfs (rw,nosuid,nodev,noatime)
/dev/loop0 on /overlay type f2fs (rw,noatime,lazytime,background_gc=on,no_heap,user_xattr,inline_xattr,inline_data,inline_dentry,flush_merge,extent_cache,mode=adaptive,active_logs=6)
overlayfs:/overlay on / type overlay (rw,noatime,lowerdir=/,upperdir=/overlay/upper,workdir=/overlay/work)
tmpfs on /dev type tmpfs (rw,nosuid,relatime,size=512k,mode=755)
devpts on /dev/pts type devpts (rw,nosuid,noexec,relatime,mode=600,ptmxmode=000)
debugfs on /sys/kernel/debug type debugfs (rw,noatime)

Am I correct that its mmcblk0p2 that is the partition that will need expanding?

Not sure but likely yes, though I do not understand the purpose of

loop0 7:0 0 253.4M 0 loop /overlay

Expanding the partition is two-fold:

  • adjusting the partition table (probably needs reboot for the adjustment to be propagated to the kernel)
  • adjusting the filesystem (after the aforementioned reboot) - squashfs - to the expanded partition space

That said I am not familiar with the intricacies of squashfs and whether it can be aligned to an adjusted partition size or how that would be achieved.
It may not even be possible and instead one would need to generate a custom build image instead.

fair :warning: - tinkering with the partition table and/or the size of a file system could render the node unstable or unusable

Actually no, seeing that the file system is mounted read-only...

Oh well, reading [1 2] would indicate overlay being the part to look into.

Supposedly you could resize mmcblk0p1 and leverage it as overlay and leave the whole squshfs part on mmcblk0p2 undisturbed.


Supposedly this should work:

  • resize the mmcblk0p1 partition (which appears unused) with fdisk /dev/mmcblk0p1 (if not familiar with fdisk look up its man pages)
  • reboot node (to propagate the adjusted partition table to the kernel)
  • format the mmcblk0p1 partition with the file system of your preference
  • create a mount point (LuCI or editing /etc/config/fstab via ssh) that mounts the mmcblk0p1 partition on /
  • reboot the node

[1] https://openwrt.org/docs/techref/file_system
[2] https://openwrt.org/docs/guide-user/additional-software/extroot_configuration

I will try something and let you know. If I don't reply I've almost certainly broken something :smile:
Edit: fdisk -l

Disk /dev/mmcblk0: 7.3 GiB, 7818182656 bytes, 15269888 sectors
Units: sectors of 1 * 512 = 512 bytes
Sector size (logical/physical): 512 bytes / 512 bytes
I/O size (minimum/optimal): 512 bytes / 512 bytes
Disklabel type: dos
Disk identifier: 0x15729631

Device         Boot Start    End Sectors   Size Id Type
/dev/mmcblk0p1 *     2048  35327   33280  16.3M  c W95 FAT32 (LBA)
/dev/mmcblk0p2      36864 561663  524800 256.3M 83 Linux

This is just the relevant info for the partition, the asterisk on mmcblk0p1 under the boot heading makes me nervous to touch it.
If i create another partition on the device and use that as extroot, do you think that might work?

Makes probably sense to create another partition. extroot may not be necessary just

should work, at least that would be my understanding derived from [1]

Please ignore /rom and /overlay and use exclusively / for your daily routines!

But then I might be wrong and extroot is necessary after all.

Excellent, again thanks for the info and help, I have to go to work now, I will post back what happened tomorrow when I get some more time

That took way longer than I anticipated! So I did not try resizing the partitions but instead I tried building firmware. This has resulted in what appears to be a very expensive brick to my inexperienced eyes.
I have lost serial connection but it does boot to what I guess is an openwrt recovery shell. I also have access to luci but zero available space and from ssh i get

root@OpenWrt:~# df
Filesystem           1K-blocks      Used Available Use% Mounted on
tmpfs                  1036080       276   1035804   0% /tmp
tmpfs                      512         0       512   0% /dev
root@OpenWrt:~# ls -l /dev
drwxr-xr-x    3 root     root            60 Apr 20 13:06 bus
crw-------    1 root     root        5,   1 Apr 20 13:06 console
crw-------    1 root     root       10,  63 Apr 20 13:06 cpu_dma_latency
crw-rw-rw-    1 root     root        1,   7 Apr 20 13:06 full
crw-------    1 root     root      254,   0 Apr 20 13:06 gpiochip0
crw-------    1 root     root      254,   1 Apr 20 13:06 gpiochip1
crw-------    1 root     root       10, 183 Apr 20 13:06 hwrng
crw-------    1 root     root       89,   0 Apr 20 13:06 i2c-0
crw-------    1 root     root        1,  11 Apr 20 13:06 kmsg
srw-rw-rw-    1 root     root             0 Apr 20 13:06 log
crw-------    1 root     root       10, 237 Apr 20 13:06 loop-control
brw-------    1 root     root        7,   0 Apr 20 13:06 loop0
brw-------    1 root     root        7,   1 Apr 20 13:06 loop1
brw-------    1 root     root        7,   2 Apr 20 13:06 loop2
brw-------    1 root     root        7,   3 Apr 20 13:06 loop3
brw-------    1 root     root        7,   4 Apr 20 13:06 loop4
brw-------    1 root     root        7,   5 Apr 20 13:06 loop5
brw-------    1 root     root        7,   6 Apr 20 13:06 loop6
brw-------    1 root     root        7,   7 Apr 20 13:06 loop7
crw-------    1 root     root       10,  60 Apr 20 13:06 memory_bandwidth
brw-------    1 root     root      179,   0 Apr 20 13:06 mmcblk0
brw-------    1 root     root      179,   8 Apr 20 13:06 mmcblk0boot0
brw-------    1 root     root      179,  16 Apr 20 13:06 mmcblk0boot1
brw-------    1 root     root      179,   1 Apr 20 13:06 mmcblk0p1
crw-------    1 root     root      250,   0 Apr 20 13:06 mmcblk0rpmb
crw-------    1 root     root       90,   0 Apr 20 13:06 mtd0
crw-------    1 root     root       90,   1 Apr 20 13:06 mtd0ro
crw-------    1 root     root       90,   2 Apr 20 13:06 mtd1
crw-------    1 root     root       90,   3 Apr 20 13:06 mtd1ro
brw-------    1 root     root       31,   0 Apr 20 13:06 mtdblock0
brw-------    1 root     root       31,   1 Apr 20 13:06 mtdblock1
crw-------    1 root     root       10,  62 Apr 20 13:06 network_latency
crw-------    1 root     root       10,  61 Apr 20 13:06 network_throughput
crw-rw-rw-    1 root     root        1,   3 Apr 20 13:06 null
crw-------    1 root     root        1,   4 Apr 20 13:06 port
crw-------    1 root     root      108,   0 Apr 20 13:06 ppp
crw-rw-rw-    1 root     root        5,   2 Apr 20 13:11 ptmx
drwxr-xr-x    2 root     root             0 Apr 20 13:06 pts
crw-rw-rw-    1 root     root        1,   8 Apr 20 13:06 random
crw-------    1 root     root      252,   0 Apr 20 13:06 rtc0
brw-------    1 root     root        8,   0 Apr 20 13:06 sda
brw-------    1 root     root        8,   1 Apr 20 13:06 sda1
lrwxrwxrwx    1 root     root             8 Apr 20 13:06 shm -> /tmp/shm
crw-rw-rw-    1 root     root        5,   0 Apr 20 13:06 tty
crw-rw----    1 root     dialout     4,  64 Apr 20 13:06 ttyS0
crw-rw----    1 root     dialout     4,  65 Apr 20 13:06 ttyS1
crw-rw----    1 root     dialout     4,  74 Apr 20 13:06 ttyS10
crw-rw----    1 root     dialout     4,  75 Apr 20 13:06 ttyS11
crw-rw----    1 root     dialout     4,  76 Apr 20 13:06 ttyS12
crw-rw----    1 root     dialout     4,  77 Apr 20 13:06 ttyS13
crw-rw----    1 root     dialout     4,  78 Apr 20 13:06 ttyS14
crw-rw----    1 root     dialout     4,  79 Apr 20 13:06 ttyS15
crw-rw----    1 root     dialout     4,  66 Apr 20 13:06 ttyS2
crw-rw----    1 root     dialout     4,  67 Apr 20 13:06 ttyS3
crw-rw----    1 root     dialout     4,  68 Apr 20 13:06 ttyS4
crw-rw----    1 root     dialout     4,  69 Apr 20 13:06 ttyS5
crw-rw----    1 root     dialout     4,  70 Apr 20 13:06 ttyS6
crw-rw----    1 root     dialout     4,  71 Apr 20 13:06 ttyS7
crw-rw----    1 root     dialout     4,  72 Apr 20 13:06 ttyS8
crw-rw----    1 root     dialout     4,  73 Apr 20 13:06 ttyS9
crw-------    1 root     root       10,  59 Apr 20 13:06 ubi_ctrl
crw-rw-rw-    1 root     root        1,   9 Apr 20 13:06 urandom
crw-------    1 root     root       10, 130 Apr 20 13:06 watchdog
crw-------    1 root     root      251,   0 Apr 20 13:06 watchdog0
crw-rw-rw-    1 root     root        1,   5 Apr 20 13:06 zero

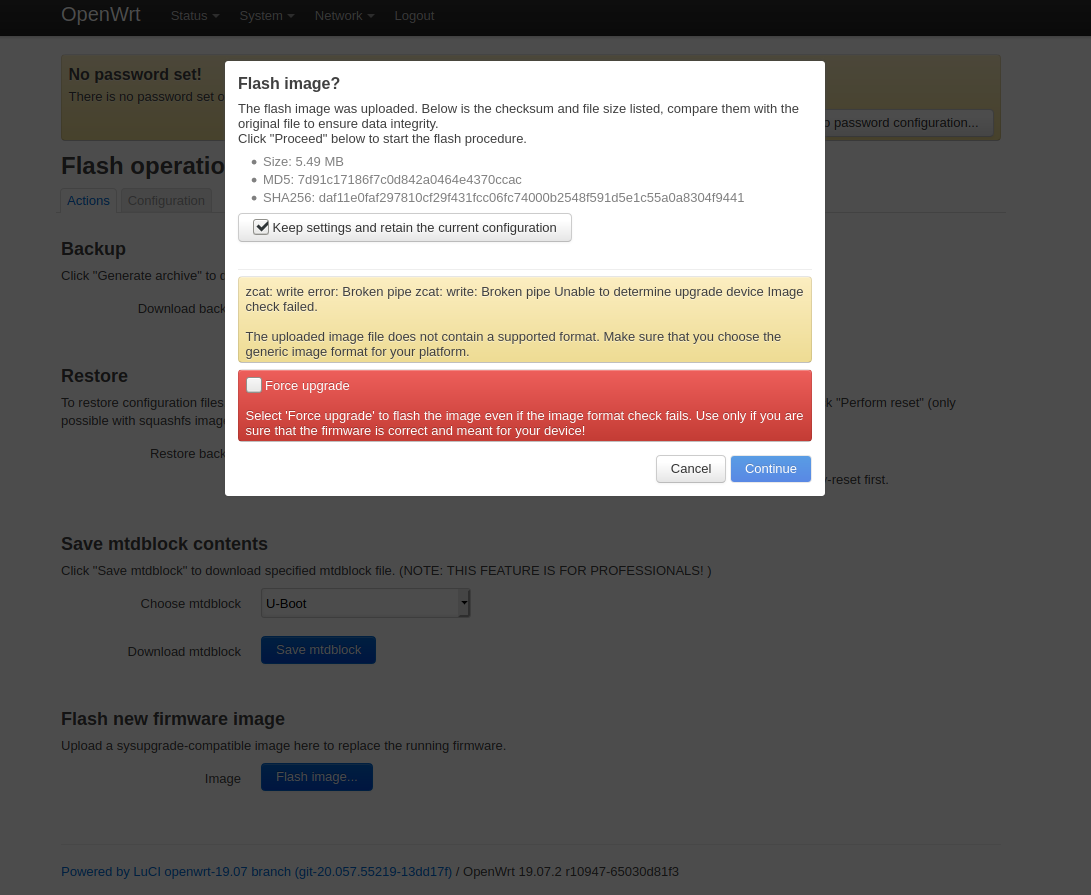
Trying to sysupgrade from luci gives this reponse

Any suggestions as to my next move would be welcomed

Not sure, but the "Unable to determine upgrade device" rings a bell. The issue should have been fixed in 19.07.2.

Could you provide the output of cat /proc/cmdline?
You could also try, just as a test

source /lib/upgrade/common.sh
export_bootdevice
echo $?

Output "0": Okay; Output "1" could not parse /proc/cmdline, to find the upgrade device.

I actually fixed it somehow, still not entirely sure how exactly! I rebooted to recovery and reset uboot from the ssh session. Then I rebooted with the reset button and 4 LED's which boots from external device with omnia-medkit and proceeded to sysupgrade from there. And the device came back. My initial panic was due me not being able to access the serial console, I still can't but this is another subject. Thanks for the reply though.

This topic was automatically closed 10 days after the last reply. New replies are no longer allowed.