D-Link open source switches: DGS 1210 product line

The GPL source code for the DGS-1210-ME is available here:
http://tsd.dlink.com.tw/downloads2008detail.asp

Scoll-down, select "Open Source" and choose your model.
The tarbal includes a build script to make the firmware;
Does not sound very "proprietary", but could be.

it even includes the build toolchain:

Install & Build

  1. Build Environment:
    1.1 CentOS 5.6 for 32-bit version, Ubuntu 10.4 for 32-bit version, fully install.
    1.2 You can open Terminal for using command line.
  1. Put "DGS-1210-10P-ME-GPLSourceCode.tar.gz" under /home and using command "tar -zxvf DGS-1210-10P-ME-GPLSourceCode.tar.gz" to untar it.

  2. Prepare for toolchain:
    3.1 Move /home/DGS-1210-10P-ME/toolchain/iproc_3.4.6 folder to /opt folder. (Ex. In /home/DGS-1210-10P-ME/, and using command "sudo mv toolchain/iproc_3.4.6 /opt")
    3.2 Change toolchain owner to root. (Ex. using command "sudo chown -R root:root /opt/iproc_3.4.6")

  3. Add yourself to the sudo list
    Edit "/etc/sudoers" to add your account to the sudoers.
    For example :
    user ALL=(ALL) NOPASSWD: ALL

    This action is only allowed by super user, and the file "sudoers" is read-only.
    You must login in super user and change the file permission.
    Remember to change file permission back to 440 by command "chmod 440 /etc/sudoers".

  1. In /home/DGS-1210-10P-ME/,
    then type command "source build.env" then type "make GPL".

  2. After building finished, you can find /home/DGS-1210-10P-ME/image folder and firmware("DGS-1210-10P-ME-B1-OS.hex"), ("DGS-1210-10P-ME-B1-BOOT.hex").

Here is the build script:

#################################################################

Copyright (C) 2009 D-Link Corp./D-Link Systems, Inc.

------------------------------------------------------

DESCRIPTION : The makefile for builing the complete

Management Switch image files.

#################################################################
include ${MGM_PROJECT_BASE_DIR}/make.h

CP := cp
RM := rm
CAT := cat
CC := $(CROSS_COMPILE)gcc
STRIP := $(CROSS_COMPILE)strip
GZIP := gzip
DD := dd
OBJDUMP := $(CROSS_COMPILE)objdump

os_dir := os/linux-3.6.5_iProLDK_3.4.6

OS_DIR := ${MGM_PROJECT_BASE_DIR}/${os_dir}
BOOT_ABSOLUTE_DIR := ${MGM_PROJECT_BASE_DIR}/boot/uboot-2012.10_iProLDK_3.4.6
OS_ABSOLUTE_DIR := ${MGM_PROJECT_BASE_DIR}/os/linux-3.6.5_iProLDK_3.4.6
IMAGE_ABSOLUTE_DIR := ${MGM_PROJECT_BASE_DIR}/image
TOOL_DIR := ${MGM_PROJECT_BASE_DIR}/tools

TAG_BOOT_VERSION := 1

IMGTAG := ${TOOL_DIR}/./imgtag
GEN_CHECKSUM := ${TOOL_DIR}/genTotalChecksum
IMGHDR := ${TOOL_DIR}/imghdr

MODEL := ${MODEL_NAME}
CUSTOMER_SIGNATURE := 2
BOARD_VERSION := 16
TAG_OS_VERSION := 1
HW_VER := B1
OUTPUT_BOOT_HEX := ${OUTPUT_IMAGE_FOLDER_NAME}-BOOT.hex
OUTPUT_OS_HEX := ${OUTPUT_IMAGE_FOLDER_NAME}-OS.hex
HEADER_MODEL := ${DISPLAY_MODEL_NAME}

.PHONY: os

Check if "image" folder exists

check-image-folder:
if [ -d ${IMAGE_ABSOLUTE_DIR} ]; then
echo "image folder exists";
else
echo "no image folder exists";
mkdir ${IMAGE_ABSOLUTE_DIR};
fi

change tool mod to 777

change_tools:
chmod 777 -R ${TOOL_DIR}

Make u-boot and copy ot to image dir

boot: check-image-folder
chmod 777 -R ${BOOT_ABSOLUTE_DIR}
${CP} ${BOOT_ABSOLUTE_DIR}/include/configs/cameo/smart5_series.h ${BOOT_ABSOLUTE_DIR}/include/configs/cameo/cameo_header.h
sed -i "s/hw_version=../hw_version=${HW_VER}/g" ${BOOT_ABSOLUTE_DIR}/include/configs/cameo/cameo_header.h
sed -i "s/#define BOARD_VERSION../#define BOARD_VERSION ${BOARD_VERSION}/g" ${BOOT_ABSOLUTE_DIR}/include/configs/cameo/cameo_header.h
make -w -C ${BOOT_ABSOLUTE_DIR} O=./build-output mdk-all
${CP} ${BOOT_ABSOLUTE_DIR}/build-output/u-boot.bin ${IMAGE_ABSOLUTE_DIR}/boot.bin

Make OS image and copy ot to image dir

os: check-image-folder
chmod 777 -R ${OS_ABSOLUTE_DIR}
cp ${OS_ABSOLUTE_DIR}/cameo/cameo.config/hurricane2_dgs_linux-3.6.5-flash.config ${OS_ABSOLUTE_DIR}/.config
make -w -C ${OS_ABSOLUTE_DIR} oldconfig
make -w -C ${OS_ABSOLUTE_DIR} zImage
if [ -f ${OS_ABSOLUTE_DIR}/arch/arm/boot/Image.gz ]; then
${RM} ${OS_ABSOLUTE_DIR}/arch/arm/boot/Image.gz;
fi
gzip -9 ${OS_ABSOLUTE_DIR}/arch/arm/boot/Image
echo 'start address ${LOADADDR}' > ${IMAGE_ABSOLUTE_DIR}/vmlinux.dump
${TOOL_DIR}/mkimage -A arm -O linux -T kernel -n Image -a ${LOADADDR} -C gzip -d ${OS_ABSOLUTE_DIR}/arch/arm/boot/Image.gz ${IMAGE_ABSOLUTE_DIR}/vmlinux.gz

os-clean:
make -w -C ${OS_DIR} clean

------------------------------------------------------------------------------

Make relevant image information and attach

------------------------------------------------------------------------------

.PHONY: vmlinux-attach-version-checksum
vmlinux-attach-version-checksum:
${CP} ${IMAGE_ABSOLUTE_DIR}/vmlinux.gz ${IMAGE_ABSOLUTE_DIR}/vmlinux.tag
${IMGTAG} ${IMAGE_ABSOLUTE_DIR}/vmlinux.tag ${TAG_OS_VERSION}
${GEN_CHECKSUM} ${IMAGE_ABSOLUTE_DIR}/vmlinux.tag ${IMAGE_ABSOLUTE_DIR}/vmlinux.sum
${CAT} ${IMAGE_ABSOLUTE_DIR}/vmlinux.tag ${IMAGE_ABSOLUTE_DIR}/vmlinux.sum > ${IMAGE_ABSOLUTE_DIR}/vmlinux.vc
${CP} ${IMAGE_ABSOLUTE_DIR}/vmlinux.vc ${IMAGE_ABSOLUTE_DIR}/vmlinux.ub
${RM} ${IMAGE_ABSOLUTE_DIR}/vmlinux.tag
${RM} ${IMAGE_ABSOLUTE_DIR}/vmlinux.sum

Make relevant image information and attach

boot-attach-version-checksum:
${CP} ${IMAGE_ABSOLUTE_DIR}/boot.bin ${IMAGE_ABSOLUTE_DIR}/boot.tag
${HEXTAG} ${IMAGE_ABSOLUTE_DIR}/boot.tag ${BOOT_VERSION}
${IMGTAG} ${IMAGE_ABSOLUTE_DIR}/boot.tag ${TAG_BOOT_VERSION}
${GEN_CHECKSUM} ${IMAGE_ABSOLUTE_DIR}/boot.tag ${IMAGE_ABSOLUTE_DIR}/boot.sum
${CAT} ${IMAGE_ABSOLUTE_DIR}/boot.tag ${IMAGE_ABSOLUTE_DIR}/boot.sum > ${IMAGE_ABSOLUTE_DIR}/boot.vc
${RM} ${IMAGE_ABSOLUTE_DIR}/boot.tag
${RM} ${IMAGE_ABSOLUTE_DIR}/boot.sum

Make bimage for update boot code only

bimage: boot-attach-version-checksum
${RM} -f ${IMAGE_ABSOLUTE_DIR}/bimage
${CP} ${IMAGE_ABSOLUTE_DIR}/boot.vc ${IMAGE_ABSOLUTE_DIR}/bimage
${IMGHDR} ${IMAGE_ABSOLUTE_DIR}/boot.vc ${IMAGE_ABSOLUTE_DIR}/${OUTPUT_BOOT_HEX} ${HEADER_MODEL} boot 0 ${CUSTOMER_SIGNATURE} ${BOARD_VERSION} ${IMAGE_ABSOLUTE_DIR}/vmlinux.dump
${RM} -f ${IMAGE_ABSOLUTE_DIR}/boot.vc ${IMAGE_ABSOLUTE_DIR}/boot.bin
${RM} -f ${IMAGE_ABSOLUTE_DIR}/bimage

zimage: vmlinux-attach-version-checksum
${RM} -f ${IMAGE_ABSOLUTE_DIR}/zimage
${DD} if=${IMAGE_ABSOLUTE_DIR}/vmlinux.vc of=${IMAGE_ABSOLUTE_DIR}/zimage bs=1024
${IMGHDR} ${IMAGE_ABSOLUTE_DIR}/vmlinux.vc ${IMAGE_ABSOLUTE_DIR}/${OUTPUT_OS_HEX} ${HEADER_MODEL} os 2 ${CUSTOMER_SIGNATURE} ${BOARD_VERSION} ${IMAGE_ABSOLUTE_DIR}/vmlinux.dump
${RM} -f ${IMAGE_ABSOLUTE_DIR}/vmlinux.vc

------------------------------------------------------------------------------

Remove unnecessary files to save disk space

------------------------------------------------------------------------------

clear-file:
find ./image -path "./image/" ! -name ".hex" -exec rm -f {} ;
find ./ -name ".pfx" -delete
find ./ -name "
.spc" -delete
find ./ -name ".pvk" -delete
find ./ -name "
.tgz" -delete
find ./ -name ".gz" -delete
find ./ -name "
.xz" -delete
find ./ -name ".bz" -delete
find ./ -name "
.bz2" -delete
find ./ -name ".Z" -delete
find ./ -name "
.tar" -delete
find ./ -name ".lha" -delete
find ./ -name "
.cab" -delete
find ./ -name "*.z" -delete

GPL:check-image-folder change_tools os zimage boot bimage clear-file
Well ... I will sacrifice my switch: build from scratch using the toolchain. Hoping to add telnet or SSH to able to gain serial access ...

I am installaling the requested Ubuntu 10.04 i386 in KVM and trying to compile all firmwares to make them available.

Edit : Dlink has been working on different versions of the 1210P switch for more than 10 years. i am running the first version of the 1210P, firmware A1 and it compiles with ... Redhat9 or Fedora code 3. This is back in 2004!!! And we are in 2017 at the time of writing. This shows how important it would be to support a line of "old" switches and make run under LEDE. The kernel of my 1210P-A1 must be full of bugs ...DLink has so many different products that it can hardly upgrade them all ...

Anyway, it is great to see all this open-source. I will build all versions and make them available to allow flashing switches (I am still dreaming it is possible).

I had a lot of fun installing this old Fedora Core 3 and it made the job.
Hopefully, I have been using GNU/Linux since RH7...

Here is the build script:

The only problem is the last command to create an image. It fails with an error!

Furthermore, this image does not seem (?) to be usable. It is just a kernel build.
What would you recommend? Starting from scratch using kernel config and making a custom LEDE firmware?

I am quite lost, although this could be quite easy as this seems non-proprietary.
I really wonder why there is nearly zero unbricked DLink switch runnning under LEDE.

By the way, I really need serial console, because after/if loading finally LEDE, there will be probably zero network configuration, thus a need for a console ...

Apparently, the switch has an emergency TFTP boot procedure.
Also included partial .config file

Anyone interested, go ahead and buy one of those switches.
They are cheap ...

Example, in UK;
http://www.ebay.fr/itm/D-LINK-WEB-SMART-SWITCH-DGS-1210-16-/132186724131?hash=item1ec6f15723:g:WrwAAOSww5hZEdOi

16 ports = 20 GDB + shipment

Before buying, verify that GPL source code is available:
http://tsd.dlink.com.tw/downloads2008detail.asp

Then contact me in this thread.

I will now try to compile a custom LEDE release for my D-Link switch.

Do I miss something or everything is available for a LEDE? What could happen worse now? What if I boot in LEDE and i don't have any network? What do you think of network and switch, is it well supported in your opinion?

Hi All.
Not sure if you are still interested by finding the serial console port...

I was playing with my DGS 1210-10P which has POE board broken. Yet, despite only the POE pcb (which is independent from the main pcb) the whole stuff refuse to boot correctly.
So I hack to find if I could simply configure somewhere there is no poe board...

Well the serial console is a RS232 one. CON2 is link to a ADM3202 RS232/TTL converter (at the back of the pcb)
IMG_8792

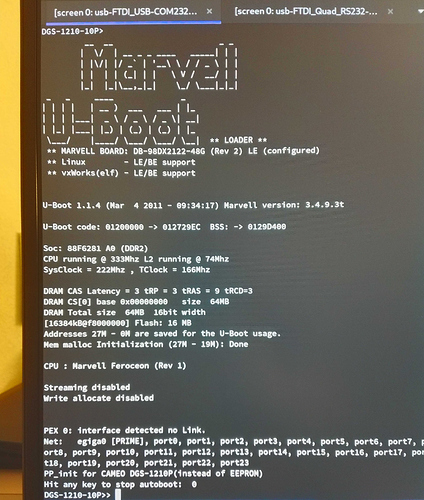
115200 bauds. Uboot console available, just hit a key to stop the boot. Looks like being able to boot from nfs...

Arnaud

2 Likes

I am looking at getting one of these (1210-28P) and I would very much like to have OpenWrt on it. Has there been any progress on this?

Have a look at

There has been quite some progress.

Let the hacking begin!


1 Like

Hi,
I bought 1210-28P rev. C1 and hope it would be possible to install OpenWrt. There is source code available on D-link web page.
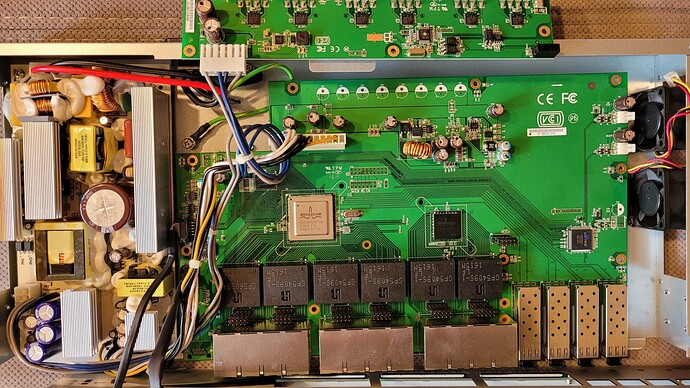
I made pictures of PCB which I could share on wiki page. There are 3 places to install headers and one for jumper. There is also place to install additional port in front of the switch with hole inside of front panel which is covered by label, however I think it would require to mount additional chip which is missing and I don't know details what type should it be.
I removed heatsinks from chips, those are:
Broadcom
BCM53344A0KFSBG
TE16-14 P10
583467-51 P3A

Broadcom
B50282C1KFBG
TE1608 P21
574621-03 01 W

Other chips which seems to be more important (there are also some other small size chips)

FPGA located near fans
Lattice LCMXO256C
3TN100C
B6011R41

DDR3 1 Gb SDRAM:
Nanya 1607
NT5CB64M16FP-DH
54903560EP 3 TW

Chips on separate board with Ethernet ports
QUAD IEEE802.3AT PSE CONTROLLER
Broadcom
BCM59111KMLG
PD1616 P10
585532 1

Is there any chance to have OpenWTR on this switch? If needed I can provide more details about this unit.

There hasn't been any development for Marvell or Broadcom (such as in your case) switch SOCs for OpenWrt so far. While it might be possible to get them working, you'd have to start the development from zero.

From a purely practical point of view and considering the second hand prices of these devices, it might be more sensible to look for supported realtek based devices instead, have a look at https://svanheule.net/switches/ for an overview.

I could solder some chips or other components, connect console etc. however unfortunately I'm not developer. I could only compile and install firmware if I have description how to do that.
Is it difficult to add support for this switch in OpenWRT ? Since there is source code available for d-link firmware isn't it sufficient just copy all necessary drivers from it to OpenWRT to have it working ?

No.

You aren't just adding a new device to a well-established and -supported target, which would take you 2-3 long weekends and a few all-nighters. You'd be adding a completely new target, writing low level kernel code for SOC support and drivers. How much the v3.6.5 based Broadcom kernel helps you with that (and how complete the GPL tarball might be) is unknown at best.

To tackle this, you need:

  • experience (hard- and software)
  • equipment (soldering stuff, spi-nor writers/ serial console, scope, logic analyzer, …)
  • time, motivation and stubborn persistence
  • the patience to mainline the necessary bits and pieces

The mission, should you take it, would be a many-months journey with an open ending. If you'd get cracking and go into hiding now, taking every spare moment you can gather, you may have the first presentable results in ~half a year at best.

…or you could blow 50-100 bucks on an already supported realtek rtl838x device and be done with it.

1 Like

Others have gotten nowhere before you. Good luck!

Would it be helpful if console port would be added ?
I could solder missing RJ45 socket, chip, resistors and capacitors but I don't know what elements should it be. The other unknown is if it would be enough or it would require modification in firmware. Since there is source code maybe activation of this port wouldn't be difficult anyway.
Is there any specific switch model which could be used as an example to check what is that missing chip ? I tried to look for that but it's hard to find pictures of switch without cover to see what's inside.
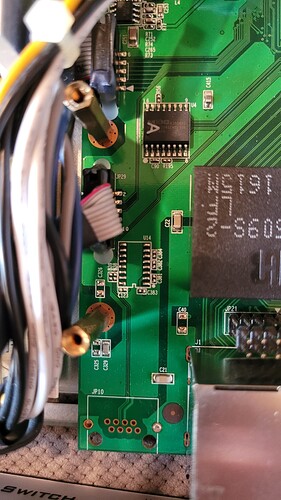
I found only similar looking from outside dgs-1510 which has serial console. Description says that there should be used special RS232 to LAN cable so I suppose that missing chip could be simple MAX232 type converter. There are visible 2 paths which goes to RJ45 and then another 2 paths which goes from chip to main CPU. I will order TTL to USB converter and try to connect there.

Serial console access will be required, but... you are the only one with the hardware, you need to do the documentation and the development yourself, on your own. If you have to ask about these topics already, the learning curve will be steep and the chance of success minimal.

I would assume getting console access is the least of your problems but yeah, it definitely would be a required step number one (of an unknown several dozens of steps). Which BTW rather than trying to solder such unknown missing components one could use a logic analyser to assess which exact pins are RX/TX (and ground) to be used with a regular USB to serial TTL adapter. Good luck!

1 Like

I examined missing U14 chip and I think this is MAX3232.
All connections match this schematic: https://www.doc-diy.net/electronics/rs232plug/
So that it seems missing parts would be:
U14 - MAX3232
C123, C381, C383, C383, C384 - capacitor 100n
B38, B39 - I don't know what that could be however I suspect some kind of fuse, this part seems to be not required so simple connection should be enough
JP10 - RJ45 socket

I also checked voltage which is 3,26V.

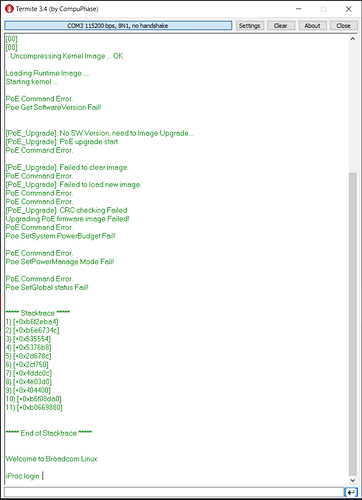
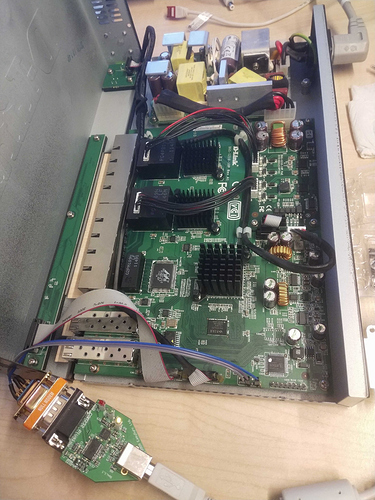
I connected external MAX3232 RS232 converter using 115200 8N1 settings and it works as expected :slight_smile:
Here are result for booting with disconnected LAN PoE board. Since it works as expected I will try to desolder all parts from coverter and solder them on switch board this way I will have easy connection on front panel. Complete RS232 converter is cheaper than price for only MAX chip.


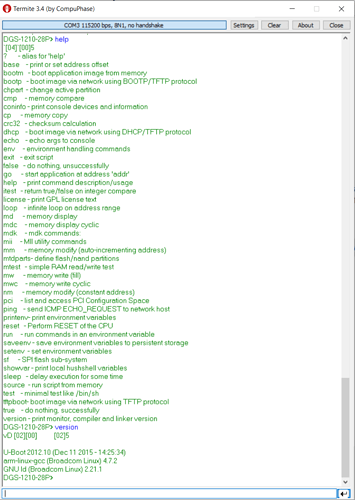
There are build in console commands.

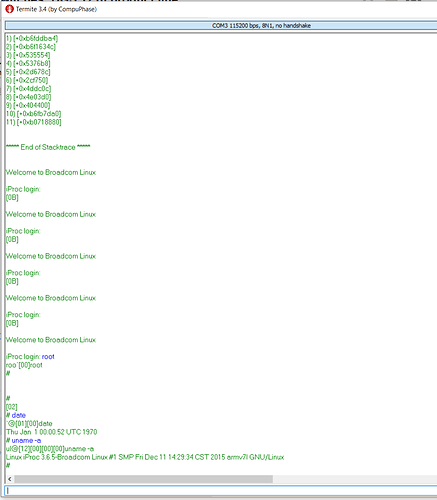
But I'm not sure how I got there, since next boot I had normal shell