The NAND flash partitions are different from the stock firmware. At the moment this is possible via the UART.
Method without UART.
№1 OEM partitions (dualboot)
You can build the firmware with the original partitions, but the rootfs size will be less than 32MB. Haven't tried this method yet. Make sure to back up your NAND-flash before starting and it's good if you have a UART adpater on hand.
Using a commit from the LayOutOEM branch (git cherry-pick beeline-smartbox-turbo_LayOutOEM) build the firmware. From the stock firmware, SSH will switch to the second slot (Sercomm1). echo -ne "$(echo 31 | sed 's/../\\x&/g')" | dd of=/dev/mtdblock3 bs=1 seek=7 count=1
Reload.
No tested.
Using a commit from the Breed branch (git cherry-pick beeline-smartbox-turbo_Breed) build the firmware. Change in environment autoboot.command = boot flash 0x400100. Flash *-breed.bin
I have an adapter, and I can connect it without soldering, but I can't solder those missing bridges at the moment. So I wanted to test another way. Let's see. Thx.
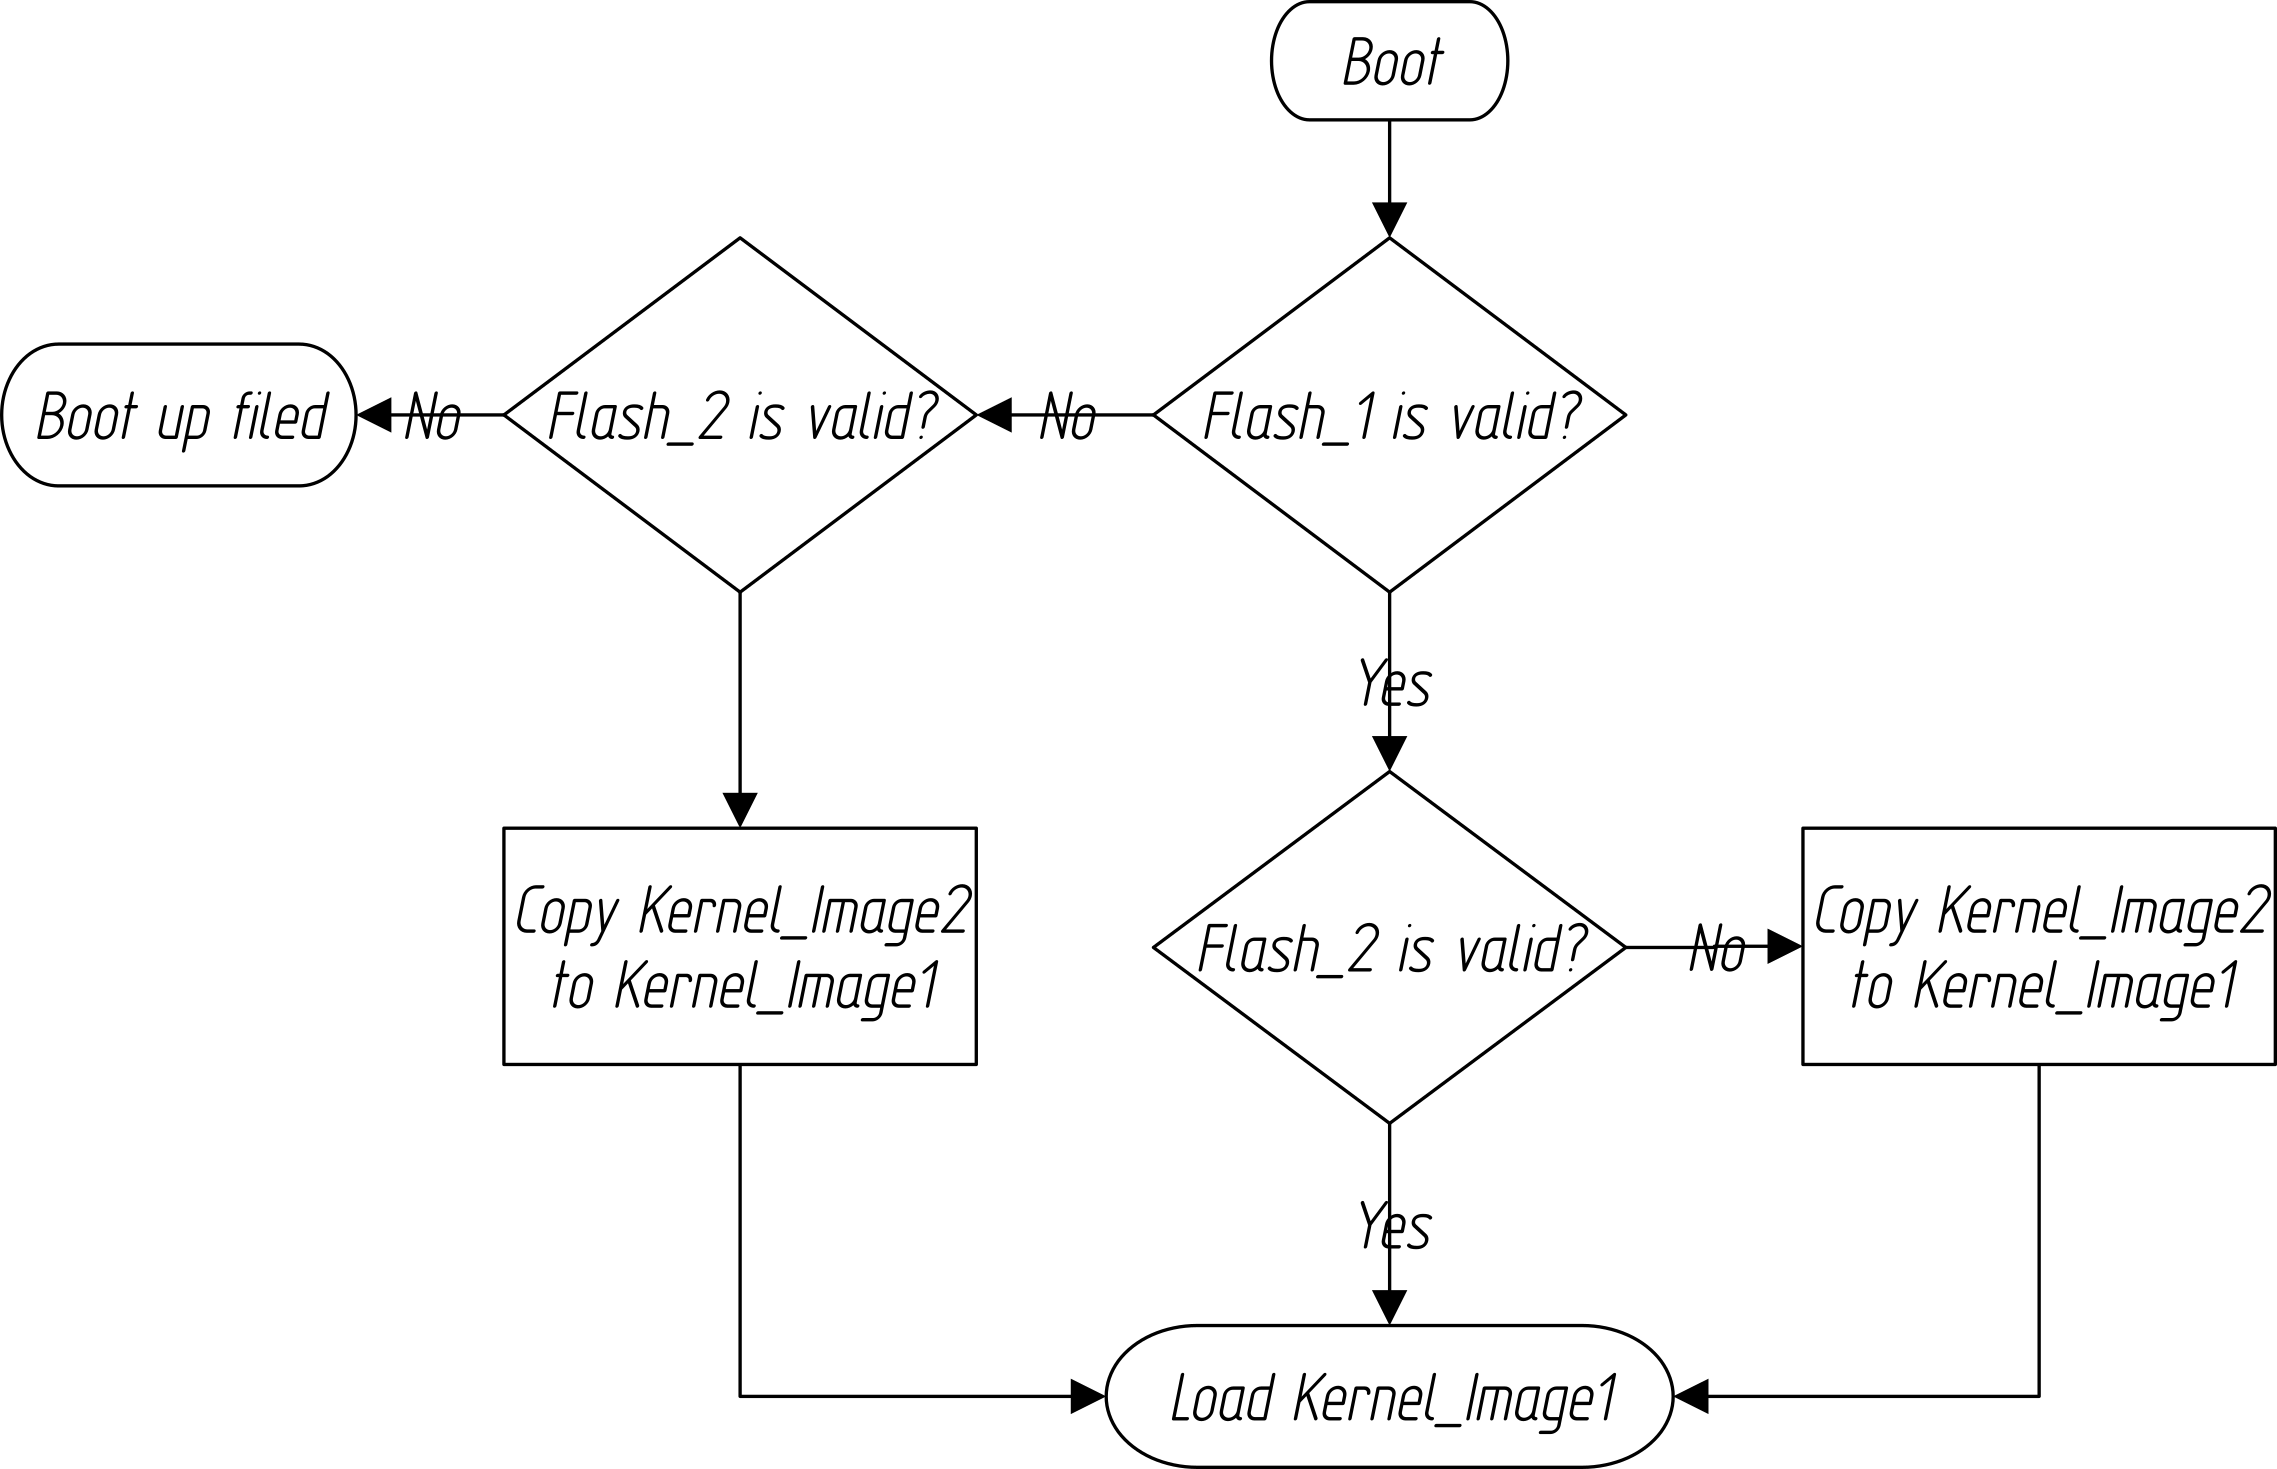
I am not sure this method will work. According to the dual-boot manual, boot loader checks the validity of a kernel on boot. If it is valid, it copies it to another partition. But I didn't get how does it check validity.
So, It DOES WORK!!!
I've built your beeline-smartbox-turbo_LayOutOEM branch and installed it right from the stock firmware this way:
Logged with SuperUser password: serial # and enabled SSH.
boot_flag indicates which slot to load.
boot_count counts the number of times one slot is started.
Slot
Flag
kernel
rootfs
Counter
1
Sercomm0
uImage1 (Kernel 1)
rootfs1 (File System 1)
boot_count1
2
Sercomm1
uImage2 (Kernel 2)
rootfs2 (File System 2)
boot_count2
When the U-boot of the specified slot is loaded, its counter is incremented (example FF-> 01). When the stock firmware boots successfully, it will write to the FF counter. If the boot_count = 03 when loading the slot, then the flag will be toggled. if boot_count1 = 03 and boot_count2 = 03 then the device will switch to Emergency mode (start sc_dl).
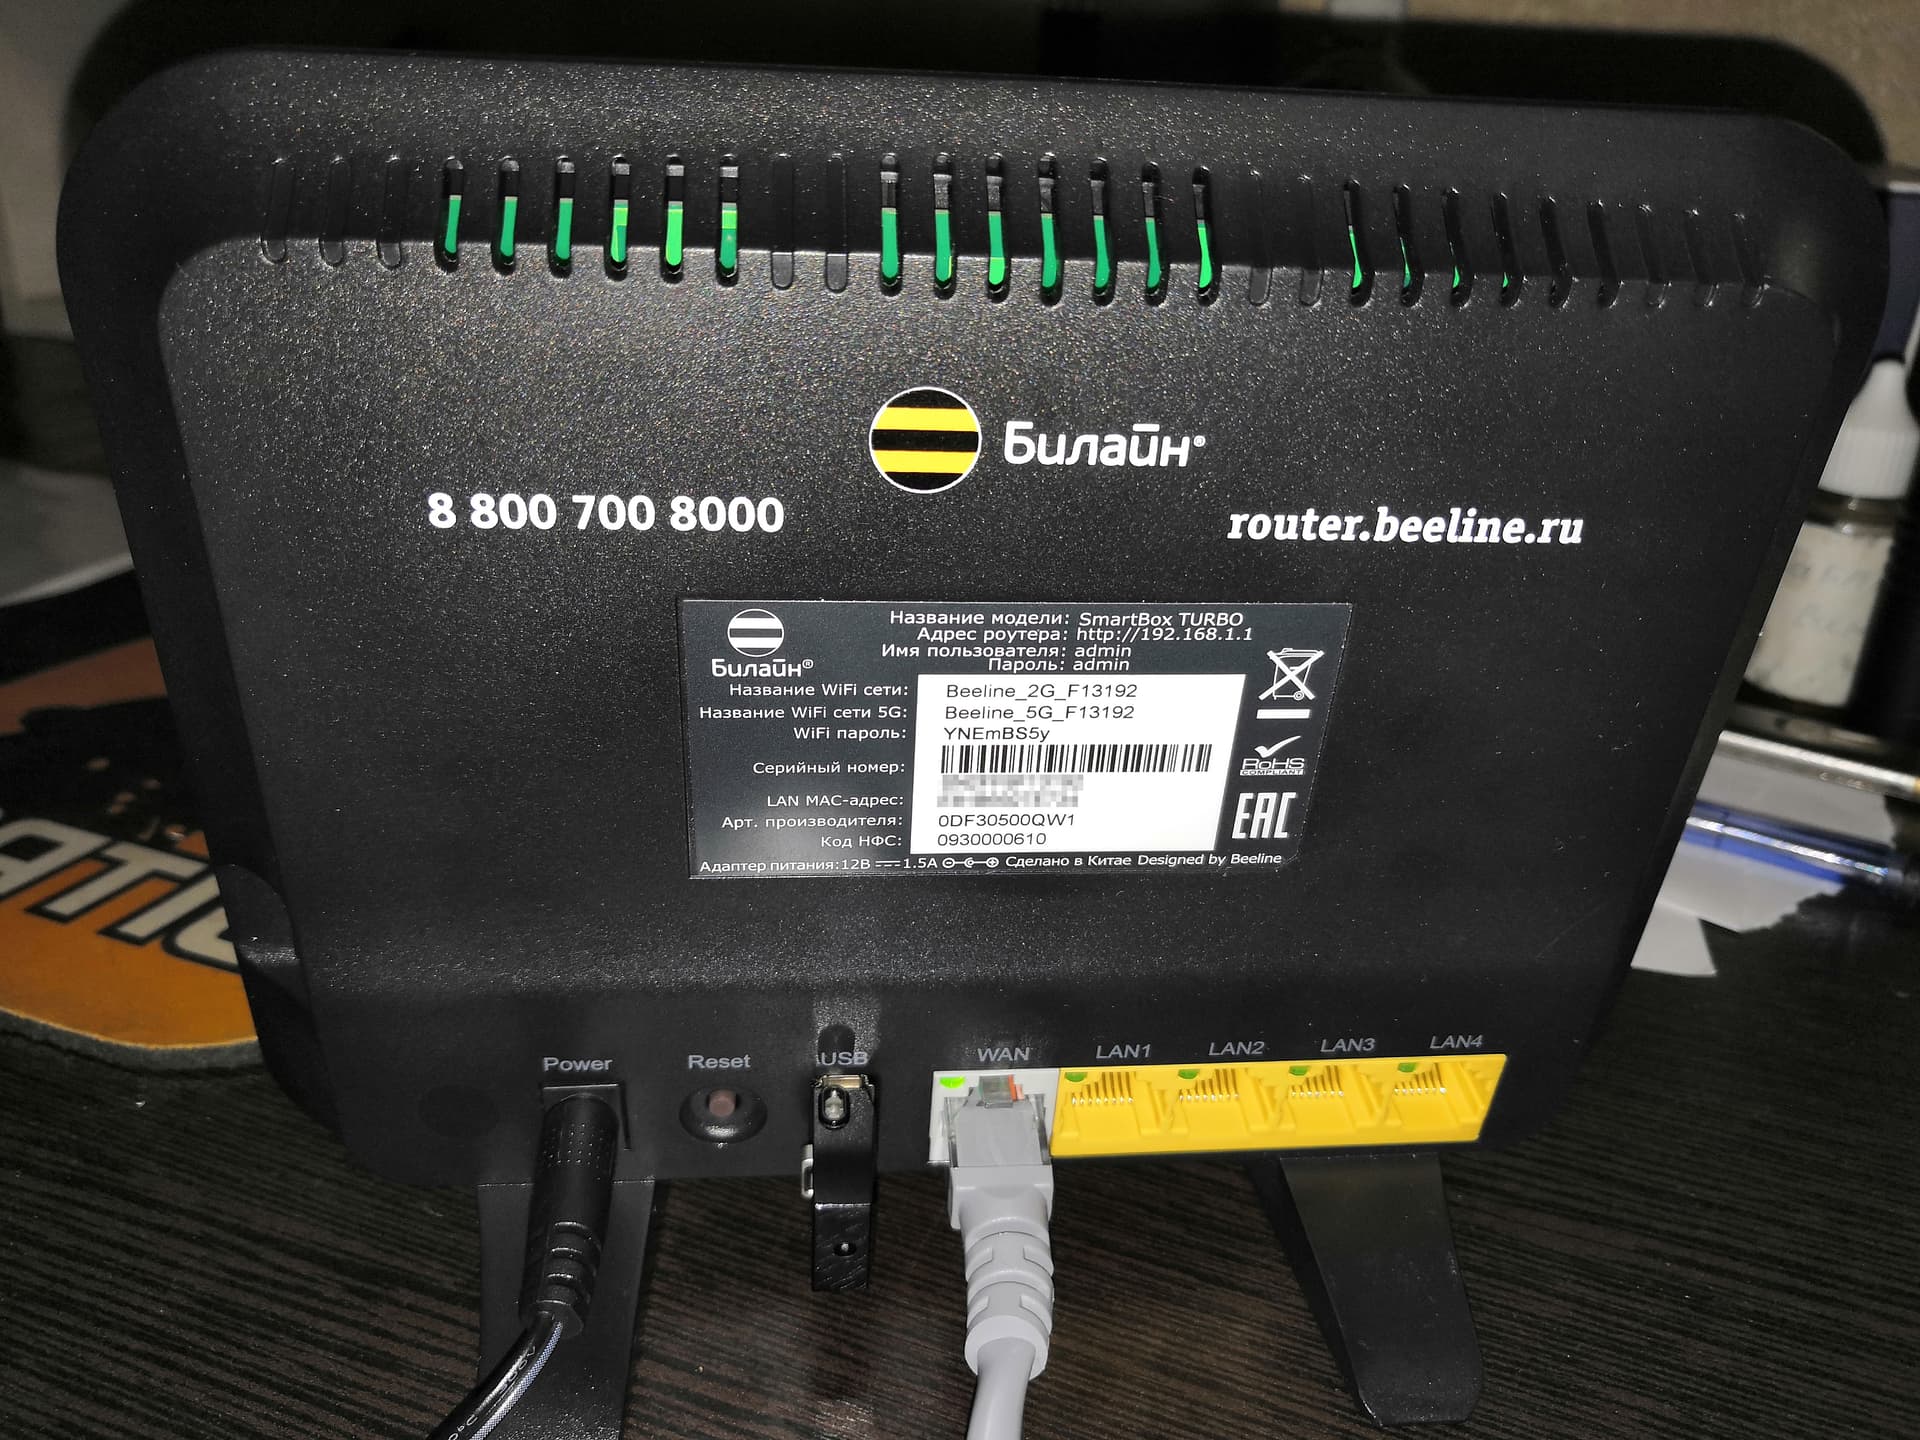
SSH for FirmWare OEM v1.0.12 on Beeline SmartBox TURBO+
Login to the web interface http://192.168.1.1/ (by default) under SuperUser (root) credentials. Password: SDXXXXXXXXXX, where SDXXXXXXXXXX is serial number of the device written on the backplate stick.
Login:		SuperUser
Password:	SDXXXXXXXXXX
Turning on SSH. Navigate to:
-> Advanced settings
	-> Others
		-> Access Control
			-> Users Root Select
				-> SSH Admin - Enable LAN
					-> Save
						-> Apply
Point № 2, can / should be automated (sed, awk).
In point № 3, there was another option, killall sshd; /usr/sbin/sshd -p 22, but the command was interrupted via SSH, but worked via the UART.
CSN=$(hexdump -e '/2 "%1s"' -n $((0xC)) -s $((0x21010)) /dev/mtd2)
mkdir /tmp/$CSN; cd /tmp/$CSN;
for i in 0 1 2 3 4 5 6 7; do
echo "===Dump mtd$i.bin backup===";
nanddump -f mtd$i.bin /dev/mtd$i;
done
pwd
Copy the directory via SFTP or via TFTP, USB or any other method convenient for you. Example: $ scp -r SuperUser@192.168.1.1:/tmp/SD2134F98765 SD2134F98765 with a client on a PC
Delete backup images from RAM router. rm -r /tmp/$CSN
Create the remaining backups
mkdir /tmp/$CSN; cd /tmp/$CSN;
for i in 8 9 10; do
echo "===Dump mtd$i.bin backup===";
nanddump -f mtd$i.bin /dev/mtd$i;
done
The creation of a backup takes place in several stages due to the fact that the size of RAM and NAND are the same (128 MiB).
CSN - Serial Number Device.
A directory will be created with the name in the form of the serial number of the device in the /tmp directory with the images of the partitions.
Can be improved. Tried using GZ but no TAR. It turned out the wrong action, there is one combined file in the archive.
SSH for FirmWare OEM v1.0.03 on Beeline SmartBox TURBO
Login to the web interface http://192.168.1.1/ (by default) under SuperUser (root) credentials. Password: SDXXXXXXXXXX, where SDXXXXXXXXXX is serial number of the device written on the backplate stick.
Login:		SuperUser
Password:	SNXXXXXXXXXX
Configure WAN. Navigate to:
->Setting
	-> WAN
		-> ADD
			* Name - WAN1
			* Connection Type - Static
			* IP Address - 172.16.0.1
			* Netmask - 255.255.255.0
				-> Save
					-> Apply
Default WAN1
Enable SSH and HTTP on WAN.
->Setting
	-> Remote control
		-> ADD
			* Protocol - SSH
			* Port - 22
			* IP Address - 172.16.0.1
			* Netmask - 255.255.255.0
			* WAN Interface - WAN1
				-> Save
					-> Apply
		-> ADD
			* Protocol - HTTP
			* Port - 80
			* IP Address - 172.16.0.1
			* Netmask - 255.255.255.0
			* WAN Interface - WAN1
				-> Save
					-> Apply
Set up on PC
	* Connection Type - Static
	* IP Address - 172.16.0.2
	* Netmask - 255.255.255.0
	* Gateway - 172.16.0.1
Connect PC cable to WAN TURBO
Connect SSH. Example on Linux without key saving. $ ssh -o "UserKnownHostsFile /dev/null" SuperUser@172.16.0.1