This is my first post here, so first of all, I would like to thank you all for this amazing forum !
As to the issue I have - I carefully followed the instructions @jav posted, but unfortunately after I completed step #5 and rebooted the router, I lost any access to it (according to the constant blue lights on it - it is not in a "debug mode" anymore).
My questions are:
a) Is there anything I can do to debrick the router? I have a few serial adapters (such as CP2102), but I'm not sure how to open the case and whether there is any way to connect them to the router..
b) as instructed above, I used @dimfish 's ubi initramfs-factory.ubi; but I'm wondering - could I use an official snapshot instead?
With the new image (ubootmod) this process is outdated. Please see:
You can decide on which of the two options (stock or ubootmod) to stay.
Anyway, with that image it should work.
Things to check from where you are:
Is it really bricked? Doesn't respond to ping at 192.168.1.1 (from one of the LAN ports)?
If not, can you check if it's generating any traffic (with tcpdump or wireshark)?
If it's bricked, rebooting it 6 times should bring back the original firmware, and you can retry from there.
Serial port can be accessed without opening the case. You can see the serial port through the fins in the bottom of the router, and connect to it through them. Works fine and you'll be able to load another firmware. I rescued my first AX6000 that way.
I might be misreading this but coming from the stock Redmi AX6000, what is the new flash process if not first following the steps linked PR#11115 (step 1)?
@jav you are right! It is not bricked ! I mistakenly left the cable connected to the WAN port (stupid me).
I was able to establish ssh connection to the router and it says "OpenWrt SNAPSHOT, r0-2e737aa".
Given this situation, what is my next step? Continuing following the instructions above (to step #6 - "setup uboot-env") or doing something else? I would like to update to the most recent snapshot version.
Right now, the process would be to start with PR#11115 (step 1), and if you just want the stock flavor, you're done. If you want to go ubootmod flavor, follow the complete guide of the commit.
If you're already in the former flavor (non-stock one), you can switch over as I explained in
Remember to use the right /dev/mtdX device (the same one you used on the first attempt). If unsure, do fw_printenv flag_boot_rootfs to check (0 = ubi, 1 = ubi1, use cat /proc/mtd to verify the partition number)
Once done, reboot and you should be able to continue installation from step 5 of PR#11115.
Now, I'm confused a little bit because previously I ran the following command: "ubiformat /dev/mtd9 -y -f /tmp/initramfs-factory.ubi", while now it seems that there is no mtd9... only mtd7 (and the instructions refer to mtd8 or mtd9 only).
I executed all the commands in your post and then continued from step #5 of PR#11115.
However, after I ran sysupgrade -n /tmp/stock-squashfs-sysupgrade.bin, I received the following error:
"invalid sysupgrade file
Mon Jan  2 09:43:08 UTC 2023 upgrade: Commencing upgrade. Closing all shell sessions.
Command failed: Connection failed"
Afterwards when I tried to establish SSH connection to the router, I received a warning message that said: "WARNING: REMOTE HOST IDENTIFICATION HAS CHANGED!" Doesn't it mean that sysupgrade succeeded?
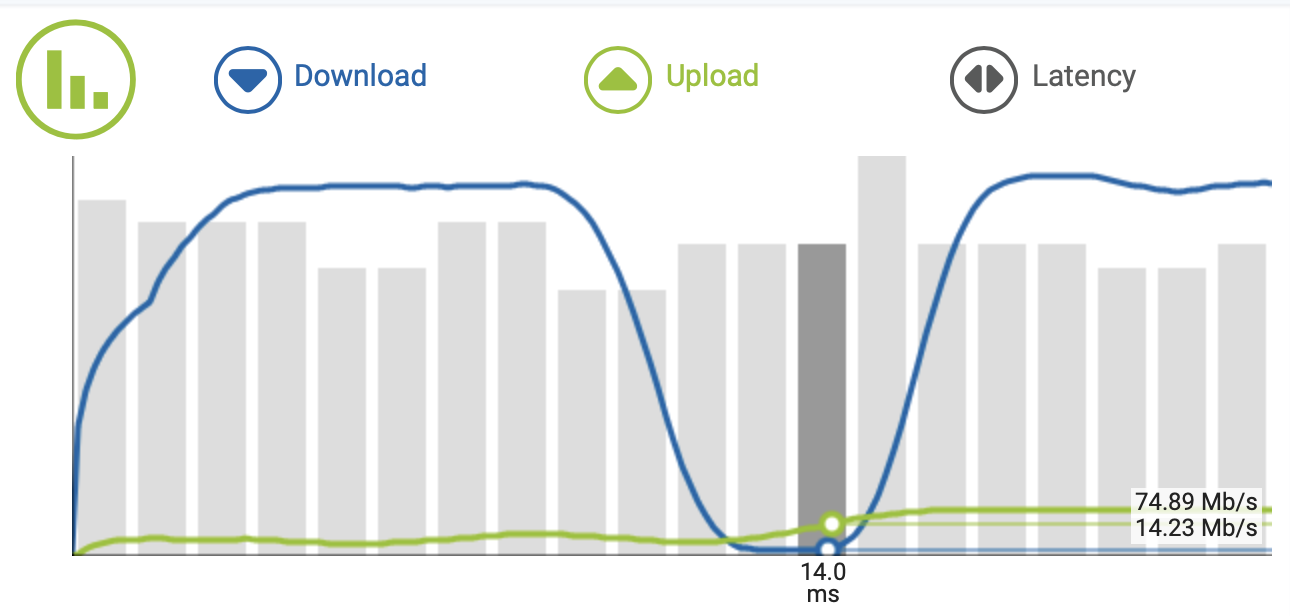
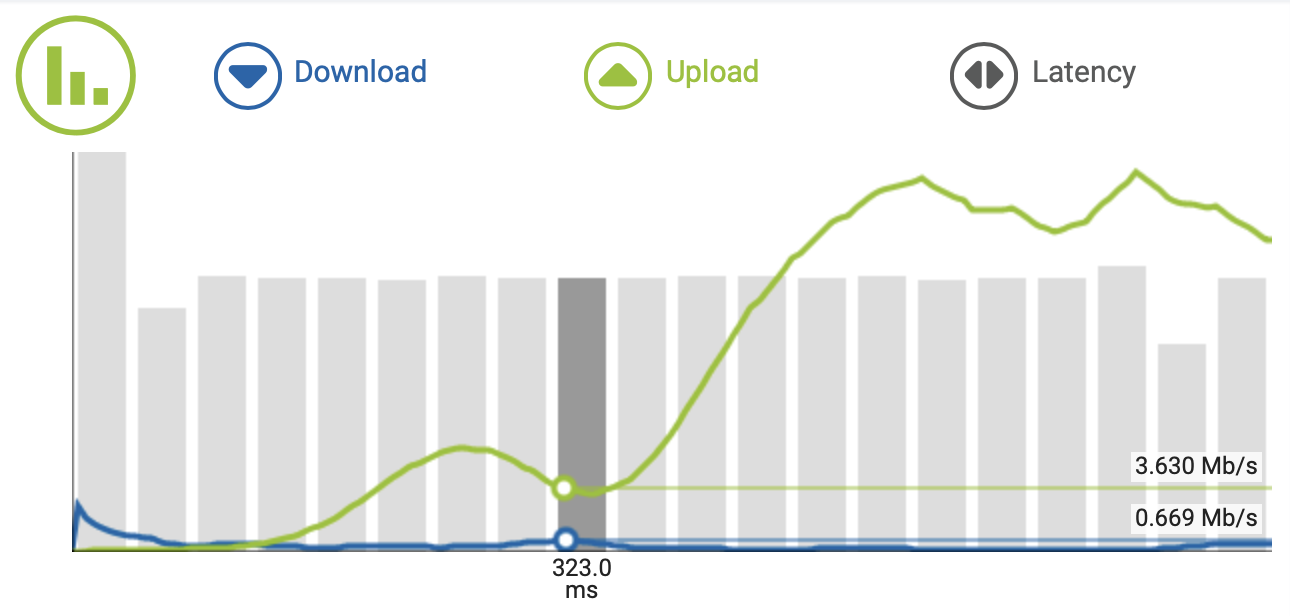
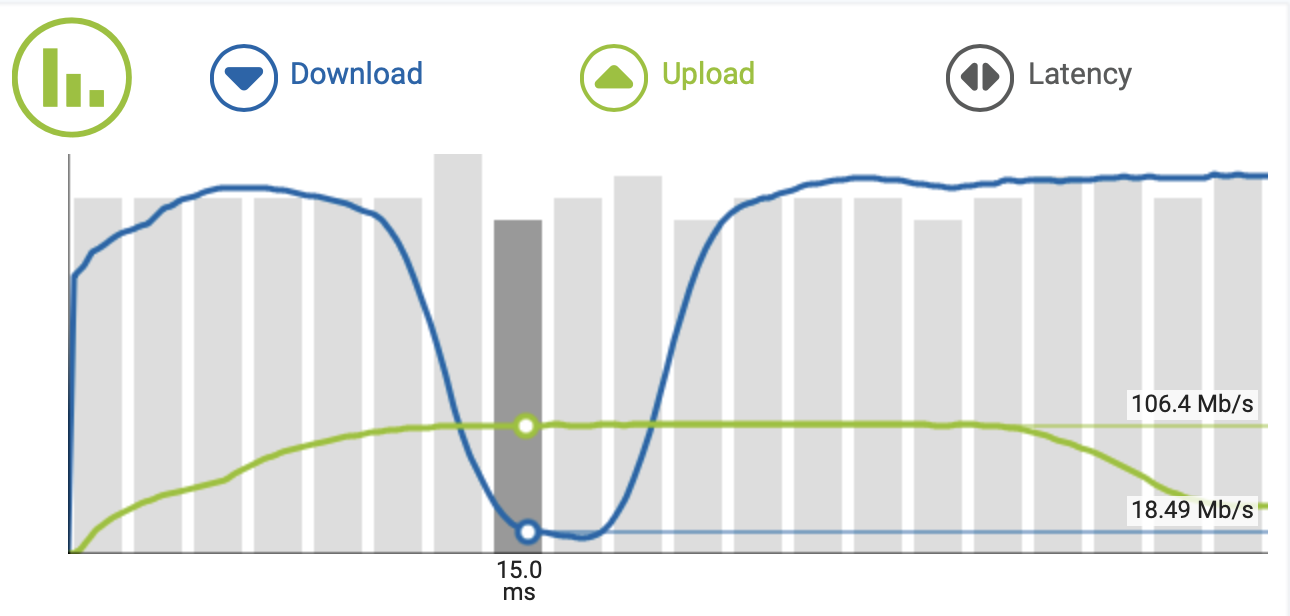
I've just flashed a brand new AX6000 and I'm experiencing similar issues. I get 900/100 service which is stable on ethernet. But over AX WiFi, it behaves very unpredictable. See this nperf speed test. The peaks are at 850 mbps but then it will randomly drop to around 10 mbps. I have tried channel 36 and 100 and see it with both in 160 MHz mode. The client is a 2021 M1 MacBook Pro (A2442).
I never had these issues with the previous AX3200 in 160 MHz mode auto channel. Local iPerf tests give similar results fluctuating between 850 and 70 mbps averaging around 300 mbps. In my case 80 MHz is even worse, around 0.5 mbps. This test was at 80 MHz channel 52.
@Newuser sysupgrade worked. That's just a bug that can be ignored, and the "REMOTE HOST IDENTIFICATION" means that the ssh keys were regenerated.
Now you can stick to the stock version, and that's fine, or you can move to the ubootmod version, using the ubootmod guide I linked above. Your choice.
Anyway, you can go ahead and configure and enjoy OpenWrt.
I heard that there was a problem on some of Mac service daemon that makes a private broadcast for other mac devices, using WiFi chip for mac dedicated connection sharing feature for cellular phone etc... Probably send a beacon each 100ms and it creates some problem with AX wifi devices... I don't remember what the service name was or where do I read that. You might try to find it and disable that service to avoid that effect for example...
Many thanks @jav !! It seems that everything works
However, I'm not sure that I fully understand what is the practical difference between using stock and u-boot mod (save for the the more efficient space usage..is the additional space really required?).
I believe I that I read somewhere that with stock layout there is a (theoretical) chance that the stock firmware (or its leftovers) will call home (but perhaps I misunderstood the comment). Is this true?
I would like to believe that it is not possible with OpenWrt running on the router.
Hey guys. Flashed a fresh snapshot, even right after it was compiled and can not get SQM to work. Always says kernel is wrong. Anyone get this working? It's a bit of a necessity for me as I've got a garbage DSL modem (I know I know, but I live out in nowhere) that hangs hard if you don't limit it.
Key differences between both versions, as I understand them:
stock:
System can be recovered with Xiaomi tools.
Easy original firmware restore.
Less space available.
A failed update can leave the system stuck as in some circumstances (not sure about the details) bootloader starts with UART disabled. In that case, flash may have to be unsoldered to recover.
While uncommon, there's a possibility that stock bootloader calls home.
ubootmod:
Full open-source software, from bootloader.
Cannot be restored with Xiaomi tools.
Original firmware restore complex and unproven.
Most efficient use of flash space.
Multiple recovery mechanisms in case of failed update (serial, tftp, initramfs).
bootloader & factory partitions not protected in case of a future flash block failure in those areas (not sure how much the original bootloader is able to protect them).
I had OpenWRT with stock layout (#11115). I tried to switch to uboot mod layout (#11565) step-by-step.
At point 3 i entered mtd -r -e ubi write ax6000-ubootmod-initramfs-factory.ubi ubi instead of origin command, as it was mentioned here. Device rebooted and kept bootlooping. Brick :c
After connecting usb-uart i've seen u-boot menu and option to Load Image, etc.
Please, describe fully what You have done to unbrick it and finish uboot mod layout migration.
Please, describe these steps. Is it Load Image and ubootmod-initramfs-factory through tftp?
Use u-boot to tftp boot into the ubootmod initramfs image (connect your pc and host TFTP server at 192.168.31.100 with the ubootmod initramfs image on it, then on UART console tftpboot ubootmod initramfs image bin) then when booted from that, try the steps again. IIRC correctly that’s what I did.
Necessary “I’m not responsible if you brick your bootloader” message here.